This post contains affiliate links. I may earn a commission if you purchase through them at no extra cost to you.
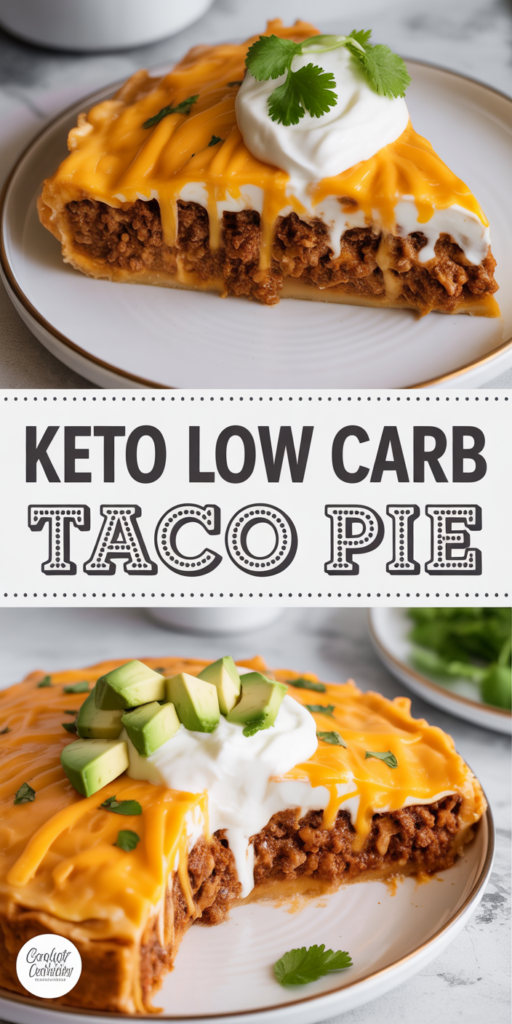
I am thrilled to share my favorite crustless, layered dinner that turns classic taco flavors into a baked, low carb meal.
This easy, spicy recipe uses ground beef, eggs, and cream to build a firm, sliceable texture without a heavy crust. The result is a protein-packed dish that feels like comfort food but keeps carbs in check.
I keep a jar of salsa on hand to finish each slice with a bright kick. Whether you follow a strict keto plan or want a healthy weeknight meal, this taco pie proves you can enjoy cheesy, savory goodness with fewer carbs.
Why You Will Love This Keto Taco Pie
This crustless, layered dinner has become my go-to when I want big flavor without a long prep time. The whole recipe takes just 45 minutes from start to finish, so I can get a hot meal on the table fast.
My family asks for this pie all the time. It tastes rich and satisfying, and even people who don’t follow a low carb plan enjoy it. I like that it feels indulgent but is easy to make.
It also saves me time in the kitchen. Once the filling is in the oven, I can prep a simple salad or set the table. That extra time makes weeknight dinners less stressful.
- Ready in 45 minutes — perfect for busy evenings.
- Family-friendly flavors that please most people.
- A reliable, crowd-pleasing recipe for dinner or a casual meal.

| Feature | Benefit | Time |
|---|---|---|
| Crustless bake | Less prep, fewer carbs | 45 minutes |
| Family-approved | Requests for repeats | Immediate |
| Oven finish | Firm, sliceable texture | 20–25 minutes |
The Benefits of a Crustless Dinner Bake
Going crustless changed how I cook weeknight dinners—faster prep, fewer carbs, same comfort.
This grain-free, gluten-free dish fits dietary needs without sacrificing flavor. It skips flour and keeps the filling front and center.
That makes this taco pie a smart choice for families who want a hearty meal and better blood-sugar control. The bake packs protein and healthy fats that keep everyone full until the next meal.

- Less prep time so I can get dinner on the table fast.
- Versatile enough to match low carb or keto plans.
- A comforting family-friendly food that trims carbs without losing taste.
| Benefit | Why it matters | Result |
|---|---|---|
| Grain-free | Good for gluten-sensitive eaters | More inclusive meals |
| Faster prep | No crust to make or roll | Saves time on busy nights |
| Low carbs | Better for blood sugar control | Satisfying without extra carbs |
Essential Ingredients for Your Low Carb Taco Casserole
I keep the ingredient list short and precise so the filling sets firm and the flavors shine. Below are exact measurements I use in this recipe to get reliable results every time.
Almond Flour Crust Options
If you want texture, stir 3 tablespoons almond flour with 1 tablespoon melted butter and press it into the pan as an optional crust. It adds a light nutty base without adding many carbs.
Choosing Your Cheese
I recommend 1 cup of finely shredded Mexican blend or cheddar cheese for best melt and structure. You can swap Monterey Jack or pepper jack if you want more heat.
- 1 pound ground beef
- 2 tablespoons high-quality taco seasoning (no MSG, no starches)
- 4 large eggs
- 2/3 cup heavy cream
- 1 cup shredded cheddar cheese
- 3 tablespoons almond flour (optional crust)
- Salt and freshly ground black pepper, to taste
| Ingredient | Amount | Notes |
|---|---|---|
| Ground beef | 1 pound | Use 80/20 for flavor and moisture |
| Eggs | 4 large | Binds the filling for slicing |
| Heavy cream | 2/3 cup | Creates a rich, custard-like texture |
| Cheddar cheese | 1 cup | Shredded finely for even melt |
Selecting the Best Quality Ground Beef
I always start by picking high-quality ground beef to build a hearty, reliable dinner. For this recipe I use one pound of grass-fed, grass-finished ground beef for the best flavor and nutrition.
If you cannot find good meat locally, Farm Foods Market ships grass-fed beef to your door. Choosing top-quality beef makes the final dish taste richer and more satisfying.
Cook the ground meat in a hot skillet over medium-high heat until browned and no longer pink. This takes a few minutes of steady heat and stirring to break up the pieces evenly.
Drain excess grease well. Removing extra oil keeps the taco filling from getting soggy and helps the casserole set firm while baking.
- I use 1 pound of ground beef for consistent texture and flavor.
- Grass-fed beef gives deeper taste and better fat profile.
- Brown in a hot skillet, then drain to control grease.
| Beef Type | Flavor | Best Use |
|---|---|---|
| Grass-fed, grass-finished | Rich, slightly grassy | Recommended for this recipe |
| 80/20 conventional ground | Classic beefy flavor | Great for quick weeknight dishes |
| Lean ground (90%+) | Milder, less fat | Use if you prefer less grease |
Mastering Your Own Homemade Taco Seasoning
I started mixing spices in bulk so I always have the right seasoning when the skillet heats up. Making a simple blend saves time and keeps unwanted fillers out of my meals.
A cleaner mix for better flavor
My go-to blend combines chili powder, paprika, cumin, garlic powder, onion powder, oregano, and a pinch of cayenne. I control the salt and adjust heat so the mix fits my tastes and dietary needs.
- I make a large jar every few weeks so weeknight dinner prep is fast.
- Stir the seasoning into browned ground beef until every piece is well-coated.
- Use the same mix in enchilada sauce or on roasted vegetables for extra flavor.
| Yield | Use | Notes |
|---|---|---|
| Small batch (3 tbsp) | One recipe | Fresh and quick |
| Large batch (1/2 cup) | Multiple dinners | Store in airtight jar |
| Custom adjust | Reduce salt or heat | Fits dietary needs |
Preparing the Egg and Cream Mixture
I begin by blending eggs and cream so the bake will slice cleanly and stay moist. In a medium bowl, I whisk 4 large eggs with 2/3 cup heavy cream until the mixture looks light and slightly frothy.
I add 1/4 cup salsa next to bring bright flavor and a touch of heat. Then I stir in three thinly sliced green onions for mild bite and color.
I season the mixture with 1/2 teaspoon sea salt and a few grinds of black pepper. Mixing thoroughly makes sure the salsa and onions distribute evenly through the base.
- I whisk the eggs and cream until fluffy to help the filling set.
- Adding salsa deepens the flavor without extra time or fuss.
- Green onions and salt round out the ingredients for balanced taste.
| Ingredient | Amount | Purpose |
|---|---|---|
| Eggs | 4 large | Bind and firm the filling |
| Heavy cream | 2/3 cup | Add richness and custard texture |
| Salsa & green onions | 1/4 cup + 3 | Flavor, moisture, and freshness |
Layering Your Keto Mexican Recipe
Layering the filling carefully makes a big difference in how the finished dish holds together and slices.
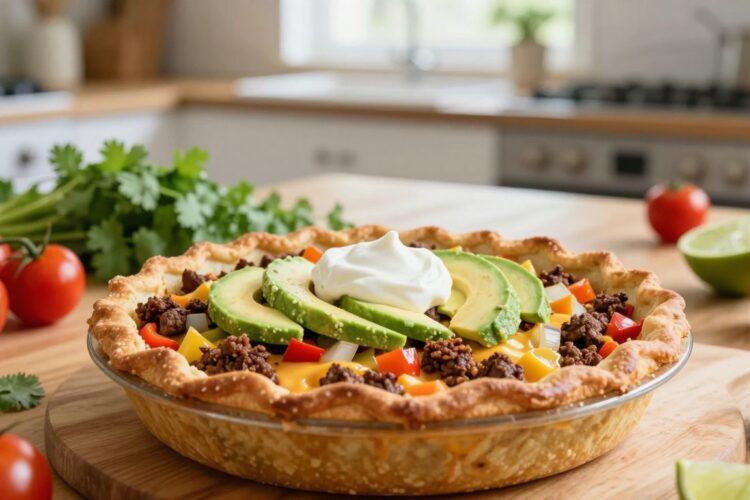
I start by spreading my seasoned ground beef evenly across the bottom of a well-greased 9-inch pie pan. This creates a savory base that browns slightly while baking.
Next, I pour the prepared egg and cream mixture over the meat. I tilt the pan so the mixture covers the entire surface and fills gaps between pieces of ground beef.
- I sprinkle the remaining cheddar cheese on top to form a golden, melty crust as it bakes.
- The layering helps the seasoning and salsa infuse into every slice for steady flavor from top to bottom.
- Using a proper pie pan ensures the bake holds shape and is easy to slice once it cools for serving.
| Layer | What to do | Why it matters |
|---|---|---|
| Bottom | Seasoned ground beef, spread evenly | Forms a flavorful base and stabilizes the bake |
| Middle | Egg and cream mixture, poured to cover | Sets into a firm, custard-like texture for slicing |
| Top | Remaining cheddar cheese, sprinkled | Creates a golden crust and locks in moisture |
This simple layering technique makes the recipe a fast, low carb dinner option when time is short.
Baking for the Perfect Firm Texture
Getting the oven right sets the stage for a firm, sliceable result with a golden top. I preheat my oven to 350°F so the filling cooks evenly from edge to center.
I place the taco pie in the center rack and let it bake for 35–45 minutes. This time lets the eggs set and the cheese melt into a cohesive dish.
- I always preheat to 350°F for even heat and consistent results.
- Bake in the center of the oven for 35–45 minutes until the top is golden and the center no longer jiggles.
- Use a deep dish pan to prevent spills and help the filling hold its shape.
| Step | Detail | Why it matters |
|---|---|---|
| Preheat | 350°F (oven 350) | Ensures even bake minutes and steady texture |
| Bake time | 35–45 minutes | Sets the center and browns the cheese top |
| Pan | Deep dish pie pan | Prevents overflow and supports sliceable form |
Allowing the full bake minutes is key. When the aroma of melted cheese and seasoned beef fills the kitchen, you know the recipe is ready to cool and slice.
Cooling and Slicing for Best Results
I find that patience for five minutes after baking rewards me with perfect slices and easier serving. Let the taco pie rest in the pie pan on a wire rack right after it comes out of the oven.
Cooling for this short time lets the layers firm up so the dish holds its shape. If you slice too soon, the filling can fall apart and the slices look messy.
- I always let my taco pie cool at least 5 minutes before cutting.
- Resting the bake in the pie pan makes slicing cleaner and quicker.
- Use a sharp knife and steady cuts to get even serving pieces.
- This brief wait is the final prep step that gives the best texture and presentation.
| Step | Action | Why it matters |
|---|---|---|
| Remove from oven | Place on wire rack | Stops carryover cooking |
| Wait 5 minutes | Leave in pie pan | Layers firm for neat slices |
| Slice | Sharp knife, steady strokes | Even serving for the table |
Recommended Toppings for Extra Flavor
Fresh toppings lift a slice and bring bright contrast to the rich filling. I use a few quick garnishes to make each plate pop and to balance the heat and salt.
Fresh Avocado and Cilantro
Sliced avocado or a scoop of guacamole adds buttery texture and healthy fats. I sprinkle chopped cilantro on top for a citrusy, herb note that cuts through the richness.
Extra salsa on the side brightens every bite and adds color to the serving plate.
Creamy Sour Cream Additions
I love a generous dollop of sour cream on my slice to give a cool, creamy contrast to the spicy beef. A light drizzle of cream-based sauce or crema can also soften heat and tie the flavors together.
- A spoonful of sour cream calms the spice and highlights the cheese.
- Avocado or guacamole adds a smooth balance and healthy fat.
- Fresh cilantro and extra salsa brighten the look and flavor.
- Pickled jalapeños add zip if you want more heat.
| Topping | Flavor | Why use it |
|---|---|---|
| Sour cream | Cool, tangy | Balances spicy meat and rich cheese |
| Avocado / Guacamole | Buttery, mild | Adds healthy fat and creamy texture |
| Cilantro | Herbaceous, bright | Lifts seasoning and adds freshness |
| Salsa / Pickled jalapeños | Acidic or spicy | Adds color and adjustable heat |
Serving Suggestions for a Complete Meal
I often pair a warm slice with crunchy cucumbers and extra salsa for a quick, balanced dinner. A simple side salad of leafy greens brightens the plate and adds refreshing crunch to the rich beef filling.
My family likes a dollop of sour cream on top and extra salsa on the side for brightness. For a heartier serving, add low carb tortilla chips and roasted vegetables to keep carbs low while stretching the meal.
- I serve this dish with a tomato-cucumber salad for color and acidity.
- Offer extra salsa and sour cream so everyone in the family can customize their plate.
- Pair with a light soup or roasted veg for a fuller weeknight dinner that stays low on carbs.
| Option | What to add | Why it works |
|---|---|---|
| Light | Leafy greens, cucumbers | Fresh crunch balances rich meat |
| Heartier | Low carb chips, extra salsa | More texture and flavor without many carbs |
| Family-friendly | Sour cream, roasted vegetables | Customizable toppings please everyone |
How to Properly Store Leftovers
A good storage routine makes reheating a slice feel almost like serving it fresh from the oven.
I always store my leftover taco pie in an airtight container in the refrigerator. This keeps the dish fresh for up to 3 days and keeps flavors bright.
If I have a large amount, I cover the pie pan tightly with foil. That prevents the top from drying out and keeps the texture firm for the next meal.
- Cool the pie completely before refrigerating to avoid soggy layers.
- Use airtight containers so the carbs and fats stay balanced and the taste stays strong.
- Label containers with the date so you know how many days remain for safe eating.
Proper storage means a quick lunch or dinner is always ready. I find the flavors often improve after a night in the fridge, so leftovers can be better the next day.
| Method | Best for | Notes |
|---|---|---|
| Airtight container | Single slices | Keeps moisture and is easy to stack in the fridge |
| Foil-covered pie pan | Large portions | Prevents drying and fits directly back in the oven for reheating |
| Glass storage with date | Multiple meals | Good for portion control and safe for microwave or oven reheating |
Freezing Your Easy Keto Dinner Bake
Preparing and freezing this bake lets me grab a hot, satisfying plate any day of the week. I freeze the whole pie or portion it out so a quick meal is ready when time is short.
Reheating from Frozen
I let the pie cool completely before wrapping it tightly in foil, or I place individual slices in freezer-safe containers. I always label the container with the date so I know how long it has been stored.
- I love that this keto taco pie freezes beautifully for busy weekdays.
- To reheat, place a frozen portion in the pan and warm in the oven at oven 350 for about 10–15 minutes until hot through.
- Freezing individual portions saves time and prevents waste of leftovers.
| Storage | Freezing Time | Reheat |
|---|---|---|
| Whole pie | Up to 8 weeks | Thaw, then oven 350 for 20–25 minutes |
| Individual slices | Up to 6 weeks | Direct from freezer, oven 350 for 10–15 minutes |
| Quick reheat | Within 2–3 days (fridge) | Warm 5–7 minutes in oven or microwave briefly |
Adjusting for Altitude and Oven Variability
Every oven behaves a little differently, and I adjust times so my recipes produce the same results no matter where I bake.
Oven temperature can swing by 10–25°F from the dial setting. I use an oven thermometer to confirm actual heat and note whether my unit runs hot or cool.
At higher altitudes, liquids evaporate faster and boil at lower temperatures. That can mean slightly longer bake times so the center sets without drying the top.
- I double-check ingredients and measurements before I start; small changes affect texture and final set.
- Some people find an oven thermometer and a written note about timing for each recipe very helpful.
- Watch the last few minutes of baking closely to avoid overcooking; a gentle jiggle test works well for custard-like bakes.
| Issue | Adjustment | Why it helps |
|---|---|---|
| Oven runs hot | Lower temp 10–20°F | Prevents overbrowning while center cooks |
| High altitude | Add 5–10 minutes | Allows liquids to set despite lower boiling point |
| Ingredient variance | Verify weights, not just cups | Consistent texture and sliceability |
Troubleshooting Common Recipe Issues
When the filling doesn’t set or the flavor is off, targeted fixes save the meal and your time. I walk through the quick checks I use so you can get dinner right in minutes.
If your taco seasoning tastes too salty, cut back on added salt in your homemade blend next time. I also keep a small jar of low-salt mix so I can adjust on the fly for family tastes.
- Always brown the ground beef fully and drain the excess grease from the skillet before adding seasoning.
- If the pie seems too runny, make sure the egg and cream mixture is whisked until smooth so the filling will set.
- Prefer milder taco flavor? Reduce chili and cayenne, then taste and add more as needed.
- Speed up prep by measuring ingredients ahead; this saves minutes when you start cooking.
- This recipe is forgiving—small adjustments after tasting will still give a great serving and tasty leftovers.
| Issue | Quick fix | Why it helps |
|---|---|---|
| Too salty seasoning | Reduce salt in taco seasoning | Balances flavor for people and family |
| Runny center | Whisk egg-cream mixture more | Ensures firm set in 35–45 minutes |
| Greasy beef | Drain after browning | Prevents soggy layers and improves texture |
Enjoying Your Gluten Free Taco Pie
I love how a simple bake can turn familiar spices and ground beef into a cozy family meal. Each slice makes a hearty, low-carb dish that works for weeknight dinner or a relaxed weekend serving.
This keto version satisfies cravings for Mexican-style food while keeping carbs in check. A little extra taco seasoning on top brightens each bite and helps the flavors sing.
Feel free to print this recipe or save the post to try later. Share it with friends who want an easy, gluten free meal that feeds a crowd for days.
Whether you are new to keto or have years of experience, this taco pie is a reliable favorite in my house. Thanks for reading the post — I can’t wait to hear how your version turns out.