
This post contains affiliate links. I may earn a commission if you purchase through them at no extra cost to you.
I created this quick snack to curb salty cravings while staying on my low carb plan. I want something crispy, cheesy, and fast when hunger hits. This bite-sized treat delivers big flavor with minimal fuss.
I make this recipe when I need a reliable appetizer that fits my macros. The melted layers and savory pepperoni give a satisfying crunch that feels indulgent without the carbs.
I bake these in the oven so they come out golden and crisp every time. They take minutes to prepare and are great for parties or an evening snack at home.
I share this simple approach so you can enjoy a guilt-free bite that helps you stay on track. Try it tonight and see how easy sticking to goals can taste.
Quick, low carb snack that is crispy and cheesy.
Easy oven method and simple ingredients for fast prep.
Why You Will Love These Keto Pepperoni Cheese Roll-Ups
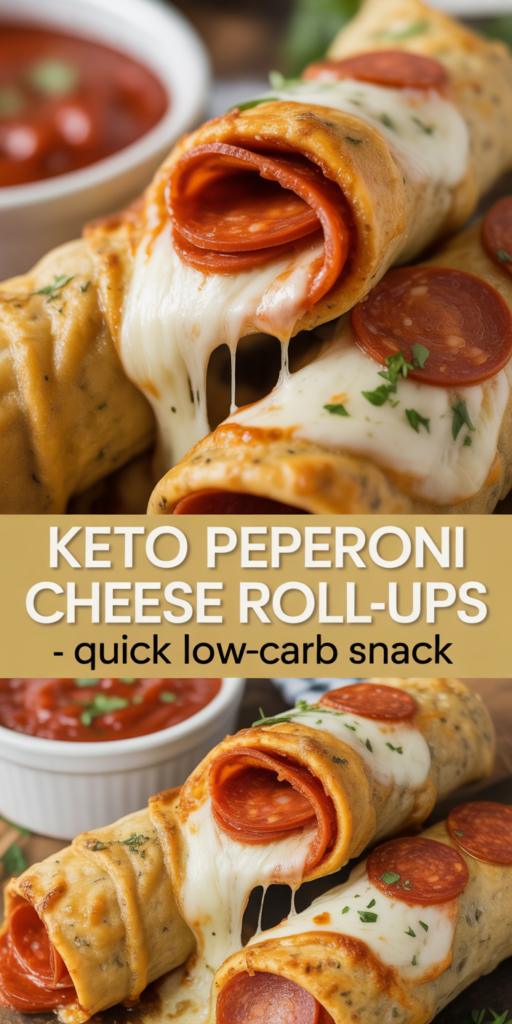
These pizza-inspired bites turn simple slices of mozzarella into a crispy, flavor-packed snack in minutes.
I believe this recipe is the ultimate low carb snack because it converts plain cheese into a golden, crunchy treat that tastes like mini pizza. I use high-quality mozzarella so the inside stays gooey while the edges crisp in the oven.
You will love how these keto pizza bites satisfy cravings and save time on busy weeknights. My family loves these recipes for parties and quick snacks, and I always keep extra pepperoni on hand for last-minute prep.
They are truly an easy keto solution that lets you customize toppings. Guests who do not follow a low carb plan still ask for seconds, which makes this a go-to homemade appetizer.

| Prep Time | Cook Time | Servings | Ease |
|---|---|---|---|
| 5 minutes | 8–10 minutes | 8–12 bites | Very easy |
| Minimal tools | Oven-baked | Party-friendly | Family favorite |
The Nutritional Benefits of Low Carb Snacking
Smart low carb snacking helps me stay full and focused between meals.
I look for foods that offer energy and real nutrients so I avoid high-carb temptations. These bites fit that bill and save me time in the kitchen.
The Power of Pepperoni
One ounce of pepperoni gives about 12.3 grams of fat and 138 calories. It also provides 52.4 mg of omega-3 fatty acids per ounce, which support brain and eye health.
- I always emphasize that pepperoni is a fantastic low carb snack because it contains zero carbs and supplies healthy fats to keep you full.
- When I track macros, these recipes help me avoid hidden sugars and fillers found in many processed snacks.
- I include product links and affiliate links on my site, but I only share items I use myself.
- Take the time to read labels on the paper or package to spot added sugars that could add carbs.
| Per Ounce | Fat | Calories |
|---|---|---|
| Pepperoni | 12.3 g | 138 |
| Omega-3 | 52.4 mg | Supports brain health |
I focus on high-quality cheese and pepperoni to keep snacks nutritious and satisfying. These easy keto ideas make low-carb living simple and tasty.

Essential Ingredients for Your Crispy Snack
Start with a few quality items and you’ll get consistent, golden results every time. I keep my list short so prep stays fast and outcomes stay reliable.
Choosing Quality Mozzarella
Pick thick-cut mozzarella slices that melt evenly. I use 12 cheese slices as a base, or I make a fathead dough if I want a sturdier crust.
Fathead dough ingredients: shredded mozzarella, cream cheese, and one egg. For a lighter option, use almond flour in the dough mix.
Selecting Your Marinara
Having the right sauce matters. I keep a jar of keto marinara sauce for dipping and check labels to make sure there’s no added sugar.
A good marinara sauce complements the savory toppings and makes dipping feel indulgent without the carbs.
- To make the base, you will need 12 slices of mozzarella cheese or fathead dough made with almond flour, cream cheese, and an egg.
- I always make sure to have high-quality pepperoni on hand; its flavor shows through in every bite.
- Use parchment paper on the baking sheet to prevent sticking and speed cleanup.
- Add Italian seasoning or garlic powder to boost savory notes before baking.
| Item | Quantity | Role |
|---|---|---|
| Mozzarella (thick slices) | 12 slices | Base / melts to crisp |
| Fathead Dough Option | Mozzarella, cream cheese, 1 egg, almond flour | Alternative base for texture |
| Keto Marinara Sauce | 1 jar | For dipping |
| Parchment paper | 1 sheet | Prevents sticking during oven baking |
Preparing Your Baking Sheet and Oven
Before I touch ingredients, I set up my pan so nothing sticks and every bite browns evenly.
I always preheat my oven to 400 degrees. This ensures the cheese melts and reaches a golden edge in the right amount of time.
Next, I line a cookie sheet with high-quality parchment paper. A lined cookie sheet keeps the snacks from sticking and makes cleanup fast.
- I set the oven at oven 400 degrees and wait until it reaches temperature before baking.
- Use parchment paper on the baking sheet so the cheese slides off when done.
- It takes only a few minutes to prepare the sheet, and that small step saves time later.
- A sturdy baking sheet helps heat distribute evenly so each bite cooks the same.
| Step | Why it matters | Time |
|---|---|---|
| Preheat oven | Ensures even browning and proper melt | 5 minutes |
| Line cookie sheet | Prevents sticking and speeds cleanup | 1–2 minutes |
| Choose baking sheet | Even heat = consistent texture | Instant |
Make these small preparations first and you’ll notice better texture and easier cleanup every time.
Step by Step Guide to Perfect Roll-Ups
With a few careful moves, you can transform warm slices into tight, golden snacks ready to dip. Start by prepping your baking area: line cookie sheet with parchment paper so the melted layer releases cleanly.
Melting the Cheese
Preheat the oven to 400 degrees. Place mozzarella slices on the lined sheet and bake for 6 minutes.
You’ll know they are ready when the cheese slices start to brown around the edges and look bubbly. Remove the sheet from the oven and work quickly.
Rolling Techniques
Sprinkle Italian seasoning over each melted round, then add pepperoni slices while the surface is still warm. Let cool for about 2 minutes so the slices are pliable but not too hot to handle.
Use a small spatula to lift an edge and roll tightly into a tube, tucking the pepperoni inside. If a slice is too gooey, return it to the oven for 30 seconds, but make sure not to overcook.
Cooling for Crispiness
After rolling, let the tubes rest on the sheet for another minute to set. Cooling helps them firm up and achieve a crisp outside while the center stays tender.
Serve warm with a small bowl of marinara sauce for dipping. The total time for this recipe is under 10 minutes, so it’s perfect when you want a fast, savory bite.
| Step | Action | Time |
|---|---|---|
| Prep | Line cookie sheet with parchment paper | 1–2 minutes |
| Melt | Bake mozzarella slices at oven 400 degrees until edges brown | 6 minutes |
| Roll | Cool 2 minutes, add pepperoni and roll tightly | 2–3 minutes |
| Serve | Let set, serve with warm marinara sauce for dipping | Under 10 minutes total |
Expert Tips for Achieving the Ideal Texture
The secret to perfect texture is timing: watch the oven during the final minutes so the cheese turns golden brown around the edges.
Use a high-quality cookie sheet so heat spreads evenly and each slice bakes the same. If you want extra crispiness, leave the cheese slices in the oven for an additional 30 seconds, but watch them closely to avoid burning.
After you remove the tray from the oven, let the rounds cool briefly until they are pliable. This rest time helps the melted cheese set so the slices roll without cracking.
- Sprinkle Italian seasoning while the surface is still hot so the herbs stick.
- Prepare multiple batches on a lined sheet when serving guests to keep bites warm and crisp.
- Keep a small bowl of marinara sauce nearby for dipping — the contrast with a hot, crispy bite is excellent.
| Tip | Why it matters | When to use |
|---|---|---|
| Watch oven closely | Prevents overbrowning and burning | Final 30–60 seconds |
| Cool slightly before rolling | Maintains pliability and prevents cracks | Right after removing from oven |
| Use good cookie sheet | Ensures uniform crispiness | Every batch |
Creative Variations and Flavor Additions
A small change in toppings can turn the same base into a new favorite. I often swap items to explore fresh textures and tastes.
Try mushrooms, olives, or fresh basil for a bright, savory twist. You can switch pepperoni for roasted bell peppers or spinach when you want a meat-free bite.
Vegetarian Alternatives
For a vegetarian version, use thinly sliced bell peppers, sun-dried tomatoes, or sautéed mushrooms. I also like adding a few fresh basil leaves right after rolling.
- Use different cheese slices like provolone or sharp cheddar to change the flavor.
- Add a sprinkle italian seasoning before baking to mimic classic pizza notes.
- I share honest product picks via affiliate links when I use them to make prep easier.
- Serve with a keto-friendly marinara sauce or a creamy ranch for dipping.
| Variation | Topping | Suggested Dip |
|---|---|---|
| Herb | Fresh basil & garlic | Marinara |
| Veggie | Bell peppers & spinach | Creamy ranch |
| Bold | Mushrooms & olives | Spicy marinara |
Always check labels on sauces and other ingredients to avoid hidden sugars. Small swaps keep this recipe exciting and easy to personalize.
Storing and Reheating Your Leftovers
Proper storage keeps the texture and flavor intact for several days in the fridge. If I have extras, I fit them into one airtight container and chill for up to three days.
For quick reheats, I preheat the oven to 375 degrees and return the bites to a baking sheet lined with parchment paper. A few minutes in the oven brings back crisp edges without sogginess.
I always line my cookie sheet with parchment when reheating. The paper prevents sticking and makes cleanup easy.
- To freeze: place pieces on a baking sheet until solid, then transfer to a freezer-safe bag.
- When ready to eat, let them thaw slightly so they heat evenly in the oven.
- Avoid the microwave if you want to keep a crispy exterior; the oven restores texture much better.
- Make sure your oven is set to 400 degrees when cooking a fresh batch; use 375 degrees for reheating leftovers.
| Storage | Temp | Time |
|---|---|---|
| Fridge (airtight) | Cold | Up to 3 days |
| Freeze (single layer then bag) | 0°F / -18°C | Up to 1 month |
| Reheat (oven, lined sheet) | 375°F | 2–5 minutes until hot and crisp |
Enjoying Your Homemade Keto Appetizers
When guests bite into these small tubes, they get a crunchy edge and a molten center that tastes like a tiny pizza. The outside is crisp, the inside stays cheesy and gooey, and the savory pepperoni flavor shines through each bite.
I like to serve them with warm marinara sauce or a jar of keto marinara sauce for dipping. Lining the tray with parchment paper keeps the pieces intact and makes plating simple and neat.
This recipe is an easy snack that wins over kids and adults. It’s a satisfying low carb take on classic pizza flavors and makes game day or movie night feel special.