
This post contains affiliate links. I may earn a commission if you purchase through them at no extra cost to you.
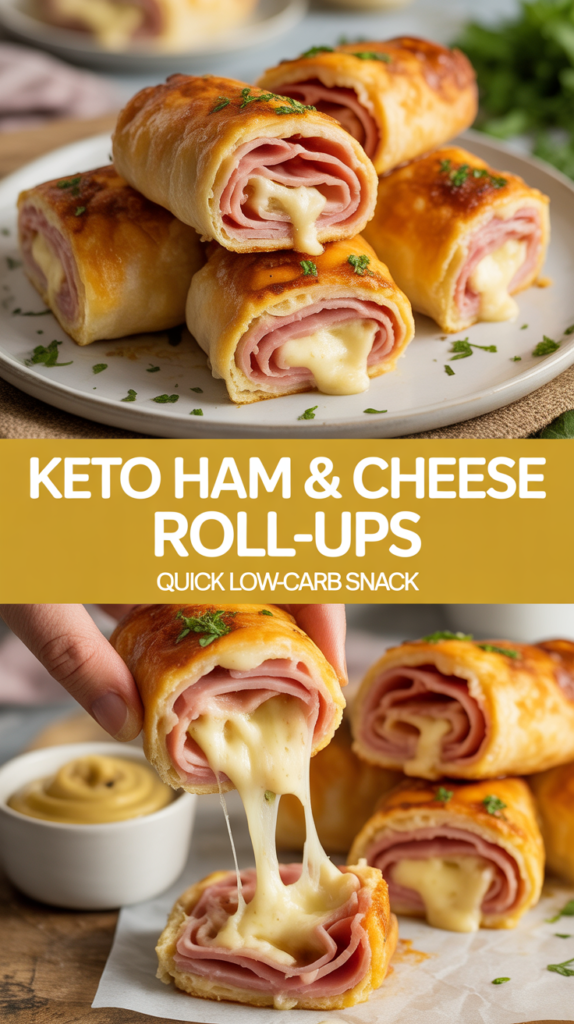
I’m excited to share a quick, low carb snack that hits every savory craving. This recipe makes a crispy, cheesy appetizer you can whip up in minutes for a party or a simple lunch.
I wrote this post so you can master an easy, satisfying bite that balances healthy fats with familiar deli flavors. Whether you need a snack between meals or a tray for guests, these rolls deliver with a golden crunch and melty filling.
Save this pin to your Pinterest board so the guide is handy for your next gathering. I’ve aimed to keep the steps clear for cooks at any skill level. Try it today and make these a regular keto ham snack in your rotation.
Why You Will Love These Keto Ham & Cheese Stuffed Roll-Ups
I love how a simple blend of sharp cheddar and silky cream cheese turns ordinary deli slices into a craveable, handheld lunch. The combination gives a gooey center that stays rich without extra carbs.
These ham cheese bites pack big flavor in small packages. Kids and adults both reach for them at parties, and they travel well for work or school.
My favorite recipes use this exact cream and cheese pairing for a decadent mouthfeel. You can swap cheeses to suit your palate and still get the same melty texture.
They are quick to assemble and perfect when time is tight. Whether you need a crowd-pleasing appetizer or a fast solo meal, these ham cheese roll ups deliver every time.

| Feature | Taste | Prep Time | Best For |
|---|---|---|---|
| Cheddar + Cream | Sharp, creamy | 5 minutes | Quick lunch |
| Customization | Flexible | 2–3 minutes | Party trays |
| Texture | Gooey interior, crisp edges | Bake 10–12 minutes | Snack or meal |
The Benefits of Choosing Low Carb Appetizers
A smart low carb snack helps you enjoy party food without derailing daily goals. I stick to choices that deliver real satiety and steady energy so I can enjoy the event and stay on track.
The Role of Healthy Fats
Cream cheese is a solid source of healthy fat, calcium, and minerals that support your body while following a keto plan. I use full‑fat ingredients to get more nourishment per bite and to feel satisfied longer.
Choosing low carb appetizers keeps you within your macros while still offering high protein and flavor. These bites are naturally sugar free and gluten free, so they work well for many guests.
- Healthy fat helps sustain energy during busy days and social events.
- High‑quality protein prevents grazing and keeps you full between meals.
- A low carb approach reduces blood sugar spikes common with traditional snacks.
- I recommend full‑fat ingredients to maximize the benefits of fat in every bite.

| Benefit | Why It Matters | Example |
|---|---|---|
| Healthy fats | Longer energy, nutrient absorption | Cream cheese, avocado |
| Low sugar | Stable blood sugar and fewer cravings | Sugar free fillings |
| High protein | Improved satiety and muscle support | Deli protein or full‑fat dairy |
Essential Ingredients for Your Fathead Dough
I start by gathering a few reliable pantry items that shape the dough and filling. Using fresh dairy and thin deli slices makes assembly simple and keeps the texture right.
Selecting Quality Deli Ham
Choose high-quality deli ham slices that are thin but not fragile. Thin slices roll easily and layer well with melted cheese.
Choosing Your Cheese
I like a blend of shredded cheddar and mozzarella for a balanced melt and flavor. Freshly shredded cheese performs better than pre-shredded varieties.
- To make the perfect fathead dough, you will need 1.5 cups shredded mozzarella, 2 ounces cream cheese, and 1 large egg.
- For the filling, select deli ham slices thin enough to roll without tearing.
- Use a mix of shredded cheddar and mozzarella for the best melt and flavor.
- Season dough with 1 teaspoon garlic powder and 1 teaspoon Italian seasoning.
- Ensure cream cheese is softened to room temperature before mixing.
- Quality of ham slices affects final texture and taste when you make ham cheese rolls.
- Shred cheese fresh to avoid anti-caking agents found in pre-shredded bags.
| Ingredient | Amount | Why it matters |
|---|---|---|
| Mozzarella | 1.5 cups shredded | Gives stretch and structure to the dough |
| Cream cheese | 2 ounces | Adds fat and smoothness to the dough |
| Egg | 1 large | Bind and set the fathead base |
Preparing the Perfect Keto Dough Base
Begin with a simple melt-and-stir step that makes the dough come together fast.
I use a microwave-safe bowl to soften the mozzarella and cream cheese for about 60 seconds. This short time yields soft, pliable dairy that is easy to mix.
- Stir in almond flour and a single large egg until the mixture forms a smooth, consistent dough. This is the secret to a great low carb recipe base.
- Knead the dough thoroughly on a clean surface for a uniform texture. Take your time so the ingredients blend well.
- Roll the dough between two sheets of parchment paper to prevent sticking and to get even thickness for each roll.
- Set a timer for 5 minutes and let the dough rest slightly. This short rest makes handling and shaping the roll ups much easier.
This dough is versatile and holds fillings well. Follow these steps and you’ll get neat rolls that keep their shape whether you bake for guests or a quick snack.
| Step | What to Do | Why it Matters |
|---|---|---|
| Melting | 60 seconds in a bowl | Softens dairy for easy mixing |
| Mixing | Add almond flour + egg | Forms a smooth, low carb dough |
| Kneading & Rest | Knead, then rest 5 minutes | Improves texture and handleability |
| Rolling | Between parchment sheets | Ensures even thickness for consistent baking |
Layering Your Ham and Cheese Fillings
A careful build of fillings turns flat dough into a savory, melty roll that holds together.
1. Spread a thin, even layer of the cream cheese mixture over the rolled dough. Leave a small border so the edge seals cleanly.
2. Lay deli ham slices flat over the cream cheese. Make sure the ham covers the surface to create a true ham cheese combination in every bite.
3. Sprinkle shredded cheddar generously over the ham. Add a light dash of black pepper for a bright pop of flavor.
- In a small mixing bowl, stir extra herbs or spices into a custom mixture. Use this blend to sprinkle lightly for extra depth.
- Press the layers gently so the cream acts as glue and keeps the roll ups tight during baking.
- Add a final dusting of cheese roll flavor—extra cheddar—just before you begin rolling to boost melt and browning.
| Step | Why it Matters | Quick Tip |
|---|---|---|
| Spread cream cheese | Creates a sticky base | Leave 1/2″ border |
| Layer ham | Ensures even meat in each slice | Keep slices flat |
| Top with cheddar | Melts into a cohesive filling | Add pepper to taste |
Rolling and Slicing for Crispy Results
A firm, compact roll makes all the difference when you want perfectly browned, crunchy pieces. I walk through tight rolling and clean slicing so each bite stays neat and crisps up evenly.
Achieving a Tight Roll
Start at one long edge and roll the dough firmly, using the parchment to help guide a compact log. Keep gentle, even pressure so the filling layers stay aligned and don’t bulge.
Once the log is formed, chill it in the fridge for at least 20 minutes. That rest time firms the cheese and makes slicing much easier.
Tips for Clean Slicing
- Use a sharp, serrated knife and saw gently to avoid squashing the log.
- Slice about 1-inch thick pieces so each cheese roll bakes evenly and gets crisp on all sides.
- If the log softens, return it to the fridge for 10 more minutes to firm up before continuing.
- Wipe the knife between cuts to keep ham and filling from smearing for a neat presentation.
| Action | Why it Helps | Quick Tip |
|---|---|---|
| Roll tightly | Prevents gaps and oily spots | Use parchment to guide |
| Chill 20 minutes | Firms filling for clean cuts | Do not skip resting time |
| Slice 1-inch | Bakes evenly into crispy pieces | Use serrated knife |
Baking to Golden Perfection
Finishing these rolls in a hot oven produces a crisp exterior and a soft, gooey center I love.
Preheat the oven to 400 degrees Fahrenheit. Line a baking sheet with parchment to stop the melted filling from sticking.
Arrange the roll ups with space between each so hot air can circulate and edges crisp evenly. I leave at least an inch between pieces.
- Bake for 15 to 20 minutes until the dough is golden and the cheese is bubbling.
- Watch closely in the last few minutes — the high fat in the mixture browns quickly.
- Remove from the oven and rest for a few minutes so the cream cheese center sets before serving.
That blend of cream cheese and mozzarella keeps the inside molten while the outside turns satisfyingly crunchy. Each serving stays relatively low in calories, so you can enjoy a rich, savory bite without guilt.
| Temperature | Time | Result |
|---|---|---|
| 400°F | 15–20 minutes | Golden crust, bubbly interior |
| Watch last 2–3 min | N/A | Prevent over-browning from fat |
| Rest 3–5 minutes | N/A | Filling firms for clean slices |
Creative Variations for Savory Cravings
If you like variety, these savory roll ideas make it easy to change the flavor with a few simple swaps.
Below I share quick ways to brighten, heat, or swap the protein so the snack feels new every time.
Adding Fresh Herbs
I stir chopped chives or parsley into the cream cheese for a bright lift. Fresh herbs add color and a clean finish.
Incorporating Spicy Elements
For heat, I mix red pepper flakes or a spoon of horseradish into the cream. Diced jalapeño or a dash of hot sauce also works well.
Using Different Meats
Thinly sliced turkey or roast beef makes a great swap if you want to change the flavor from traditional ham.
I also like adding crispy bacon pieces inside a few slices for extra texture and smoky depth.
- Add chives, parsley, or basil to brighten the filling.
- Spice it with jalapeños, hot sauce, or red pepper flakes for a bold bite.
- Swap in turkey or roast beef, or add bacon for smoky crunch.
| Variation | What to Add | Result |
|---|---|---|
| Herb Bright | Chives, parsley | Fresh, lighter flavor |
| Spicy Kick | Jalapeño, red flakes, horseradish | Warm heat, lively finish |
| Meat Swap | Turkey, roast beef, bacon | Different savory profile and texture |
Storing and Reheating Your Leftovers
Keeping your extras crisp and tasty starts with the right storage and a quick reheat method. I store leftover ham cheese pieces in an airtight food storage container in the refrigerator for up to three days.
When it’s time for lunch, I reheat slices in an air fryer or a skillet over medium heat for a few minutes to bring back the crunch. I avoid the microwave because it softens the dough and changes the texture of the cheese roll.
- Keep leftover ham cheese roll ups refrigerated in an airtight container for up to three days.
- Reheat in a skillet or air fryer for 3–5 minutes until edges are crisp.
- Store extra filling in a small bowl and assemble fresh rolls later in the week.
- These pieces are a solid source of protein and healthy fat, roughly 277 calories per serving, and sugar free.
| Storage | Time | Best Reheat |
|---|---|---|
| Airtight container | Up to 3 days | Skillet or air fryer, 3–5 minutes |
| Filling in bowl | 2–3 days | Assemble then bake or crisp |
| Do not | N/A | Microwave — softens texture |
Pairing Suggestions for a Complete Meal
A few smart sides can take these bites from snack status to a complete, crowd‑pleasing plate. I keep pairings simple so flavors stay bright and the spread feels balanced.
Serving with Low Carb Dips
I like to offer a spicy mustard and a creamy low carb dip as the first choices. Both lift the savory filling and add contrast to the warm, melty center.
- Serve these roll ups with spicy mustard or a creamy low carb dipping sauce to enhance savory notes.
- For lunch, pair them with a fresh salad or a bowl of broccoli cheese soup for added comfort.
- For dinner parties, place these appetizers next to a sweet and spicy chicken salad for color and contrast.
- I often add keto-friendly chicken wings for a heartier spread that guests love.
- Feel free to try ranch or blue cheese dressing if you want a familiar creamy option.
- Finish with a cold glass of sugar-free sweet tea to round out the meal.
| Pairing | Why it Works | Serving Tip |
|---|---|---|
| Spicy mustard | Bright, tangy contrast | Offer in a small ramekin |
| Broccoli cheese soup | Warm, creamy complement | Serve in small bowls for lunch |
| Sweet & spicy chicken salad | Balances savory and sweet | Serve family-style at dinner |
Enjoying Your Crispy Keto Snack
Treat yourself to a simple, savory snack that’s ready in minutes and travels well for lunch or a casual dinner. I hope you enjoy every bite of these crispy, cheesy keto bites as much as I do.
This low carb appetizer is great to share with friends or keep on hand for quick meals. Save this post to your recipe collection or pin it so you can find it for your next gathering.
Whether you eat them warm from the oven or cold from the fridge, these ham cheese pieces satisfy savory cravings while staying on track with your goals. Thanks for following along — I can’t wait to hear how your ham cheese roll turns out!