This post contains affiliate links. I may earn a commission if you purchase through them at no extra cost to you.
I make this dish when I want creamy comfort without a lot of fuss. My version bakes in a 9×13-inch pan at 350°F until it’s bubbly and golden, and it often becomes a repeat dinner at my house.
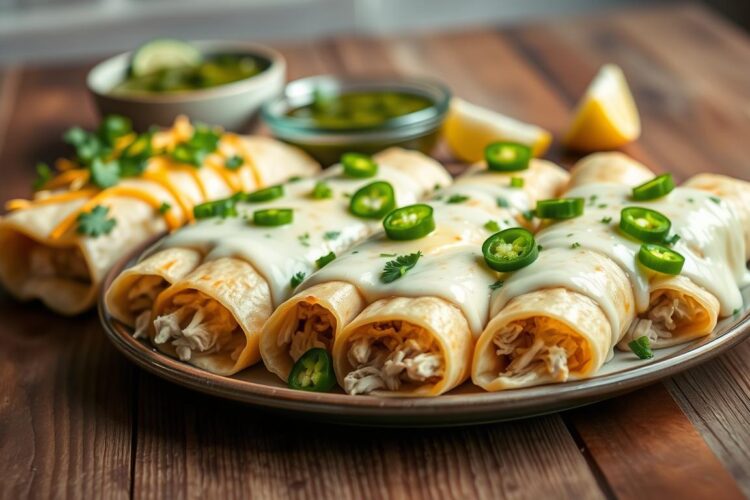
The filling features tender chicken wrapped in soft tortillas and a rich white sauce that turns cheesy and cozy in the oven. Kids and grown-ups both enjoy the mild, family-friendly spice level.
I call it a no-stress, crowd-pleasing recipe that works for weeknights or a casual potluck. You can pick a quick soup shortcut or stir up a simple homemade sauce—the goal is the same: creamy sauce and soft tortillas, not dried-out edges.
The ingredient list reads like pantry and fridge staples, and leftover chicken fits right in. Read on and I’ll walk you step by step so the sauce stays silky and the bake comes out perfectly bubbly.
– Creamy, cheesy baked dinner that’s kid-friendly and great for gatherings.
– Tender chicken and soft tortillas topped with a rich white sauce.
– Option to use a canned-soup shortcut or make sauce from scratch.
Why I Make These Creamy White Chicken Enchiladas for Family Dinners
When I want a meal that feels like a hug and satisfies a crowd, this creamy white bake is my pick. It stays mild, melts together beautifully, and everyone finds a way to love a slice.

Creamy, cheesy comfort without a lot of spice
The sauce is rich and cheesy but not hot. A little diced green chile adds flavor without turning dinner into a challenge for picky eaters.
Perfect for weeknights, potlucks, and casual gatherings
This version travels well and reheats cleanly. I bring it to potlucks and it always clears the serving dish fast.
Great way to use rotisserie chicken or leftover cooked chicken
Using rotisserie chicken or any cooked chicken cuts prep time in half. I shred the meat, mix it with sauce and cheese, and roll—done.
- Kid-friendly flavor with a creamy, cheesy finish
- Feeds a group and stores well for several days
- Fast to assemble when using pre-cooked poultry
What You’ll Taste: Creamy, Cheesy, Comforting Enchiladas in Every Bite
Every bite delivers a cozy, creamy hit that tastes like a restaurant favorite made at home. The flavors are mild, savory, and built to please a crowd without overpowering anyone.
Tender shredded chicken wrapped in soft flour tortillas
I stuff tender shredded meat into warm flour tortillas that stay pillowy after baking. The roll holds together and gives a soft chew that contrasts the silky sauce.
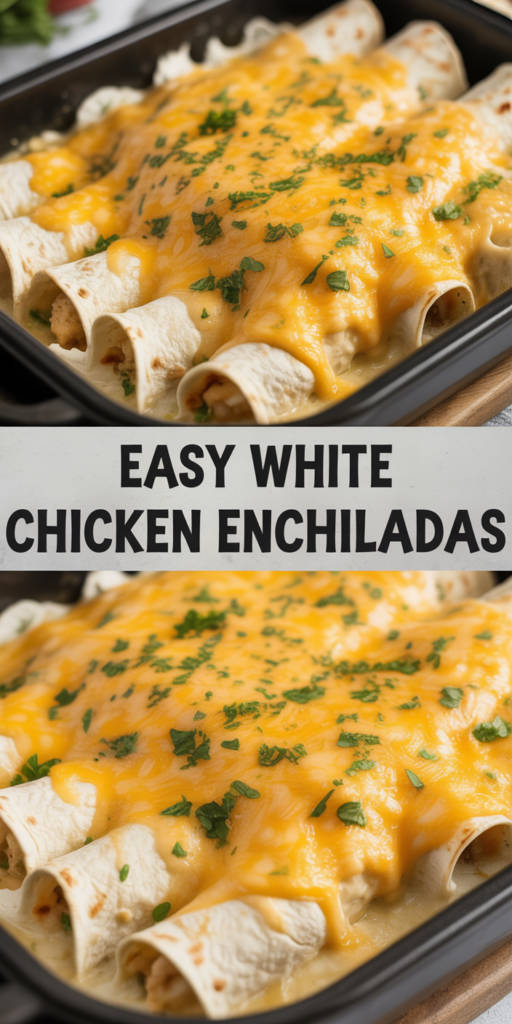
Rich white sauce baked until bubbly and golden
The white sauce becomes a creamy blanket as it bakes, bubbling at the edges and turning lightly golden on top. A quick broil adds small golden spots for looks and flavor.

Cheese, texture, and the flavor profile of this chicken enchilada
I fold cheese into the filling for richness and sprinkle more on top to get that irresistible melty finish. The result is saucy but sliceable after a short rest.
- Tender, pillowy tortillas with juicy filling
- Silky white sauce that bubbles and lightly browns
- Creamy, savory flavor with a gentle zip from green chiles
Quick Prep Snapshot: Time, Oven Temp, and Pan Size
To keep the bake smooth, I always get the oven preheated and the baking dish greased first. That small step saves time and helps the sauce stay creamy as the filling heats through.
Preheat and why it matters
I preheat oven 350°F because oven 350 is the sweet spot for even heating. It warms the filling without breaking the sour cream and keeps the sauce silky.
Why a 9×13-inch dish works best
I use a greased 9×13-inch dish so the tortillas fit snugly and the sauce covers edge to edge. The size prevents unrolling and gives an even bake across the pan.
Bake time and visual cues
Bake about 20–25 minutes until the edges bubble and the cheese melts. If you want a light crust, broil briefly—watch closely so the top doesn’t scorch. Let the pan rest about 5 minutes before serving so the sauce sets for cleaner slices.
| Step | Setting | Why it helps |
|---|---|---|
| Preheat | Preheat oven 350°F | Even heating keeps sauce creamy |
| Pan | 9×13-inch dish, greased | Fits tortillas snugly, prevents unroll |
| Bake time | 20–25 minutes | Watch for bubbling edges and melted cheese |
| Finish | Optional broil + rest 5 minutes | Light browning without scorching; sauce firms for serving |
Ingredients I Use for Easy White Chicken Enchiladas
Below I list the key ingredients I rely on to get that silky sauce and melty filling. Each item plays a clear role, so the final bake stays creamy and sliceable.
Core ingredients and what they do
- Cooked shredded chicken — moist and well seasoned; rotisserie or leftovers speed prep and add flavor.
- Flour tortillas — soft, flexible wraps that hold the filling and stay tender under sauce.
- Sour cream (full‑fat recommended) — adds tang and creaminess and keeps the sauce smooth while baking.
- Cream of chicken soup or homemade white sauce alternative — soup is convenient; homemade lets you control thickness.
- Diced green chiles (do not drain) — add mild flavor and moisture without overpowering heat.
- Shredded Monterey Jack cheese — keeps the topping light in color and melts beautifully.
- Garlic powder, salt, and black pepper — simple seasoning to keep the flavor kid-friendly.
- Fresh parsley — a bright finish that lifts the rich, creamy cheese and sauce.
| Component | Convenience | Control |
|---|---|---|
| Cream of chicken | Fast and consistent | Less adjustable texture |
| Homemade sauce | Takes a bit longer | Adjust thickness and seasoning |
| Diced green chiles | Keep the juice | Adds flavor without heat |
Exact Ingredient Measurements (So the Sauce Turns Out Perfectly Creamy)
These exact amounts give a consistently creamy sauce you can count on. I list each measurement so you can copy it into a shopping list with no guesswork.
2 cups cooked shredded chicken
10 flour tortillas (taco size)
1 cup sour cream
1 can (4 oz) diced green chiles (do not drain)
2 cups shredded Monterey Jack cheese (divided)
1 can (10.5 oz) cream of chicken soup, or my homemade white sauce option below
1 tsp garlic powder
1/2 tsp kosher salt
1/4 tsp black pepper
2 Tbsp fresh parsley, chopped
Keep the cheese divided so part melts into the filling and the rest browns on top. Do not drain the diced green chiles; the juice helps keep the sauce loose and flavorful.
| Ingredient | Amount | Note |
|---|---|---|
| Cooked shredded chicken | 2 cups | Rotisserie or leftovers work well |
| Flour tortillas | 10 (taco size) | Warm before rolling to prevent tearing |
| Sour cream | 1 cup | Full-fat keeps sauce smooth |
| Monterey Jack cheese (divided) | 2 cups | Mix half in filling; save half for topping |
| Cream of chicken soup | 1 can (10.5 oz) | Or use my homemade white sauce alternative |
How I Prep the Chicken Fast (Rotisserie, Roasted, or Leftovers)
A store-bought rotisserie saves prep time and gives the filling built-in flavor. I often reach for one when I want minimal fuss and a juicy result.
Why I favor rotisserie for speed
My fastest path is rotisserie chicken because it is seasoned and stays moist in the bake. Using it cuts hands-on time and makes the filling more forgiving.
Other cooked chicken options and shredding tips
If I roast breasts, I allow about 35–45 minutes until done. Poaching or boiling is also reliable and keeps meat tender.
- Two-fork method: pull the meat apart for slightly chunky shreds.
- Stand mixer trick: use the paddle on low for 30–60 seconds for fast, even shredding.
| Method | Time | Result |
|---|---|---|
| Rotisserie | Ready-made | Seasoned, very moist |
| Roast breasts | 35–45 minutes | Good flavor, controlled seasoning |
| Poach/boil | 15–20 minutes | Tender, neutral flavor |
Keep shreds medium-sized so the filling stays hearty and not mushy under sauce. That little detail helps the bake finish tender and juicy.
My Creamy White Sauce: Soup Shortcut or Homemade on the Stovetop
I use two simple sauce routes depending on time and how much control I want over texture and seasoning.
Quick canned-soup shortcut
For the fastest path, I stir a can of cream of chicken with sour cream and a splash of milk. This keeps prep minimal and gives an even base for the chicken enchiladas recipe.
Homemade roux-based white sauce
I melt butter, whisk in equal parts flour, then slowly add chicken broth until the sauce thickens. That roux method gives me full control of thickness and seasoning before I fold in cream elements.
Temperature tips so sour cream stays smooth
- After the sauce thickens, I lower the heat and cool it 3–5 minutes before stirring in sour cream.
- Keep the pot off a hard boil once sour cream is added—too much heat will make it split.
- Either route makes a creamy, mild sauce that bakes evenly when spread edge-to-edge over the tortillas.
| Method | Time | Why I use it |
|---|---|---|
| Canned soup + sour cream | 5 minutes | Fast, consistent cream and flavor |
| Roux (butter + flour) + broth | 10–12 minutes | Custom thickness and seasoning control |
| Heat control | Lower before adding sour cream | Prevents curdling and keeps sauce silky |
Step-by-Step: Preparing the Creamy White Sauce
A smooth, lump-free sauce begins with a calm whisk and steady additions of liquid. I walk through each step slowly so beginners can follow along and get a glossy, even mixture.
Whisking until smooth and thick (no lumps)
1) Melt 2 tablespoons butter over medium heat. Add 2 tablespoons flour and whisk for 1 minute to cook out the raw taste.
2) Gradually add 1 1/2 cups chicken broth while whisking. Keep the heat steady so the base comes together without scorching.
Stirring in sour cream and diced green chiles off a hard boil
3) Cook until the sauce thickens and bubbles — it should coat the back of a spoon and look glossy. Remove from direct heat and cool 3–5 minutes.
4) Stir in 1 cup sour cream and the can of diced green chiles. Do not return the pan to a hard boil; keep the mixture gentle so the dairy does not separate.
Seasoning the sauce with garlic powder, salt, and pepper
5) Finish with 1 teaspoon garlic powder, 1/2 teaspoon salt, and a dash of black pepper. Taste and adjust so the cream flavor stays mild and savory.
- If the sauce is too thick, add a splash of broth to loosen it.
- If slightly lumpy, whisk vigorously off the heat until smooth.
| Step | Timing | Look for |
|---|---|---|
| Cook flour | 1 minute | Faint nutty smell |
| Thicken with broth | 3–5 minutes | Coats spoon, glossy |
| Add dairy | Cool 3–5 minutes | Mixture stays smooth, no boil |
Mixing the Filling for Creamy White Chicken Enchiladas
My goal is a filling that binds without getting gummy when cooled—soft and flavorful every time.
I start by placing 2 cups of shredded chicken into a large bowl. I add 1 cup of shredded Monterey Jack cheese and half a cup of the sauce. This creates a cohesive mixture that stays moist as it bakes.
Chicken + cheese for a simple, crowd-pleasing center
- Toss chicken, cheese, and 1/4 tsp garlic powder in the bowl.
- Add 2 Tbsp sour cream or a splash of sauce to loosen the blend.
- Fold gently until evenly combined—do not overwork or the texture will get dense.
How I season the filling so it’s flavorful but kid-friendly
I keep salt and pepper light because the sauce and topping add salt as it bakes. I taste a small spoonful, adjust one pinch at a time, and remember the oven will concentrate flavors.
| What | Amount | Why |
|---|---|---|
| Shredded chicken | 2 cups | Even texture, quick to warm |
| Monterey Jack cheese | 1 cup (mixed) | Binds filling, melts smoothly |
| Sour cream or sauce | 2–4 Tbsp | Keeps mixture creamy, not stiff |
This approach delivers a mild, creamy white chicken filling that fits classic white chicken enchiladas. It stays family-friendly and easy to roll, with enough cheese to melt but not so much that the center firms up after cooling.
Filling and Rolling Flour Tortillas Without Tearing
I’ve found a few simple tricks that stop tortillas from tearing and keep each roll neat for the oven. Follow these steps and your enchiladas will hold their shape and look great when you pull them from the pan.
How much filling I add to each tortilla
Use about 3 tablespoons of filling in the center of each flour tortilla. That amount fills the roll without bulging or forcing seams to split.
My rolling method for tight enchiladas that don’t unroll
- Warm tortillas briefly so they flex—room temperature works for flour tortillas; corn tortillas need a few seconds in a hot skillet.
- Place the filling in a line down the center, leaving a 1/2-inch border at each end.
- Tuck the near edge over the filling, then roll snugly. Don’t pack too tight; the roll should slide, not squeeze, so sauce won’t flood the center.
- Set each roll seam-side down in the baking pan so the seam seals against the dish and the rolls support each other.
Stack them close together so the edges hold one another. A tight roll keeps the sauce on the top and preserves that pleasing texture once baked. Next step: pour sauce edge-to-edge and finish with cheese for a golden top.
| Step | Amount / Tip | Why it helps |
|---|---|---|
| Filling | ~3 Tbsp per tortilla | Prevents bursting |
| Warm | Room temp for flour; skillet for corn | Makes them flexible, reduces tears |
| Placement | Seam-side down in pan | Locks shape as they bake |
Assembling the Pan for Easy Baking (No Dry Spots)
A careful assembly sets up a successful bake. I arrange the rolls in a greased 9×13 pan so they sit snug and support one another.
Arranging seam-side down in the baking dish
I place each roll seam-side down in a single layer. This keeps them sealed during baking and makes neat slices for serving.
Pouring sauce evenly edge-to-edge
I pour the sauce slowly across the top so it spreads from one side to the other. To avoid dry ends, I use a spoon or spatula to nudge sauce into corners and between rolls.
Adding remaining cheese for a golden finish
Finally, I sprinkle the remaining Monterey Jack across the top. A full, even covering yields a bubbly, golden top that seals in moisture.
- Arrange rolls snug in the pan so they bake evenly.
- Pour sauce edge-to-edge and push into corners with a spoon.
- Top with remaining cheese for a golden, bubbly finish.
| Step | Tip | Why it helps |
|---|---|---|
| Arrange | Seam-side down, single layer | Keeps rolls sealed while baking |
| Sauce | Spread edge-to-edge, fill corners | Prevents dry edges and keeps tortillas soft |
| Top | Evenly sprinkle cheese | Creates golden, moist finish in the oven |
Once the pan is assembled, it goes straight into the oven for best texture. Proper coverage means soft centers and a perfect top every time.
Baking Until Bubbly and Golden
A clear visual cue tells me when the dish is done: bubbling sauce at the sides and a fully melted, lightly golden top. Start the clock only after the pan goes into the preheated oven so your minutes are accurate.
My bake time range for perfectly heated enchiladas
I bake the pan at 350°F for 20–25 minutes. Look for sauce bubbling around the edges and the cheese completely melted across the top.
If your oven runs hot, begin checking at the 18‑minute mark so the top doesn’t over-brown.
Optional quick broil for lightly browned cheese
If you want a bit of color, switch to broil 1–2 minutes at the end. Keep the rack a safe distance from the heating element and watch closely—broil works fast and can go from golden to scorched in seconds.
Resting time before serving (so the sauce sets up)
Remove the pan and let it rest about 5 minutes. That short pause lets the heat redistribute, the sauce thicken slightly, and the rolls slice cleanly without the filling running.
| Action | Timing (minutes) | Doneness cues |
|---|---|---|
| Bake | 20–25 | Bubbling sauce at edges; melted cheese on top |
| Optional broil | 1–2 | Light golden color on top; watch closely |
| Rest | ~5 | Sauce firms slightly; easier to serve |
Final tip: use an oven thermometer if you suspect your appliance runs hot or cool. Those small checks help you hit the perfect balance of heat, bubbly sauce, and a golden, melty top every time.
Serving Ideas I Love for a Full Meal
I round out the pan with a few simple sides so dinner feels complete and balanced. These pairings keep the creamy white profile front and center while adding texture and color.
Simple sides that work every time
I serve a crisp salad for freshness, warm Mexican rice for comfort, and refried beans for heart. Together they make a family-friendly meal that travels well to potlucks.
- Crisp leafy salad with a light lime vinaigrette — brightens the plate
- Mexican rice — comforting, mild, and easy to portion
- Refried beans — creamy, filling, and familiar to kids
Toppings that preserve the creamy white vibe
I set out chopped parsley, sliced green onions, and extra shredded cheese. These keep the look and flavor gentle while adding a fresh note that contrasts the rich filling.
| Pairing | Why I use it | Best for |
|---|---|---|
| Salad | Freshness, crunch | Every meal |
| Beans | Hearty balance | Family plates and potlucks |
| Extra toppings | Brighten without heat | Kids and guests who prefer mild |
Quick hosting tip: put toppings in small bowls so guests customize without adding spice. This keeps the white chicken and chicken enchiladas mild, creamy, and crowd-friendly.
Make-Ahead Tips for Busy Weeks (Without Soggy Tortillas)
On busy nights I split the work: tortillas and filling go in the dish, sauce waits until the last minute. That approach saves time and keeps rolls from turning soggy while they chill.
How I prep ahead and keep the sauce separate
I assemble and roll the tortillas, place them seam-side down in the baking dish, then cover tightly and chill. I store the sauce in a separate airtight container in the fridge so it can’t soak into the rolls.
Reheating tip if the sauce thickens
If the sauce firms up in the fridge, I warm it gently and whisk in stock or milk 1 tablespoon at a time until it pours. This thins smoothly and keeps flavor intact.
Quick prep timeline and storage basics
- Night before: roll tortillas, cover pan, refrigerate.
- Bake day: pour room-warm sauce over rolls and bake 20–25 minutes.
- To freeze: wrap sealed dish or freeze individual rolls for longer storage in the freezer.
| When | What to do | Why it helps |
|---|---|---|
| Night before | Assemble rolls; chill covered | Saves time; prevents drying |
| Bake day | Add warmed sauce; bake | Fresh texture; avoids soggy tortillas |
| Long-term | Freeze rolls; make sauce later | Freezer keeps quality; sauce stays fresh |
Storing Leftovers and Freezer Instructions That Actually Work
I treat storage like part of the recipe—small steps preserve texture and flavor. Below I cover fridge basics, my freezer approach, and how I bake from frozen so results stay creamy.
Fridge storage for baked enchiladas
Cool the pan to room temperature, then cover tightly with foil or an airtight lid. I keep leftovers refrigerated for about 3–4 days. This window keeps the roll texture and sauce pleasant without drying out.
Freezer method: freeze rolled enchiladas, make sauce on bake day
For the freezer, I freeze individual rolled enchiladas without sauce. Sour-cream-based sauce can change texture in the cold, so I make the sauce fresh on bake day. Freezing rolls this way keeps filling and tortillas true to form.
Baking from frozen at 350°F when needed
To bake straight from frozen, preheat the oven to 350°F. Cover the dish and bake about 45 minutes, then uncover and bake another 10–15 minutes until the top is bubbly. Thawing overnight in the fridge is helpful, but you can cook from frozen with the longer covered time.
| Storage | Time | Tip |
|---|---|---|
| Refrigerator | 3–4 days | Cover tightly; reheat gently |
| Freezer (rolled) | Up to 3 months | Freeze without sauce; add sauce when baking |
| Bake from frozen | ~55–60 minutes | Covered then uncovered to bubble |
Food safety note: refrigerate within two hours of baking and label packages with dates. This is how I keep chicken enchiladas ready for busy nights without losing that creamy sauce and texture.
More Reasons This Creamy White Chicken Enchilada Recipe Stays on My Rotation
What sells me on this recipe is how it combines tender chicken, soft tortillas, and a sauce that never dries out.
It reliably feeds a crowd, reheats well, and works with rotisserie chicken or leftover meat when I’m short on time. A light pinch of garlic, salt, and pepper brings out flavor without heat, and a bit of full‑fat sour cream keeps the texture rich and silky.
Trust the method: spread sauce edge-to-edge, bake until the top is bubbly and lightly golden, then let the pan rest a few minutes before serving. The result is a comforting, family-friendly dish that calendars, potlucks, and busy weeknights can all count on.
.