This post contains affiliate links. I may earn a commission if you purchase through them at no extra cost to you.
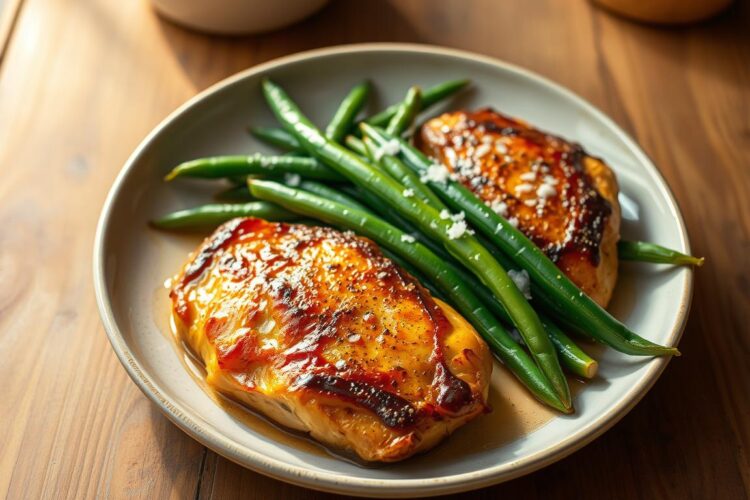
I call this my go-to Pan-Seared Chicken Thighs with Green Beans because it tastes like a real dinner but cooks fast in one skillet. In about 25–30 minutes you get golden-brown, crispy edges on the chicken and bright, tender-crisp green beans coated in a lemon-garlic pan sauce.
The method is simple: sear the chicken, cook the beans in the drippings, then deglaze the pan with stock and lemon so the sauce packs big flavor. Cleanup is minimal since everything finishes in the same skillet, which makes this ideal for busy weeknights and easy family dinners.
I use bone-in or boneless thighs depending on time, and skin-on for extra crispiness. Choose butter or olive oil based on what you have; finish with chopped parsley and a lemon squeeze for brightness.
Why I Make This One-Pan Chicken and Green Beans Dinner on Busy Weeknights
On hectic weeknights I reach for this one-skillet recipe because it delivers big flavor in minimal time. It fills the table fast, cleans up fast, and keeps meals simple.
Simple, flavorful, and healthy
I sear the protein first, then cook the vegetables in the same pan. The browned bits become the base of a quick sauce so every bite tastes savory and bright.
Ready in about 25–30 minutes
Real-world timeline: a few minutes to season, ~10–12 minutes to sear, ~5 minutes to finish the beans and sauce, then a quick reheat together. Total time fits tight weeknight schedules.
High-protein, low-carb and great for meal prep
This dinner is naturally gluten-free and keeps fat and carbs in check. Portions reheat well; the sauce helps the meat stay moist.

| Step | Minutes | Main Action | Benefit |
|---|---|---|---|
| Season | 2–3 | Salt, pepper, herbs | Quick prep |
| Sear | 10–12 | High heat browning | Deep flavor |
| Finish | 5–7 | Cook beans, deglaze | Tender beans, glossy sauce |
Ingredients I Use for Crispy Chicken Thighs and Tender-Crisp Green Beans
I keep the ingredient list short and measured so the skillet method is reliable. Below are tested amounts that make a glossy lemon-garlic sauce and perfectly cooked beans every time.

Proteins and produce
- 1.5 lb chicken thighs (skin-on preferred; bone-in or boneless both work)
- 1 lb fresh green beans, trimmed (fresh stays tender-crisp; canned are too soft)
Lemon-garlic sauce and fats
- 3 tablespoons butter, divided (or 3 Tbsp olive oil)
- 4 garlic cloves, minced
- ½ cup chicken stock
- Juice of ½ lemon
Seasonings & garnishes
- Salt and fresh-cracked black pepper, to taste
- 1 tsp paprika, 1 tsp onion powder, ¼ tsp red pepper flakes (optional)
- Optional: Italian herbs or a splash of hot sauce like Sriracha
- Chopped parsley and lemon wedges to finish
| Item | Amount | Note |
|---|---|---|
| Chicken thighs | 1.5 lb | Skin-on for crisp skin |
| Green beans | 1 lb | Trim and rinse |
| Butter / oil | 3 Tbsp | Divide for sear and sauce |
Kitchen Tools and Prep Tips That Make This Skillet Recipe Foolproof
Good gear and mise en place are the secret to fast, reliable skillet cooking. I rely on a 12-inch cast iron or a large stainless pan because each builds fond that a nonstick pan cannot.
My prep is simple: I pat the protein dry, trim the green beans, and mince the garlic. I portion butter or olive oil into a small bowl and keep a plate handy to rest the meat.
Quick green bean pre-cook options
Choose one pre-cook route so the final sauté is quick and the beans stay bright.
- Microwave: 8–10 minutes with 1/2 cup water, then drain.
- Boil: about 10 minutes in boiling water, then drain and shock if you like.
| Method | Time (minutes) | Result |
|---|---|---|
| Microwave | 8–10 | Tender, bright green |
| Boil | ~10 | Evenly cooked, quick sauté finish |
| Final sauté | 3–5 | Tender-crisp, glossy |
Preheat the pan, then adjust the heat so the skin browns steadily without burning the fond. This way I control time and get crisp edges while keeping the beans fresh.
How I Cook Pan-Seared Chicken Thighs with Green Beans
I focus on timing and heat so the meat sears perfectly while the beans stay bright and tender-crisp.
Seasoning for bold, savory flavor
I mix paprika, onion powder, salt, and pepper, then rub it evenly over each piece. Even seasoning means every bite is savory, not bland.
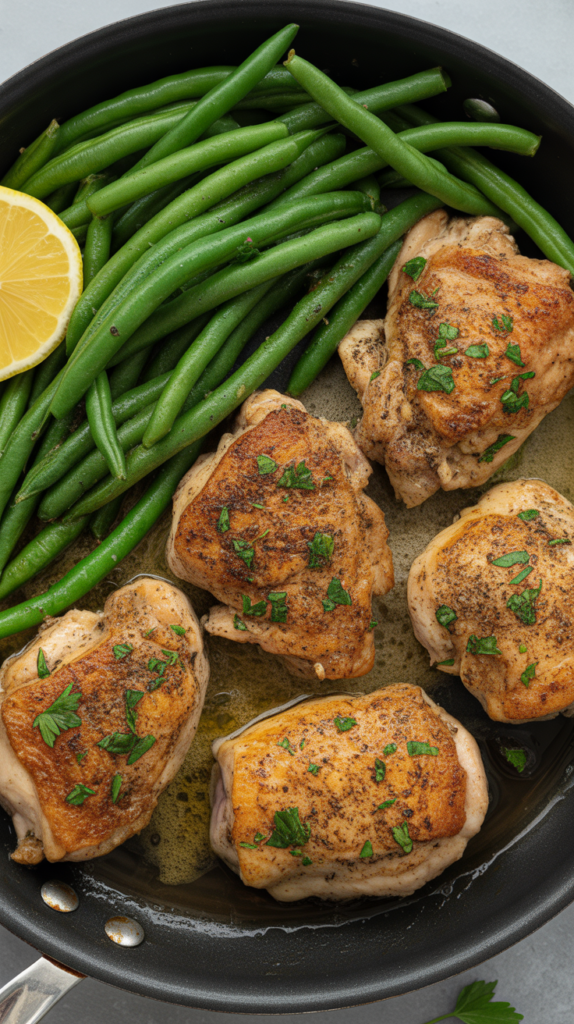
How I place and sear in the skillet
I heat the skillet until hot, then place the meat skin-side down in a single layer. Leave it untouched until the crust releases and turns golden—about 5–6 minutes per side, adjusting for thickness.
Cook to an internal temp of 165°F. Rest the pieces briefly on a plate so juices redistribute before the next step.
Finishing the beans and sauce
I add pre-cooked green beans to the same pan so they soak up the drippings, sautéing 4–5 minutes with garlic and parsley on lower heat. Watch the garlic so it turns fragrant but doesn’t burn.
Deglaze and finish
I pour in 1/2 cup chicken stock and the juice of 1/2 lemon, scraping browned bits to build a quick sauce. I return the pieces to the skillet to reheat and soak up the sauce, then finish with cracked pepper and a squeeze of lemon before serving.
| Step | Minutes | Result |
|---|---|---|
| Sear | 5–6 per side | Golden-crisp crust |
| Beans sauté | 4–5 | Tender-crisp, bright |
| Deglaze & finish | 2–3 | Glossy pan sauce |
My Best Tips for Crispy Skin, Juicy Thighs, and Perfect Heat Control
A few simple tricks make the skin crisp, the meat juicy, and the pan sauce worth savoring. I focus on contact, steady heat, and timing so each element finishes together and tastes balanced.
Skin strategy and contact
I pat the pieces very dry and start skin-side down. Press each piece briefly so the skin makes full contact with the pan.
Don’t move the meat too soon; give the crust time to release in one clean bit. That patience is the key to crispy skin and great flavor.
Temperature targets and cues
I cook over medium to medium-low; if the pan smokes or spices darken fast, I lower the heat. My target internal temp is 165°F and I watch for clear juices and meat that feels firm but springy.
Garlic, fat management, and deglazing
I add garlic only after lowering the heat and once the beans are in the pan so it smells fragrant, not burned. If rendered fat builds up, I spoon some off so the sauce stays glossy instead of greasy.
For a quick sauce I deglaze slowly with stock and a splash of lemon, scraping the browned bits. Let it bubble briefly to concentrate flavor, then finish with cracked pepper and a little butter if you want richness.
| Issue | Heat cue | Quick action |
|---|---|---|
| Skin browning too fast | Pan smoking or spices dark | Lower heat 1–2 notches; move to cooler burner if needed |
| Too much rendered fat | Pool of fat around pieces | Spoon off excess before deglazing |
| Garlic burning | Sharp bitter smell | Take pan off heat, add garlic later at low heat |
| Sauce thin or bland | Little fond left | Reduce liquid briefly and scrape brown bits for flavor |
Easy Swaps, Add-Ins, and Serving Ideas for a Complete Meal
A few smart swaps stretch this one-pan method into many different dinners. I keep the core technique and tweak fats, protein, and sides to suit the night.
I use butter for a richer, classic lemon-garlic sauce. Olive oil keeps the dish lighter and makes weeknight cooking easier. Either fat helps build fond and delivers bold flavor.
Using chicken breasts and other cuts
If I swap in chicken breasts, I watch time closely. Boneless breasts cook faster; pull them off at 160°F and let rest so they stay juicy. Bone-in pieces need a few extra minutes but use the same skillet method.
Simple serving ideas
- Keep it light: a crisp salad makes a fresh side.
- Comfort night: roasted or mashed potatoes soak up extra sauce.
- Grain bowls: rice or quinoa turn this into a full meal.
- Pasta option: toss noodles into the pan for a saucy finish.
| Swap | Result | Best for |
|---|---|---|
| Butter | Richer sauce, glossy finish | Comfort dinner |
| Olive oil | Lighter, brighter flavor | Weeknight meal |
| Breasts (boneless) | Faster cook, needs careful rest | Quick cooking |
| Extra seasoning | Italian herbs or red pepper flakes add heat | Flavor variations |
Keep add-ins minimal: extra garlic, a pinch of Italian seasoning, or a dash of hot sauce changes the heat and flavor without complicating the pan. These tweaks make the recipe repeatable and flexible for busy nights.
How I Store and Reheat Leftovers for Meal Prep Without Drying Out the Chicken
Leftovers are an asset—done right they make the next few days effortless. I portion the meat and green beans into airtight containers for easy meal prep, spooning a little sauce over the top to protect the protein and keep the beans moist.
I refrigerate containers up to 3 days. Keep lids tight so the beans don’t dry out and the sauce stays glossy.
For reheating I prefer a gentle stovetop method: warm a skillet over low heat, add a small bit of water or stock, cover, and heat until just warmed through. For busy days I use the microwave in short bursts of 30–45 seconds, stirring between bursts so the chicken heats evenly and doesn’t overcook.
Finish leftovers with fresh pepper, a squeeze of lemon, or a pinch of parsley to brighten the sauce. This recipe’s quick cook time and strong flavors make it ideal for stress-free meal prep.