
This post contains affiliate links. I may earn a commission if you purchase through them at no extra cost to you.
I love a one-dish comfort meal that also works for meal prep. This version is extra rich and intentionally packed with protein while skipping starchy fillers.
In this post I give a complete, no-guesswork recipe with exact ingredients, precise measurements, and clear bake-time cues. I walk you through each step so you can cook with confidence.
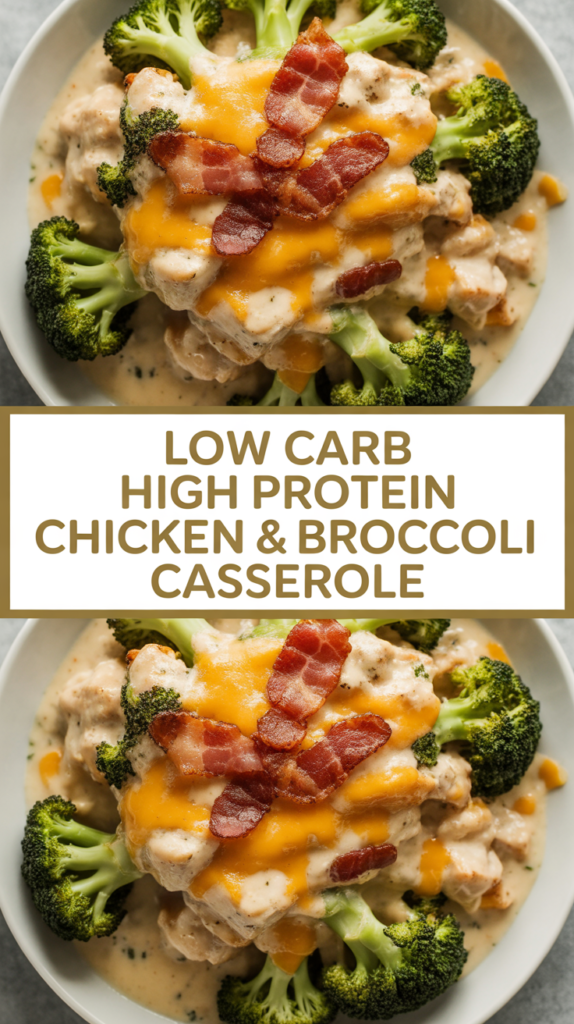
The taste? Cheesy and satisfying, with tender florets, a smoky crispy bacon finish, and a silky sauce that hugs every bite. It feels like classic comfort food but without rice or pasta.
I make a pan on Sunday, portion it into airtight containers, and the leftovers keep well for 3–4 days. This casserole handles weeknight dinner and grab-and-go lunches with zero fuss.
My extra-creamy, protein-packed comfort casserole for easy meal prep
For easy meal prep that doesn’t skimp on comfort, I rely on this savory oven dish. It stays rich and satisfying thanks to a soft cheese and heavy cream base, plus a thick layer of melted cheddar on top.

Why it still feels like comfort food
The cream cheese + heavy cream base creates a silky sauce that clings to each bite. Generous cheese and a crisped bacon finish give the familiar, indulgent payoff you expect from classic recipes that use rice or pasta.
Who this bake is perfect for
I make it for busy weeknights, meal prep days, or when someone at the table follows a keto plan. It’s family-friendly and doesn’t taste like a “diet” dish.
Flavor and texture snapshot
- Juicy cooked chicken pieces for savory hits.
- Tender, bright florets that add fiber and about 3g net carbs per cup.
- Bubbly cheese with crunchy bacon on top for contrast.
| Macro | Role | Notes |
|---|---|---|
| Protein | Keeps you full | Lean meat + cheese |
| Fat | Rich mouthfeel | Cream and cheddar |
| Carbs | Kept low | Veg adds fiber and net count |
What you’ll need for a high protein keto casserole
Start by lining up the tools and ingredients so prep feels fast and tidy. I give an exact ingredient list and precise measurements below, not vague estimates, so your bake turns out the same every time.

Exact ingredients and precise measurements
I promise a full ingredient list with clear grams, cups, and ounces. That way you can shop, measure, and move straight to assembly without guessing.
Recommended baking dish size and basic kitchen tools
I recommend an 11×17-inch baking dish. That size helps the filling bake evenly and fits my covered-then-uncovered method at 400°F in the oven.
- Large mixing bowl for combining filling
- Large skillet and a saucepan for the sauce
- Steamer basket or pot for blanching florets
- Cutting board and a sharp knife
- Measuring cups and spoons, foil for covering
| Task | Tool | Typical minutes |
|---|---|---|
| Prep (chop, steam, mix) | Bowl, board, steamer | 20 minutes |
| Baking (covered then uncovered) | 11×17-inch dish, oven | 25–30 minutes |
| Resting and cool | Counter | 10 minutes |
This list keeps meal prep streamlined. If you want to print or save the recipe, everything below is laid out so you can repeat the dish without extra thinking.
Exact ingredients for the creamy cheese sauce and casserole filling
Here are the exact amounts I use for the sauce and filling, down to teaspoons and ounces. I group items so shopping and prep stay fast. The measurements assume an 11×17 baking dish that feeds 6–8.
casserole filling
- Cooked diced chicken breast — 3 cups (about 12 oz cooked, diced). Use rotisserie or meal-prepped poultry for speed.
- Fresh broccoli florets — 4 cups (about 16 oz; cut florets to even bite-size pieces)
- Cooked bacon pieces — 8 slices, crumbled (reserve half for topping)
creamy cheese sauce
- Cream cheese — 8 oz (softened)
- Heavy cream — 1 cup
- Shredded cheddar cheese — 2 cups (8 oz), plus 1/2 cup for topping
- Garlic powder — 1 tsp
- Onion powder — 1 tsp
- Salt — 1/2 tsp
- Black pepper — 1/4 tsp
Notes: cream cheese gives body while heavy cream thins the sauce for pourability. Combine everything into one cohesive mixture that bakes until thick and bubbly, coating each chicken broccoli bite.
| Ingredient | Amount | Role |
|---|---|---|
| Cooked diced chicken breast | 3 cups (12 oz) | Protein, even bites |
| Fresh broccoli florets | 4 cups (16 oz) | Fiber, texture |
| Cream cheese + heavy cream | 8 oz + 1 cup | Body and pourable sauce |
| Shredded cheddar + bacon | 2 cups + 8 slices | Gooey melt + smoky crunch |
How I prep broccoli so it stays bright and tender (not watery)
Bright, firm florets are the secret to a sliceable, non-soggy bake. I aim for pieces that are vivid and just crisp-tender because they will soften more in the oven. That keeps the finished dish clean to portion for meal prep.
Light steaming vs. quick blanching
Option one: steam for about 6 minutes over boiling water. Stop when the florets turn vibrant green and yield slightly to a fork. Option two: plunge into boiling water for 2–3 minutes, then move immediately to an ice bath to halt the cooking.
How to drain and cool to prevent a runny bake
Draining matters. I shake florets gently in a colander, then spread them on a sheet pan so residual steam escapes. For blanched pieces, the ice bath cools quickly and locks texture.
- Thaw frozen broccoli fully and press in a towel to remove extra moisture.
- Use a colander and gentle shake to remove trapped water.
- Spread florets on a sheet pan to release steam before mixing into the filling.
| Method | Typical minutes | Cooling |
|---|---|---|
| Steaming | 6 minutes | Sheet pan to cool |
| Blanching | 2–3 minutes | Ice bath then drain |
| Frozen broccoli | Thaw fully | Press dry, then air cool |
Proper prep stops hot steam from thinning the sauce. When I take these steps, the florets stay bright and help the bake slice and reheat well.
How I make the ultra-creamy cheese sauce
I walk you through a foolproof method to turn soft cheese and cream into a glossy, pourable sauce. This step is where the dish earns its silky texture, so I stay patient and gentle.
Softening and melting cream cheese smoothly
I always bring the cream cheese to room temperature first. If I’m short on time, I nuke it in 10-second bursts until pliable.
I melt it over low heat in a small saucepan, stirring constantly with a silicone spatula. That steady motion prevents lumps and keeps the texture even.
Adding heavy cream for a pourable consistency
Once the cream cheese is glossy, I add heavy cream slowly—about a quarter cup at a time—while whisking. This gradual addition keeps the sauce from breaking.
I use 1 cup total and stop when the sauce coats a spoon but still pours. The target is thick enough to cling, loose enough to spread across the dish.
Seasoning the sauce for a savory finish
I finish with garlic powder (1 tsp), onion powder (1 tsp), 1/2 tsp salt, and 1/4 tsp black pepper. I taste and adjust before assembling because this is the one chance to balance flavor.
Keep heat moderate throughout. If the pan gets too hot, the dairy can seize. Gentle warmth and constant stirring keep the sauce silky and stable.
- Soften cream cheese first for lump-free melting.
- Whisk in heavy cream slowly for a glossy finish.
- Season deliberately and taste before pouring over the bake.
| Step | Typical time | Goal |
|---|---|---|
| Soften cream cheese | 2–3 minutes | Pliable, no cold chunks |
| Melt and whisk | 3–5 minutes | Uniform, lump-free base |
| Add cream & season | 2–3 minutes | Glossy, pourable, well-seasoned |
How I assemble Low Carb High Protein Creamy Chicken & Broccoli Casserole
A tidy assembly makes the difference between a runny pan and a firm, sliceable dish. I take a moment to spread the filling so each bite is balanced and the bake cooks evenly.
Evenly combining chicken and broccoli in the baking dish
I tip the diced chicken and blanched florets into a large bowl and fold them together. Then I transfer the mixture to my 11×17 dish and pat it into an even layer so every serving has the same protein and veg balance.
Pouring the sauce over the top for full coverage
I pour the sauce slowly across the surface, moving from one side to the other. Then I nudge the filling gently with a spatula so sauce sinks into gaps instead of pooling only on top.
Finishing with shredded cheddar and bacon pieces
- Sprinkle shredded cheddar evenly to form a uniform cheese crust.
- Scatter most bacon pieces under the cheese, and reserve some for the very top to stay crisp.
- A final light press ensures good contact between cheese, sauce, and the filling.
| Step | Why it matters | Quick cue |
|---|---|---|
| Even layer | Consistent bake | Flat, uniform surface |
| Slow pour | Full coverage | Sauce sinks into gaps |
| Top with cheddar & bacon | Golden crust, smoky crunch | Cheese covers, bacon on top |
Baking until bubbly and golden
Getting the timing right in the oven makes the difference between a saucy pan and a neat slice. I want a hot, bubbling sauce and a lightly browned top without drying the filling. Below are the exact cues and minutes I use so you can replicate the finish.
Oven temperature and bake-time cues
I set my oven to 400°F. I cover the dish and bake for 30 minutes so the center heats through and the sauce gets hot and bubbly.
Then I uncover and bake another 8–12 minutes until the cheese melts and the top shows golden spots. Look for edges bubbling and a steady rise of steam—that signals the right internal temperature.
Resting so it sets, not runs
After removing from the oven, I rest the dish about 10 minutes. The sauce firms as it cools, making clean portions easy to scoop and reducing runniness.
Note: if your ingredients started warm or cold, the required minutes will shift. Rely on bubbling and golden color—don’t depend on clock time alone.
| Step | Temperature | Typical minutes |
|---|---|---|
| Covered bake | 400°F | 30 minutes |
| Uncovered brown | 400°F | 8–12 minutes |
| Rest | off heat | 10 minutes |
Quick note: serving size and calories vary by brands and how you portion. Use the visual cues above so each slice has a hot, cheesy center and a crisp top every time.
Meal prep, storage, and reheating tips for best texture
When I turn this bake into weekly lunches, a clear routine saves time and flavor.
I cool the pan on the counter for about 10 minutes, then slice into even portions. I pack each portion in an airtight container so the sauce and cheese stay protected and the dish keeps its shape.
How I portion for grab-and-go lunches
I aim for consistent sizes so calorie math and reheating are predictable. Cold slices go straight into containers and into the fridge within two hours of baking.
Fridge timeline and best containers
Store in sealed, food-grade containers for 3–4 days to keep flavors clean and the texture stable. Avoid shallow lids that let the top dry out.
Freezer-friendly tips
Cool completely, wrap portions tightly, or use freezer-safe meal containers. Thaw overnight in the fridge for best results. If you used frozen broccoli, press extra moisture out before freezing to prevent a watery sauce.
Reheating methods that keep it rich
- Microwave individual portions, stir halfway, heat until hot (about 2–4 minutes depending on wattage).
- Oven: cover and reheat at 350°F for 12–18 minutes until warmed through.
- Skillet: low heat with a splash of water, stirring to restore creaminess.
If the sauce tightens, add a small splash of heavy cream and stir—this brings back a glossy finish. This is a reliable recipe I print and save because it holds up well for meal prep.
| Storage | Container | Time |
|---|---|---|
| Fridge | Airtight, food-grade | 3–4 days |
| Freezer | Freezer-safe wrap or container | 2–3 months |
| Reheat – Microwave | Covered container | 2–4 minutes (stir once) |
| Reheat – Oven | Covered baking dish | 350°F for 12–18 minutes |
Your next cozy, low-carb dinner staple (and a great make-ahead win)
This recipe is why I reach for a one-pan bake when I want comfort without fuss. It fits keto life and still feels indulgent, so weekday dinners and weekend meal prep both win.
You can assemble the chicken broccoli filling a day ahead and pop the covered dish into the fridge. If you bake it straight from cold, add a few extra minutes so the center heats through and the sauce bubbles up.
The eating experience is exactly what I aim for: tender broccoli, juicy chicken bites, a rich cheese sauce, and crisp bacon on top. It’s a full meal, not a side—perfect for portions, calories you can track, and quick work lunches.
Give it a try: bake, portion into servings, and keep a few in the fridge. That simple routine is where this broccoli casserole shines for my week.