This post contains affiliate links. I may earn a commission if you purchase through them at no extra cost to you.
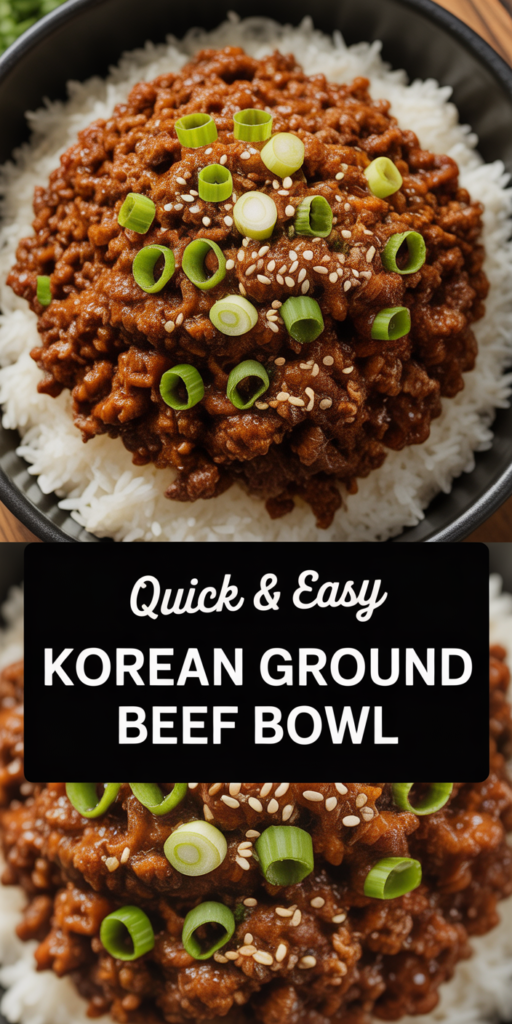
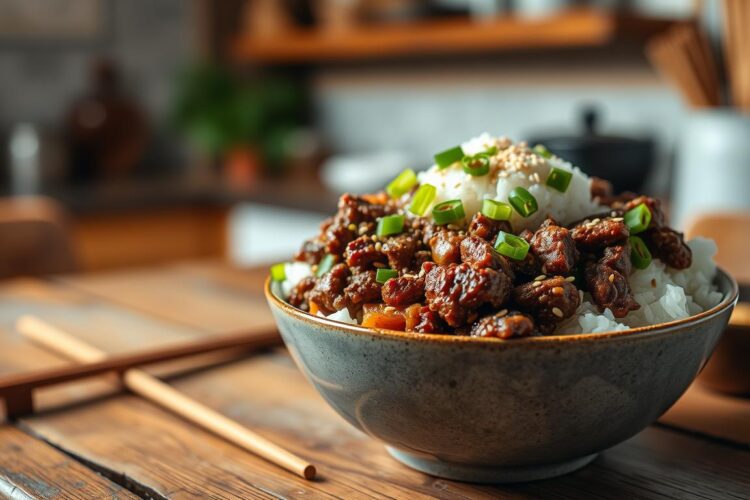
I love a quick, budget-friendly meal that tastes like takeout. This glossy, sweet-and-savory beef served over hot white rice gets a sprinkle of green onions and sesame seeds for contrast.
This is a true weeknight dinner that lands on the table in about 15-20 minutes. You need one skillet and a simple whisked sauce to get that bulgogi-style flavor without thin steaks or long marinating.
The sauce is about umami from soy, warmth from garlic and ginger, and sweetness from brown sugar or honey. I sometimes add red pepper flakes for a little heat.
This recipe works for solo meals, family nights, or meal prep. The cooked mixture stores well, so I make it once and eat it for days. Later I give exact ingredient measures and clear steps so the sauce comes out thick, glossy, and clingy—not watery.
Why I Make This Korean-Inspired Beef Bowl on Busy Weeknights
I make this dish when evenings are tight and I still want bold, takeout-like flavor. The sauce—soy, garlic, and ginger—does the work, so the finished plate tastes restaurant-level without a lot of fuss.

Fast “bulgogi-style” flavor without thinly sliced meat
Bulgogi usually relies on thinly sliced cuts and long marinades, but I swap in ground for speed. Crumbled meat browns quickly and soaks up sauce in just a few minutes, giving a glossy, clingy finish.
Budget-friendly dinner that still tastes restaurant-level
Using ground beef keeps costs down while delivering big flavor. The crumbled texture increases surface area, so more sauce sticks to each bite and the overall dish feels elevated.
Perfect for meal prep lunches and easy dinners in minutes
I often double the batch for easy lunches. Portion rice and the sauced mixture into containers for grab-and-go meals. The method is forgiving, reliable, and ready in about 15–20 minutes—ideal for weeknight rotation.
- No marinating means less hands-on time.
- The sauce transforms simple ingredients into rich, umami-packed bowls.
- Optional add-ins let me change the vibe across the week.
Korean Ground Beef Bowl: Sweet, Savory, Glossy Beef Over White Rice
A quick whisked sauce is my shortcut to a shiny, savory dinner that feels special without fuss.
The signature sauce is a simple mix of soy sauce, a sweetener, and aromatics—garlic and ginger—that I whisk and simmer until it thickens. It clings to the meat, creating that glossy finish I described earlier.

The soy-garlic-ginger sauce that makes the beef shine
The sauce brings umami and salt from soy, rounded by brown sugar or honey for sweetness. Garlic and ginger add a bright backbone so each bite tastes layered and bold.
Balancing umami, sweetness, and optional heat
I keep the plate savory-first and lightly sweet. If I want more heat, I sprinkle red pepper flakes so the spice reads as an accent, not a takeover.
Fresh contrast from green onions and sesame seeds
Fresh chopped onions cut the richness, while white sesame seeds add a nutty crunch. I spoon the glossy beef over fluffy white rice so the sauce soaks in slightly but still shines.
- Glossy means the sauce simmers until it thickens and coats each piece.
- The finish always gets a splash of sesame oil for aroma.
- This base is adaptable—more veggies or different grains work—but the sticky sauce stays the star.
Ingredients With Exact Measurements
Exact ingredient amounts keep the sauce glossy and consistent every time. Below I list what I use for the sauce, the cooked meat, and simple serving items so you can cook without guesswork.
For the soy-garlic-ginger sauce
- 1/4 cup low-sodium soy sauce (or tamari)
- 1/4 cup packed brown sugar (or 3 tablespoons honey)
- 1 tablespoon rice vinegar
- 1 tablespoon freshly grated ginger
- 3 cloves garlic, minced
- 1/2 teaspoon red pepper flakes (optional)
- 2 teaspoons sesame oil, plus 1 teaspoon to finish (optional)
For the beef and the bowl
- 1 pound ground beef (lean if preferred)
- 1 tablespoon neutral oil for the skillet
- Salt and pepper, only if the beef is very lean
- 4 cups cooked white rice (about 2 cups dry)
- 2 green onions, thinly sliced
- 1 tablespoon white sesame seeds
Optional add-ins for heat and brightness
- Extra rice vinegar to finish (to taste)
- More red pepper flakes for heat
- Quick-pickle for cucumbers or carrots: 2 tbsp rice vinegar + 2 tbsp water + 1/2 tsp sugar + 1/2 tsp salt
| Component | Amount | Role | Substitution |
|---|---|---|---|
| Soy sauce | 1/4 cup | Umami and salt | Tamari for gluten-free |
| Brown sugar / Honey | 1/4 cup / 3 tbsp | Sweetness, glossy finish | Honey swaps refined sugar |
| Ground beef | 1 lb | Meat base, soaks sauce | Ground turkey or chicken |
| White rice | 4 cups cooked | Classic base for serving | Quinoa or noodles |
Kitchen Tools I Use (One Pan, Minimal Cleanup)
I prefer a single skillet and a few simple tools so cleanup is quick and stress-free. This keeps the focus on fast cooking and a glossy sauce instead of a sink full of dishes.
My essentials are a large skillet, a spatula or wooden spoon for breaking up the ground, a small bowl and whisk for the sauce, plus measuring cups and spoons. A wide pan browns meat faster because more surface area touches the hot metal, cutting cook time and boosting flavor.
Skillet tips for quick browning and managing fat
Spread the ground in an even layer and let it sit for 30–45 seconds before stirring. That pause helps searing, so the meat browns instead of steaming.
If the pan yields a lot of fat, drain most of it so the sauce stays glossy, not oily. Use medium-high heat for browning, then lower to a quick simmer after you add the sauce so the mix reduces in a few minutes.
| Tool | Purpose | Quick Tip |
|---|---|---|
| Large skillet (cast iron works) | Efficient browning and even heat | Use a wide pan to reduce cook time |
| Spatula / wooden spoon | Break up and move ground | Let meat sit briefly to develop color |
| Small bowl & whisk | Mix sauce evenly | Whisk before adding to hot pan for smooth gloss |
How I Make Korean Ground Beef in One Skillet
My go-to is a one-skillet method that turns pantry staples into a glossy, savory meal. I set up the sauce first so flavor is even from the first stir.
Whisk together the sauce for even flavor
In a small bowl I whisk together soy sauce, brown sugar (or honey), rice vinegar, grated ginger, and red pepper flakes if I want heat. Whisk together until the sugar dissolves so the sauce is smooth and ready to hit the pan.
Brown the beef, add garlic, then simmer until glossy
I heat a large skillet over medium-high, add a teaspoon of oil if the pan is dry, then add the ground beef. I brown the meat for 3–5 minutes, breaking it into small crumbs.
After draining excess fat, I stir in minced garlic briefly so it becomes fragrant but not burned. Then I pour in the sauce and simmer for about 2 minutes until the liquid reduces and turns glossy.
Finish with sesame oil for aroma
Off the heat, I stir in a small drizzle of sesame oil for a toasted finish. I taste and adjust — more soy sauce for salt, another pinch of brown sugar for sweetness, or extra red pepper flakes for heat.
- Start with the sauce mixed for even coverage.
- Brown meat quickly, drain fat so the sauce clings.
- Simmer briefly to achieve a sticky, glossy finish.
| Action | Time | Quick Tip |
|---|---|---|
| Brown beef | 3–5 minutes | Let it sit briefly to sear for more flavor |
| Simmer with sauce | 2 minutes | Reduce until the sauce clings to the meat |
| Finish with oil | 30 seconds | Stir in sesame oil off heat for best aroma |
How to Assemble the Bowl for the Best Bite
Assembly matters: rice that’s hot and fluffy makes the sauce sing in every mouthful.
Fluffy cooked white rice as the classic base
I start with a bed of steaming white rice. Fresh-cooked rice gives the softest texture and soaks just enough sauce.
Leftover rice works, too — it reheats quickly and still pairs well with warm beef for simple weeknight meals.
Garnishes: chopped green onions and white sesame seeds
I finish each bowl with chopped green onions for brightness and a sprinkle of white sesame seeds for nutty crunch. These toppings change every bite.
Optional quick-pickled crunch with rice vinegar
While the beef browns, I toss sliced cucumber or shredded carrots with rice vinegar, a little sugar, water, and salt. It takes two minutes and adds crisp contrast.
For a final lift, a tiny splash of vinegar right before serving brightens the whole dish.
- Ideal ratio: a warm bed of rice, then a generous scoop of glossy beef so the sauce lightly coats the grains.
- Build individual bowls for dinner or portion into containers for grab-and-go lunches.
| Component | Role | When to add | Notes |
|---|---|---|---|
| White rice | Base that soaks sauce | Plated first | Fresh-cooked best; leftovers reheat well |
| Glossy beef | Main flavor and sauce | Plopped over rice | Generous scoop so sauce coats rice |
| Pickles & toppings | Brightness and crunch | Added last | Green onions, sesame seeds, quick-pickles |
Ingredient Notes and Smart Substitutions
A few simple ingredient swaps keep this sauce balanced and weeknight-proof. I focus on swaps that preserve the glossy, sweet-savory finish so the dish still feels like takeout at home.
Soy sauce vs. tamari for gluten-free needs
I use low-sodium soy sauce to avoid oversalting. For a gluten-free swap, I switch to tamari at the same measurements and get nearly identical umami without extra salt.
Brown sugar vs. honey for sweetness
Brown sugar gives a caramel note and helps the sauce glaze the meat. Honey is smoother and slightly floral; use the same amount or reduce by 1 teaspoon if very sweet is a concern.
Fresh ginger vs. ground ginger
Fresh ginger is best for bright bite. In a pinch, swap 1 tablespoon fresh for 1/4 teaspoon ground ginger. The ground form keeps the aromatic profile when fresh isn’t available.
Controlling heat with red pepper flakes
I start with 1/4 to 1/2 teaspoon red pepper flakes and taste after simmering. Add more at the end if you want extra heat. Fresh minced garlic gives a sharper savory kick; pre-minced jarred garlic works when I’m rushed.
| Ingredient | Swap | Notes |
|---|---|---|
| Soy sauce | Tamari | Use same amount; low-sodium soy keeps salt balanced |
| Brown sugar | Honey | Brown sugar = caramel note; honey = smoother, reduce slightly if needed |
| Fresh ginger | Ground ginger | 1 tbsp fresh = 1/4 tsp ground; fresh gives brighter flavor |
| Red pepper flakes | Extra flakes or chili oil | Start 1/4–1/2 teaspoon; finish to adjust heat |
Easy Variations to Keep These Beef Bowls on Repeat
To keep this recipe fresh, I change one element each week so dinners never feel repetitive. The sauce stays the same, but the protein, veggies, and base can rotate to suit time and appetite.
Swap the protein
I switch to ground turkey or ground chicken when I want a lighter meat option. Both cook similarly to the original and soak up the sauce well.
Watch for dryness: reduce simmer time slightly with turkey or chicken so the dish stays juicy.
Add veggies
Veggies keep the plate bright and add texture. I toss in quick-pickled cucumbers, shredded carrots, or steamed broccoli for crunch and balance.
Baby spinach stirred in at the end wilts fast and adds color without extra cooking time.
Change the base
Rice is classic, but quinoa adds protein, cauliflower rice cuts carbs, and noodles turn it into a stir-fry-style meal. Each base shifts the bowl’s vibe while the sauce remains constant.
- I set up a simple toppings bar for family dinners—mild options for kids, extra heat and crunch for adults.
- For meal prep, I cook one batch of the sauced meat and rotate bases and toppings through the week.
| Swap | How it changes the dish | Quick tip |
|---|---|---|
| Ground turkey / chicken | Lighter meat, less fat | Don’t over-reduce sauce; cook slightly less time |
| Quinoa | Boosts protein; nutty texture | Rinse well; use 2:1 water to quinoa |
| Cauliflower rice / noodles | Lighter or more filling, depending on choice | Steam cauliflower briefly; cook noodles al dente |
| Pickles & toppings | Adds brightness and crunch | Keep toppings separate for meal-prep flexibility |
Meal Prep and Storage Tips for Korean Beef Bowls
My favorite prep trick is to separate rice and meat so textures stay right. That keeps the rice fluffy and the sauced mixture glossy when you reheat later.
How I portion rice and beef into containers
I pack warm rice on the bottom and spoon the beef mixture on top when I want an assembled meal. For meal-prep, I store toppings like green onions and pickles in a separate container so they stay crisp.
Fridge time and best texture for leftovers
Store in an airtight container in the fridge up to 4 days. The flavors often improve after a day, but keeping rice and sauce separate prevents soggy grains.
Freezer-friendly tips for the beef mixture
I freeze only the sauced mixture, not the fresh toppings, for up to 3 months. Thaw overnight in the fridge before reheating for best texture.
Reheating without drying out the sauce
Reheat gently on the stove over medium-low or use short microwave bursts. Add a splash of water (or a teaspoon of broth) to loosen the sauce and keep the mixture glossy—about 60–90 seconds in the microwave usually does the trick.
- Portion rice and meat separately for flexible meals.
- Use airtight containers to extend fridge life and lock flavor.
- Freeze only the sauced mixture; thaw in the fridge overnight.
| Item | Storage | Best practice |
|---|---|---|
| Sauced mixture | Fridge: 4 days, Freezer: 3 months | Cool, then seal in a container; thaw overnight |
| Cooked rice | Fridge: 3–4 days | Store separate to avoid soak-through |
| Toppings | Fridge: 3–5 days | Keep separate in small containers for crunch |
This make-ahead approach saves time and keeps each serving saucy and satisfying. It’s one of my go-to meal-prep recipes for busy weeks.
Make Tonight’s Korean Ground Beef Bowl and Let the Sauce Do the Work
Make tonight easy: one skillet, a whisked sauce, and a satisfying meal in under 20 minutes. I rely on the sauce to turn simple ground beef into a takeout-style dinner that feels special.
The payoff is clear: glossy, sweet-savory beef spooned over hot rice, finished with a drizzle of sesame oil, chopped green onions, and a scatter of sesame seeds for crunch.
Keep it flexible—mild or spicy, served on rice or noodles, or bulked up with quick veggies. It’s perfect for meal prep too; I often double the batch so lunches are handled for days.
Ready to cook? Gather your ingredients, whisk the sauce, brown the meat, and build your bowl. Fast, budget-friendly, and seriously satisfying.