
This post contains affiliate links. I may earn a commission if you purchase through them at no extra cost to you.
I love a fast cheesecake fix after dinner, and this is mine: an easy, no-fuss, no-bake low carb dessert that comes together in minutes. It gives the creamy filling vibe of a full cake without the oven or long chill time.
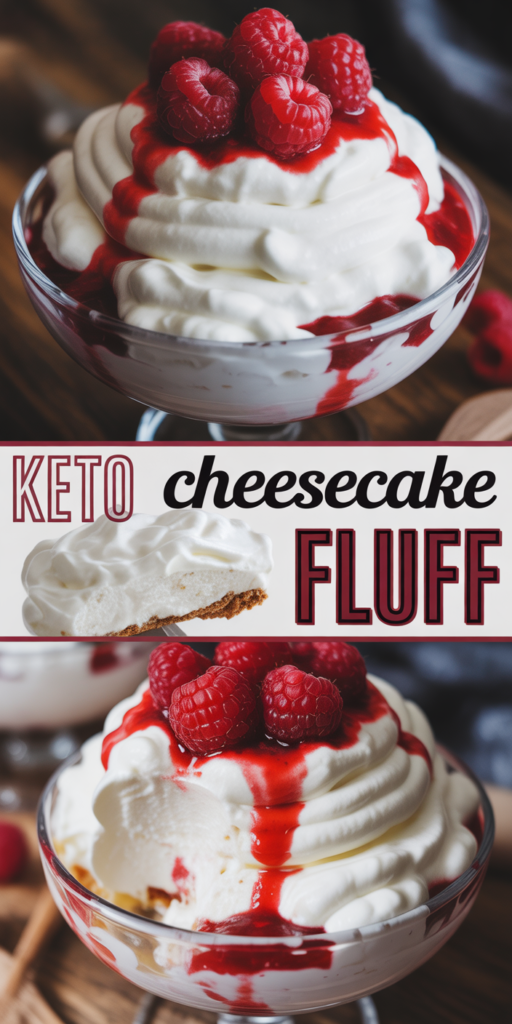
In my kitchen, cheesecake fluff means whipped cream cheese and heavy cream beaten into a mousse-like texture. The result tastes like cheesecake filling but served in jars or bowls, no crust needed.
The core is a 5-minute, 3-ingredient base—cream cheese, heavy whipping cream, and powdered sweetener—with optional vanilla. I’ll share exact ingredients with measurements and a step-by-step method so you won’t guess.
Technique matters: whip the cream separately, then fold it into the cheese mixture to keep the texture light. I also show a raspberry-topped finish and an optional sugar-free sauce for contrast. This is perfect to portion into jars for grab-and-go treats during the week.
Why I Make This No-Bake Low Carb Cheesecake Fluff on Busy Nights
When weekdays run long, I need a dessert that comes together in minutes and still feels like a treat. I’m not turning on the oven after dinner, and this no-bake, low carb option is ready in about five minutes with pantry staples I always keep.
The texture is what sells it: light and mousse-like, yet rich and creamy like classic cheesecake filling without a crust. That balance makes each serving feel indulgent but simple.

I often portion this into small jars for meal prep. A few jars in the fridge mean dessert is solved for a few days, and guests still get that special feeling even if it was whipped up last minute.
- Quick prep: 5–10 minutes using basic ingredients.
- Scales easily: I usually make four servings but I can double it for family.
- Low carbs: a reliable option when cravings hit, without overpromising numbers.
Ingredients I Use for the Best Keto Cheesecake Fluff
I keep a short shopping list so this dessert comes together fast and stays silky. Below are the items I always use and why each matters to texture and flavor.

Softened cream cheese
The cream cheese must be truly softened (30–60 minutes at room temperature). When it’s soft, I beat it smooth and skip the lumps that ruin the mouthfeel.
Cold heavy whipping cream
Cold heavy cream whips up faster and holds stiff peaks. Those peaks are the reason the mousse is airy but still rich.
Powdered erythritol or monk fruit sweetener
I use powdered sweetener so there’s no gritty finish. Powdered erythritol or powdered monk fruit blends evenly into the cheese base.
Vanilla extract and optional lemon
A splash of vanilla extract gives that classic flavor. A tiny squeeze of lemon and a pinch of salt brighten the filling without making it lemony.
Toppings: fresh raspberries and optional sugar-free sauce
Fresh raspberries add tart contrast. I save a sugar free raspberry sauce for a restaurant-style finish when I want extra color and flavor.
- All ingredients are easy to find in the U.S. and repeat often in low-carb recipes.
| Ingredient | Role | Tip |
|---|---|---|
| Cream cheese | Base | Soften fully |
| Heavy cream | Structure | Keep chilled |
| Powdered sweetener | Sweetness | Use powdered form |
| Raspberries | Topping | Add just before serving |
Exact Ingredients and Measurements
Below is the exact shopping and pantry list I use so the recipe is easy to print and prep. These amounts make about four small servings and keep the texture light and creamy.
Cream cheese mixture
• 8 oz full‑fat cream cheese, softened.
• 1/2 cup powdered erythritol or powdered monk fruit sweetener (for no gritty sugar finish).
• 1 teaspoon vanilla extract (optional).
Whipped cream component
• 1 cup cold heavy whipping cream (about 8 oz by weight), whipped to stiff peaks in a separate bowl.
Toppings and optional add‑ons
• 1/2 to 1 cup fresh raspberries, depending on how berry‑heavy I’m feeling.
• Optional: sugar‑free raspberry sauce to drizzle before serving.
• Optional add‑ons: pinch of salt and 1 teaspoon lemon juice for brightness.
- I keep the list scannable so you can print the recipe and shop quickly.
- Nutrition note: calories, fat, protein and net carbs vary by brand and sweetener—plug your exact brands into a calculator if you track carbs closely.
| Ingredient | Amount | Role | Note |
|---|---|---|---|
| Cream cheese | 8 oz | Base | Soften 30–60 minutes |
| Powdered sweetener | 1/2 cup | Sweetness | Use powdered form to avoid grit |
| Heavy whipping cream | 1 cup (8 oz) | Structure | Whip in separate bowl to stiff peaks |
| Raspberries | 1/2–1 cup | Topping | Add just before serving |
Kitchen Tools I Reach For (So It’s Done Fast)
The right gear shaves minutes off prep and keeps texture consistent. I set my station so the recipe stays quick and calm.
I favor an electric hand mixer or a stand mixer because they get cream to stiff peaks fast and make the cream cheese silky smooth. Whisking by hand works, but it takes longer and tires your arm.
Before I start, I lay out two mixing bowls, the mixer, a spatula, and a piping bag if I want a pretty finish. The two-bowl approach matters: whip the cream in one bowl and beat the cheese in the other to protect the airiness.
Piping into jars with a star tip turns a simple dessert into a gift-ready version without extra effort. This setup supports vanilla, lemon, or chocolate variations while keeping total time low.
| Tool | Why I Use It | Quick Tip |
|---|---|---|
| Electric mixer | Fast peaks and smooth base | Use medium-high speed |
| Hand whisk | Good backup, more effort | Expect extra minutes of whisking |
| Two bowls | Protects whipped cream structure | Whip separately, then fold |
| Piping bag | Gives a polished serving look | Use a star tip for texture |
How I Make Keto Cheesecake Fluff Step by Step
Here’s the step-by-step routine I use to turn simple ingredients into a silky dessert fast. Keep two bowls ready so the whipped cream stays airy and the mixture stays smooth.
Soften and beat the cream cheese
Leave the cream cheese out 30–60 minutes so it’s soft all the way through. Beat it with powdered sweetener until totally smooth, then whip another 30–60 seconds until it looks light and mousse-like.
Whip the cream separately
Chill the heavy cream and whip it in a clean bowl to stiff peaks. Stiff whipped cream is the backbone of this cheesecake mousse.
Fold, taste, chill, and serve
- Stir one third of the whipped cream into the cream cheese to loosen the mixture.
- Gently fold in the remaining whipped cream in two additions to keep air in the mousse.
- Taste and add vanilla extract or extra sweetener if needed.
- Chill 20–30 minutes (up to 2 hours) for a firmer net texture, then portion into bowls or jars.
- Top with fresh raspberries and an optional sugar-free raspberry sauce just before serving.
| Step | Time | Common issue |
|---|---|---|
| Soften cream cheese | 30–60 minutes | Too cold = lumpy base |
| Beat with sweetener | 1–2 minutes | Under-mixed = grainy texture |
| Whip heavy cream | 2–4 minutes | Under-whipped = flat mousse |
| Fold & chill | 20–30 minutes | Over-mixing = deflated mousse |
Troubleshooting: if the texture is flat, the usual culprits are under-whipped cream, cream cheese that’s still cold in the center, or over-mixing after folding. Fixes are simple: chill, re-whip a small amount of cream, or start again with softened cream cheese.
What It Tastes Like: Light, Fluffy Cheesecake Flavor With Berry Contrast
The first spoonful is what sold me: light as a mousse but unmistakably cheesecake in flavor. It feels like the silky filling of a classic cake without the weight of a crust.
Rich and creamy elements from the cream and cream cheese give that satisfying, indulgent mouthfeel. The whipped cream keeps the texture airy, so each bite reads more like a cloud than a dense slice.
Rich and creamy, but still airy like mousse
The fat in the cream and cheese delivers real dessert satisfaction even with fewer carbs. Vanilla ties the profile together and the cheese adds a gentle tang that stops the sweetness from going flat.
Why raspberries make the flavor pop
Bright, tart raspberries cut through the richness and refresh the palate. That contrast makes each mouthful taste cleaner and more craveable than a straight creamy spoonful.
Powdered sweetener blends in smoothly, so texture stays silky rather than grainy. If you’re new to low‑carb desserts, this one tastes like the real thing—just lighter, quicker, and very easy to love.
Easy Variations and Toppings I Use to Change It Up
Once you master the base, swapping flavors takes only a minute or two. I keep the same no-bake method and fold in add-ins gently so the mousse stays airy. Below are my favorite, low-carb ways to shift the profile without extra fuss.
Chocolate swirl or sugar-free chocolate chips
I drizzle a sugar-free chocolate sauce and swirl it lightly at the end. A sprinkle of sugar-free chocolate chips on top gives crunch and chocolate punch without deflating the mixture.
Lemon zest for a brighter vibe
A teaspoon of lemon zest or a squeeze of lemon juice lifts the whole bowl. That bright note makes the cheesecake flavor feel fresher and less heavy.
Nuts or toasted coconut for crunch
Chopped almonds, pecans, or toasted coconut add texture. I toast coconut until golden and scatter it on top just before serving so it stays crisp.
Peanut butter twist
For a nutty version, I fold in one or two tablespoons of natural peanut butter at the end. It mixes in easily and keeps the dessert low carb while tasting indulgent.
More berry options beyond raspberries
Blueberries, blackberries, or sliced strawberries work great. I always add fresh fruit right before serving so it stays bright and doesn’t leak juice into the mousse.
- Keep folding gentle to protect air and texture.
- Add heavier mix-ins last and only a little at a time.
- Raspberry remains my go-to for tart contrast, but other berries are easy swaps.
| Add-in | How I Add It | Why I Like It |
|---|---|---|
| Chocolate chips | Sprinkle on top | Sweet crunch, no overmixing |
| Lemon zest | Fold 1 tsp into base | Brightens flavor |
| Toasted nuts | Top before serving | Adds texture contrast |
How I Store Keto Cheesecake Mousse (Fridge and Freezer Notes)
Storing the mousse right makes weekday servings simple and keeps the texture true. I portion mine into airtight jars or covered bowls so the fridge smell doesn’t creep in and each serving stays fresh.
How long it lasts and best containers
I find the mousse keeps best about 4–5 days in the fridge when sealed tightly. Some kitchens stretch it to 6–7 days, but I use five as my safe window.
For tracking net carbs and calories per serving, I store in individual jars. That also makes grab‑and‑go servings effortless.
Why I add berries right before serving
I never add raspberries or other fruit before storage. Berries release juice and can make the mixture watery.
Adding fruit just before serving keeps the cream cheese and cream texture bright and prevents soggy desserts.
Freezing guidance and what it does to texture
You can freeze the mousse up to about 3 months, but the texture changes. Once thawed it loses some air and won’t be as fluffy.
I prefer to eat it semi‑frozen like a frozen cheesecake treat. If it softens in the fridge, a gentle stir will bring it back without knocking out all the air. Avoid aggressive mixing.
- Store: airtight containers or sealed jars in the fridge.
- Fridge life: about 4–5 days; keep covered.
- Freezer: up to 3 months; best eaten semi‑frozen.
| Storage | Time | Tip |
|---|---|---|
| Fridge | 4–5 days | Individual jars for tracking serving size and calories |
| Short chill before serving | 20–30 minutes | Add berries just before plating |
| Freezer | Up to 3 months | Enjoy semi‑frozen; texture will be denser after thaw |
Make It Tonight and Keep a Little Extra in the Fridge
Make this tonight—no planning, no oven, just a short list and five easy minutes at the counter. I use a single mixer, two bowls, softened cream, and powdered sweetener for a silky result that feels like a quick cheesecake treat.
The method is repeatable: whip the cream to stiff peaks, beat the cheese smooth with the sweetener, fold gently, then portion. Chill 20–30 minutes if you want a firmer texture, or serve right away.
Double the batch to keep low‑carb servings in the fridge. Pipe for a fancy version or spoon into jars for grab‑and‑go. Top with fresh raspberries and an optional sugar‑free sauce to make the flavor pop. Print and save this recipe—once you have the base down, it becomes a go‑to dessert version for guests and meal prep.