
This post contains affiliate links. I may earn a commission if you purchase through them at no extra cost to you.
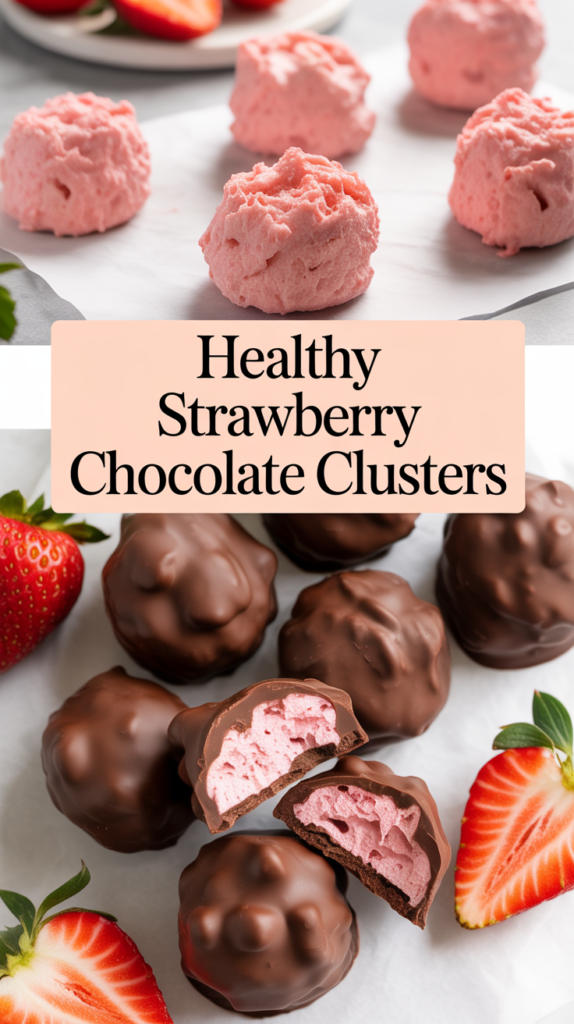
I love a no-bake dessert that feels like ice cream but lives in the freezer. These Healthy Strawberry Chocolate Clusters are viral-style frozen yogurt bites made with fresh berries and thick Greek yogurt, dipped in melted dark chocolate for a crisp snap.
This recipe is built for easy make-ahead snacks and quick after-dinner sweets. I give exact measurements and step-by-step instructions so you won’t see vague notes like “a little.” The workflow is simple: mix, scoop, freeze, melt chocolate, dip, and freeze again.
The contrast is the hook — a creamy, fruity center with a glossy, crisp chocolate shell. I keep a tray in my freezer and grab a cluster whenever I want a naturally sweet treat without turning on the oven.
This piece is informational and recipe-focused, perfect for anyone searching this exact dessert and wanting clear, reliable steps to recreate it at home.
Why I Keep These No-Bake Yogurt Clusters in My Freezer
I keep a tray of frozen yogurt bites in my freezer so I always have an easy sweet fix. These no-bake yogurt clusters feel like a smarter treat when I want something quick and satisfying.

A naturally sweet, viral-style treat for healthy snacking
The appeal is simple: minimal ingredients, zero baking, and a look that feels impressive. Ripe berries add most of the sweetness, so I only add a touch of honey if the yogurt needs it. The result is a low-sugar bite that still satisfies a dessert craving.
Meal prep dessert vibes with a creamy center and crisp chocolate shell
I freeze a full tray and grab individual portions all week. Each bite has a creamy strawberry yogurt center and a glossy chocolate strawberry coating that snaps when you bite it. They work great for hot days because they eat like tiny frozen yogurt pops.
Practical storage note
These are meant to live in the freezer. Let them sit at room temperature and they soften fast and get messy. Keep them frozen and serve quickly for the best texture and flavor.
Healthy Strawberry Chocolate Clusters: Ingredients With Exact Measurements
Here’s the precise shopping list and measurements I follow so you can measure once and get consistent results. Grouped items match how I build the bites: fruit, creamy base, sweeteners, coating, and toppings.

Fruit base
- 2 cups fresh strawberries, washed, dried, hulled, and finely chopped
Creamy “mousse-like” base options
- 1 cup thick plain Greek yogurt (preferred) OR 1 cup coconut cream for dairy-free
Natural sweetness and flavor boosters
- 1/2 teaspoon vanilla extract
- Optional: 1 tablespoon honey OR 1 tablespoon maple syrup, if berries aren’t very ripe
Chocolate coating for a glossy snap
- 1 1/2 cups dark chocolate chips (or chopped dark chocolate baking bars measured to 1 1/2 cups)
- 1 tablespoon coconut oil to thin the melted chocolate
Optional toppings for that sweet-salty finish
- Flaky sea salt, a small pinch per cluster right after dipping
Notes: flavored yogurt adds sugar, while dark chocolate keeps the overall sugar lower. Use refined coconut oil if you want minimal coconut flavor. These exact amounts make about 24 bite-size pieces depending on scoop size.
Ingredient Notes for the Best Strawberry Yogurt Texture
Getting the yogurt mixture to freeze firm begins at the ingredient stage. I choose components that control moisture and give a scoopable, creamy center.
Why fresh fruit matters and a frozen fallback
I prefer fresh strawberries because they hold shape and don’t pour water into the yogurt. When I must use frozen berries, I thaw just until I can chop, then blot them dry so the bites don’t get runny.
Thick yogurt vs coconut cream
By “thick yogurt” I mean spoonable, full-fat Greek yogurt that keeps mounds intact on parchment. Greek yogurt gives tang and extra protein, which helps texture and freeze-firmness.
- Greek yogurt: tangy frozen yogurt flavor, more protein, firmer set.
- Coconut cream: richer, mousse-like center for a dairy-free option.
Sweetener choices and fixes for a loose mixture
If berries are ripe or the yogurt is vanilla or lightly sweetened, I skip extra sweetener to keep sugar down. I use honey for a floral note or maple syrup as a vegan-friendly swap when I want smooth blending.
When the mixture looks thin, I chill it briefly or stir in a small scoop of protein powder (optional). That simple step helps the frozen yogurt hold its shape and dip cleanly.
Kitchen Tools I Use (Baking Sheet + Parchment Paper Setup)
My setup is tiny but reliable so the whole no-bake process stays clean and fast. I line a baking sheet with parchment paper, mix in a bowl, portion with a scoop, freeze, then dip. It takes minutes and minimal cleanup.
Simple equipment list for mess-free bites
- One baking sheet lined with parchment paper — the key to easy release.
- Medium mixing bowl and a sturdy spoon or spatula for folding the fruit into the yogurt.
- Small knife and cutting board to finely chop berries so each bite has even pockets of fruit.
- Cookie scoop or tablespoon measure to portion consistently for quick dipping.
- A microwave-safe bowl and a small whisk or spoon for smooth melted coating.
- Two forks for the fork-dip method so excess coating can drip back into the bowl.
| Tool | Purpose | Quick Tip |
|---|---|---|
| Baking sheet | Freeze portions flat | Choose a sheet that fits flat in your freezer to avoid misshapen pieces |
| Parchment paper | Prevent sticking and ease removal | Use full-sheet coverage so edges lift cleanly |
| Mixing bowl | Combine yogurt and fruit | Chill briefly if mixture seems loose |
| Cookie scoop | Portion evenly | Smaller scoops freeze faster and are easier to dip |
How I Make the Strawberry Yogurt Mixture
The trick is small, even pieces of fruit folded into thick yogurt so each spoonful holds flavor. I keep the steps simple and the texture firm before I scoop and freeze.
Finely chopping fruit for even “juicy pockets”
I wash, dry, hull, and finely chop 2 cups of strawberries so bits are small and even. Small pieces spread flavor without releasing too much juice into the mixture.
Mixing bowl method for a thick, scoopable mix
In a mixing bowl I stir together 1 cup Greek yogurt (or coconut cream), the chopped strawberries, and 1/2 teaspoon vanilla. If the berries are dull, I add 1 tablespoon honey or maple syrup and taste as I go.
Consistency check before you scoop
The mixture should mound on a spoon and not pour. Watery fruit or thin yogurt makes flat puddles in the tray—avoid that.
- Optional: add a small scoop of protein powder to thicken; whisk until smooth.
- Chill briefly if the mix seems loose, then use a 1-tablespoon scoop for even portions.
- Quick checkpoint: the filling should hold shape when dropped on parchment.
| Ingredient | Amount | Purpose |
|---|---|---|
| Chopped strawberries | 2 cups | Juicy pockets and natural sweetness |
| Greek yogurt | 1 cup | Thick base for scoopable texture |
| Vanilla | 1/2 teaspoon | Flavor boost |
| Honey or maple syrup | 1 tablespoon (optional) | Adjust sweetness without overdoing sugar |
Shaping the Clusters and Freezing Until Firm
Sculpting each bite into a rustic mound makes assembly fast and forgiving. I focus on portion and spacing so the dip stage goes smoothly.
Scooping portion sizes that are easy to dip
I use a 2–3 tablespoon scoop per cluster. That size feels like a small dessert but is still easy to handle when dipping.
Spacing clusters on parchment so they freeze cleanly
Drop each scoop onto a parchment paper–lined baking sheet. Leave at least one inch between pieces so they freeze as separate bites.
Freezer timing for a solid center (and what “firm” means)
Freeze the sheet at least 60 minutes; 90–120 minutes is safer if your freezer runs warm or your scoops are large. “Firm” means the center is solid to the touch and lifts cleanly with no smearing on the parchment.
- Portion with a scoop and drop onto the sheet.
- Space evenly and slide the sheet flat into the freezer.
- Freeze for the required minutes until firm, then store or dip.
Meal-prep note: you can freeze overnight and dip later. Pull only a few from the freezer at a time to keep the rest solid while you work.
Melting Dark Chocolate + Coconut Oil for a Smooth Coating
Melting the coating right sets every bite—glossy, thin shells start with technique, not luck.
I choose dark chocolate for a not-too-sweet balance and a crisp snap once frozen. Baking bars usually melt the glossiest, but chocolate chips work well when chopped or paired with a little oil.
Chocolate chips vs baking bars
- Baking bars: melt smoother and give a glossier finish.
- Chocolate chips: convenient, melt fine if stirred and slightly warmed.
Microwave method to melt chocolate safely
In a microwave-safe bowl I combine 1 1/2 cups dark chocolate chips (or chopped baking bar) with 1 tablespoon coconut oil.
Heat in 30-second bursts, stir well between each. Let the bowl rest about 1 minute after a burst so residual heat finishes the melt without overheating.
Thinning, preventing seizing, and quick fixes
That 1 tablespoon of coconut oil thins the mixture, helps prevent seizing, and yields a snappy shell when set. If the melted chocolate begins to thicken while you work, reheat for 10–15 seconds and stir until fluid again.
| Choice | Pros | Tip |
|---|---|---|
| Baking bar | Glossier melt | Chop evenly for quick, even melting |
| Chocolate chips | Easy and available | Stir often; add small oil if too thick |
| Coconut oil | Thins and adds shine | Use 1 tbsp per 1 1/2 cups chocolate |
Dipping Frozen Yogurt Clusters Without Cracking or Clumping
A fast, steady rhythm at the dipping station makes the difference between a snap and a mess. Work one piece at a time and keep the rest in the freezer so they stay rock solid.
Work fast so the coating sets smoothly
Because the centers are frozen, the melted chocolate sets almost instantly on contact. I dip quickly and return each piece to the baking sheet on parchment paper.
Fork-dip technique for full coverage
I use two forks. I lower a frozen piece into the bowl, spoon melted chocolate over it, then lift and tap the forks to let excess drip back.
- Dip one at a time; keep others frozen.
- Aim for a thin, even layer to avoid clumping.
- Don’t double-dip unless you want extra coating.
- Sprinkle flaky sea salt immediately while the coating is wet.
Drizzle option for less sugar
For a lighter treat, skip full coating and drizzle melted chocolate across the tops. That uses less chocolate and cuts sugar while keeping the look polished.
| Step | Why | Timing |
|---|---|---|
| Dip with forks | Clean edges | Minutes |
| Return to sheet | Keep shape | Freeze quickly |
| Reheat if thick | Restores smoothness | 10–15 seconds |
Chill Again, Then Serve: The Texture You’re Going For
A final freeze is the step that brings the whole bite together. I return the dipped pieces to the tray and slide them back into the freezer so the coating locks in and the center stays scoopable.
What the finished bites taste and feel like
The interior is creamy and fruity, very much like frozen yogurt. Each mouthful has a soft, tangy center that contrasts with a glossy, crisp chocolate snap.
Best time to eat: straight from the freezer vs a short thaw
After dipping I freeze the tray for about 15–20 minutes until the shell looks matte and feels hard to the touch. That visual cue means the coating is fully set and not tacky.
For maximum crunch, eat straight from the freezer. If the pieces are too firm, let them sit at room temperature for 10–15 minutes to soften. A short thaw yields a mousse-like center that’s easier to bite while keeping some snap.
I treat them as a flexible snack or a light dessert. I pull only what I plan to eat so the rest stay perfect in the freezer.
| Action | Timing | Result |
|---|---|---|
| Freeze after dipping | 15–20 minutes | Chocolate sets hard and matte |
| Eat straight from freezer | Immediate | Maximum crunch, firm center |
| Short thaw | 10–15 minutes | Softer, mousse-like frozen yogurt center |
Storing Strawberry Chocolate Clusters for Easy Healthy Treats All Week
Proper freezing preserves the creamy center and crisp shell so each bite feels freshly made. Once the coating is fully set, I transfer the pieces into an airtight container and keep it in the freezer to prevent odors and freezer burn.
I layer parchment paper between rows to stop sticking and protect the chocolate. If I make a big batch, I use a baking sheet to freeze single-layer first, then move them to the container for long-term storage.
These yogurt clusters last up to about 1 month in the freezer. They soften quickly at room temperature, so I pull one or two at a time for a grab-and-go routine that keeps the rest firm.
This recipe scales easily—double the ingredients and follow the same storage rules. Stored this way, the clusters stay creamy-fruity inside and snappy-chocolate outside whenever I want a quick treat.