
This post contains affiliate links. I may earn a commission if you purchase through them at no extra cost to you.
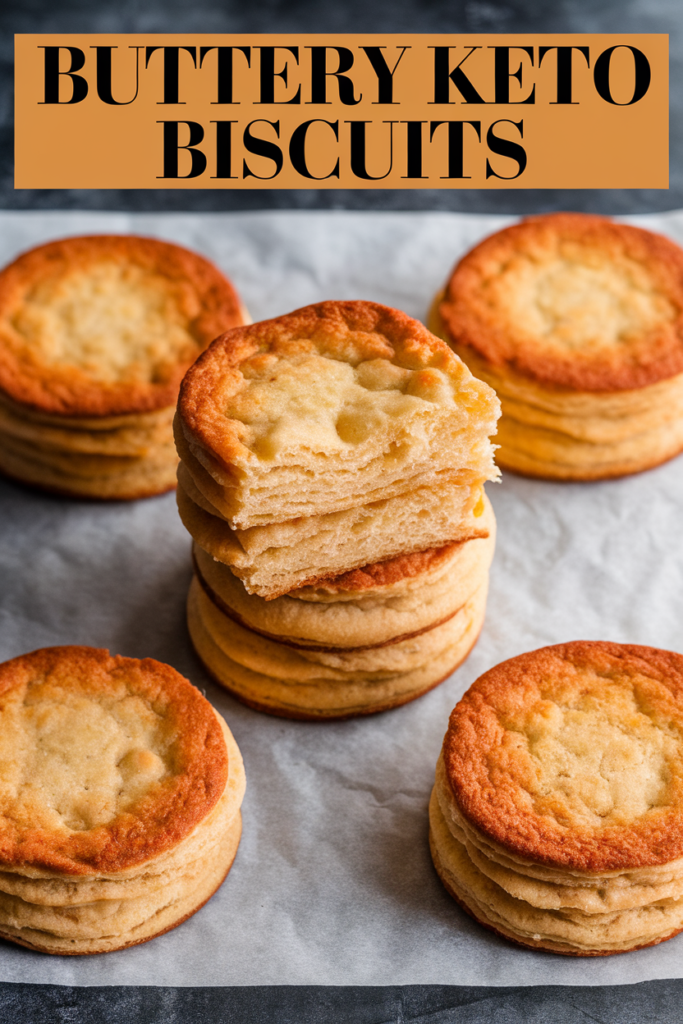
I crave a warm, buttery biscuit but still want to stay keto, so I made this fast, low-carb recipe that skips wheat flour and sugar. In about 20 minutes you get golden-brown tops, flaky layers, and a soft interior with a lightly crisp exterior.
I use almond flour to keep the texture tender while cutting carbs, and a touch of real butter for that fresh-from-the-oven aroma. The method is simple and beginner-friendly, no fancy techniques required.
These biscuits work great for quick breakfast sandwiches, easy savory sides at dinner, or batch meal prep. You can also add cheese or a garlic butter finish for a more savory bite.
Why I Make These Buttery Keto Biscuits on Busy Mornings
On hectic mornings I need something warm, fast, and satisfying that still fits my low-carb routine. These biscuits give me that comfort without wheat flour or added sugar.

Keto-friendly, low-carb, and gluten-free
They are made with almond flour and real butter so I keep carbs low and stay gluten-free. The recipe keeps me in ketosis while tasting like classic baking.
Flaky tops and soft centers
The texture is the point: flaky layers, a soft center, and a lightly crisp exterior. These are never dry or dense like diet versions.
Fast, versatile for meals
I can boost protein with egg whites (I use a brand like Bob Evans Egg Whites) when I want a lighter breakfast. I also switch flavors — cinnamon and nutmeg for holidays or garlic, dill, and chives for savory sides.
- Ready in minutes and great for meal prep.
- Makes quick breakfast sandwiches or a side for dinner.
- Bakes up reliably, so I can make a batch once and eat all week.
| Use | When | Benefit |
|---|---|---|
| Breakfast sandwich | Weekdays | Quick, high-protein start |
| Side for soup | Evenings | Savory flavor boost |
| Meal prep | Weekend | Reheats well, saves time |
What You’ll Need for Quick Low-Carb Baking
A pared-down pantry and one bowl are all I need to make a fast low-carb baking project. This short list gets you started without a special shopping trip.
Ingredients you probably already have in your keto kitchen
Core items: almond flour, baking powder, salt, eggs, and butter. I count on almond as my wheat-flour swap to keep texture tender.
Most households that follow low-carb eating keep these staples. A single measuring cup set helps me measure accurately so the dough behaves in the oven.

Recommended tools for easy mixing and shaping
- One medium mixing bowl and a sturdy spoon or spatula for a true one-bowl method.
- A baking sheet lined with parchment paper so nothing sticks and cleanup is fast.
- A flat pan or cookie scoop for even rounds, plus a measuring cup for consistent portions.
| Item | Why it helps | Tip |
|---|---|---|
| Almond flour | Tender texture without wheat | Measure gently to avoid dense dough |
| Bowl & spoon | Mix wet and dry in one place | Less washing, faster mornings |
| Baking sheet + paper | Even bake and easy release | Line sheet before you preheat |
Exact Ingredients and Measurements
Below is the exact ingredient list I use so you can measure once and bake with confidence. This keeps the texture light and predictable and avoids wheat flour or added sugar.
Dry ingredients
- 1 cup almond flour
- 1/2 teaspoon baking powder
- 1/4 teaspoon sea salt
Accurate measuring helps the biscuits lift instead of turning dense. Spoon almond flour into the cup and level it for best results.
Wet ingredients
- 2 large eggs
- 3 tablespoons melted butter
- Optional: 1 tablespoon cream or sour cream for extra moisture
Eggs and melted butter create structure and rich flavor. If dough seems dry, add the cream spoonful to keep the interior tender.
Optional add-ins and variations
- Cheesy path: 1/2 cup shredded cheddar cheese for a savory, tender interior.
- Savory seasonings: 1/2 teaspoon garlic powder and 1/2 teaspoon mixed herbs (parsley, chives, dill).
- Holiday twist: 1/2 teaspoon cinnamon + 1/4 teaspoon nutmeg for a warm, cozy note.
| Item | Measure | Why |
|---|---|---|
| Almond flour | 1 cup | Tender, low-carb flour substitute |
| Baking powder | 1/2 teaspoon | Gives lift without wheat |
| Butter | 3 tablespoons | Rich flavor and flaky layers |
Use these precise ingredients to follow the recipe easily. You’ll avoid guesswork and get consistent baking results every time.
Ingredient Notes So Your Biscuits Bake Up Flaky, Not Flat
Getting the mix right—especially the flour and cheese—keeps these biscuits puffed and tender. A few ingredient choices make a big difference to texture and flavor.
Almond flour tips and where I buy it
Almond flour behaves unlike wheat flour. Measure gently by spooning into the cup and leveling. Brands vary, so use one you trust for consistent results.
I buy almond at Costco or in the regular flour aisle at big U.S. grocery stores. That saves time when I need to restock fast.
Cheddar choice matters
Freshly grated, off-the-block cheddar cheese (I like Tillamook) melts better and helps biscuits keep shape. Pre-shredded cheese often has anti-caking agents that can change melt and flatten the bake.
Butter basics and other small fixes
Use good butter—salted or unsalted depends on your taste. If dough seems too wet, add a tablespoon more almond flour or a splash of cream until scoopable.
- Check baking powder: it must be fresh and mixed evenly to avoid bitter pockets.
- Almond adds a bit of fiber and lowers net carb versus wheat, which keeps this recipe friendly to low-carb plans.
| Item | Best choice | Why |
|---|---|---|
| Almond flour | Fine, blanched | Light texture, reliable lift |
| Cheese | Freshly grated cheddar | Better melt, maintains shape |
| Butter | High-quality salted or unsalted | Warm, bakery-style flavor |
How I Make the Dough in One Bowl
My one-bowl method turns a handful of ingredients into a smooth mixture in under five minutes. This keeps the kitchen tidy and gets you ready for baking fast.
Mix wet ingredients first
I crack the eggs into the bowl and whisk until pale. Then I add melted butter that has cooled slightly so the eggs don’t scramble.
Whisking well gives the mixture lift and helps biscuits bake light instead of heavy.
Combine dry ingredients evenly
I gently sprinkle in almond flour, baking powder, and a teaspoon of salt. I stir just until the dry mix disappears.
This prevents bitter powder pockets and keeps the texture even across each scoop.
What the dough should look like
The dough should be thick, scoopable, and slightly sticky—not runny like batter, nor rock hard. If it feels loose, add a tablespoon more flour.
If it seems dry, add a splash of cream. This step takes minutes and sets you up for flaky, not flat, biscuits.
| Issue | Sign | Fix |
|---|---|---|
| Too loose | Spreads on sheet | Add 1 tbsp almond flour |
| Too dry | Cracks when scooped | Add 1 tsp cream or beaten egg |
| Powder pockets | Bitter bites | Sift or sprinkle dry evenly, stir gently |
Shaping and Baking in About 20 Minutes
A hot oven and a quick shaping trick are what turn this simple dough into flaky, golden-topped biscuits. I preheat oven to 400°F so the baking powder hits fast and the rounds lift instead of spreading.
Why a full preheat matters
Heating the oven fully gives an instant oven spring. That initial blast of heat sets edges and creates flaky layers. For me, a steady 400°F is the sweet spot for lift and color.
Sheet and parchment setup
I line a baking sheet with parchment paper, then set that on a sturdy sheet pan so bottoms bake evenly and cleanup is easy. Using parchment prevents sticking and keeps the pan from over-browning the underside.
Shaping options and portions
Two easy shapes work: drop-style for a rustic look or gently hand-shaped rounds for a neater finish. I portion about 3 tablespoons each so every biscuit bakes in the same time window.
- Drop-style: quick spoon and go; slightly rustic edges.
- Hand-shaped: scoop, press gently into rounds for uniform tops.
- Keep spacing so add-ins like cheese don’t cause extra spreading.
Bake time and doneness cues
Bake minutes are typically 12–14 minutes at 400°F. Look for a golden brown top and set edges. The center should feel springy and the bottom should release cleanly from the parchment.
| Step | Timing | Visual Cue |
|---|---|---|
| Preheat | 5–10 minutes | Oven at 400°F |
| Shape | 2–3 minutes | Even 3-Tbsp portions |
| Bake | 12–14 minutes | Golden brown tops, springy center |
Follow these simple steps and your keto-friendly biscuit batch will come out flaky, buttery, and evenly browned in about 20 minutes. This recipe is forgiving and great for beginners.
Optional Garlic Butter Glaze and Cheesy Biscuit Upgrades
To give these biscuits a restaurant-style finish, I offer two quick, low-carb upgrades: a garlic butter glaze and a cheesy version that folds extra savory into the dough. Both stay gluten-free and keep the recipe easy.
Fast garlic butter glaze with parsley and salt
I melt 2 tablespoons butter, then whisk in 1 teaspoon garlic powder, 1 teaspoon dried parsley, and a pinch of sea salt. Right after the biscuits come from the oven, I brush the warm tops so the butter soaks in.
The glaze adds a lightly crisp, savory finish and boosts flavor so they taste like a bakery side.
Cheddar cheese version for a tender, savory interior
For the cheesy upgrade I fold in 1/2 cup freshly grated cheddar cheese to the dough. The biscuits bake with a crisp outside and a moist, tender cheese-rich center.
I sometimes add 1 tablespoon cream or a teaspoon sour cream as a creamy booster for a softer bite.
| Upgrade | Measure | Effect |
|---|---|---|
| Garlic butter glaze | 2 tablespoons butter, 1 teaspoon garlic powder | Buttery, savory crust |
| Cheddar fold-in | 1/2 cup grated cheddar cheese | Tender, moist interior |
| Creamy booster | 1 tablespoon cream or 1 teaspoon sour cream | Softer, richer texture |
Serving Ideas for Keto Breakfasts and Savory Sides
A fast breakfast or a hearty side—these rounds adapt to both roles with very little fuss. I position them as a low-carb staple that adds real flavor to simple meals.
Breakfast sandwich builds with eggs and protein
I split a warm biscuit, add a fried egg and a protein like bacon, sausage, or ham for an easy, filling start. The layers hold up well, so the filling stays intact and not gummy.
These come together in minutes and are perfect when I need a fast, portable morning meal.
Pairings for chili, soups, and weeknight dinners
I serve biscuits with chili, tomato soup, or a simple stew. The cheesy version pairs especially well with hearty bowls and boosts comfort without extra carbs.
Meal-prep tips to keep texture
I bake once, cool completely, then store in an airtight container so the interior stays soft. For make-ahead keto biscuits, rotate flavors weekly—garlic-herb one week, holiday spice the next—to keep meal prep interesting.
| Use | Why it works | Quick tip |
|---|---|---|
| Breakfast sandwich | Holds egg and protein neatly | Split warm, assemble in minutes |
| Chili side | Adds rich, cheesy contrast | Use cheddar fold-in for extra flavor |
| Make-ahead | Reheats without losing texture | Cool fully, store airtight |
Storage, Freezing, and Reheating Without Drying Them Out
Keeping the golden top and tender middle takes the right storage and reheating steps. I give simple, beginner-friendly directions so your batch tastes fresh through the week.
Short-term storage: room temp vs. fridge
If I’ll eat within 24 hours, I let biscuits cool completely, then seal them in an airtight container at room temp. I tuck in a small piece of paper towel to catch extra moisture and protect the texture.
For 2–4 days, I move them to the fridge. Chilling slows spoilage but can dry edges, so keep the container sealed and avoid stacking warm rounds.
Freezer-friendly make-ahead method
For longer storage, I cool fully, wrap each round in parchment, then place them in a labeled freezer bag. This prevents freezer odor transfer and preserves texture and fiber-rich almond base.
Reheating to restore crisp exterior and soft middle
- From fridge: preheat oven or toaster oven to 350°F; warm for 6–8 time minutes, then 1–2 time minutes at 400°F to crisp the top.
- From frozen: thaw 20–30 time minutes, then follow the fridge method or heat straight from frozen for 12–14 time minutes at 375°F.
These recipes are higher in fat, so I reheat just until warm. Add-ins like cheese or cream keep the interior moist and reheat especially well. Don’t forget to print the ingredient list, steps, and storage notes for easy meal prep.
| When | Storage | Reheat guide |
|---|---|---|
| Same day | Airtight, room temp with paper towel | Oven 6–8 time minutes at 350°F |
| 2–4 days | Refrigerate sealed | Warm 6–8 time minutes, finish 1–2 minutes at 400°F |
| Weeks | Freeze wrapped in paper then bag | Thaw 20–30 time minutes or bake 12–14 time minutes from frozen |
Ready to Pull a Warm Tray From the Oven?
Imagine pulling golden rounds from the oven in about 20 minutes and serving them warm for breakfast. I keep this make keto recipe simple so you can bake fast on real mornings.
The core formula is easy to remember: almond flour, baking powder, eggs, butter, and a pinch of salt. Mix in one bowl, shape on a sheet with parchment paper, then bake until tops are golden.
Pick a direction—classic buttery, cheesy fold-in, garlic butter glaze, or a cozy holiday spice—and the dough stays forgiving. A little cheese or a splash of cream makes the interior extra tender.
Save or print this recipe, preheat the oven, and try a batch today for quick low carb breakfasts or grab-and-go meal prep. No special gear needed—just a bowl, a sheet, parchment paper, and a hot oven.