This post contains affiliate links. I may earn a commission if you purchase through them at no extra cost to you.
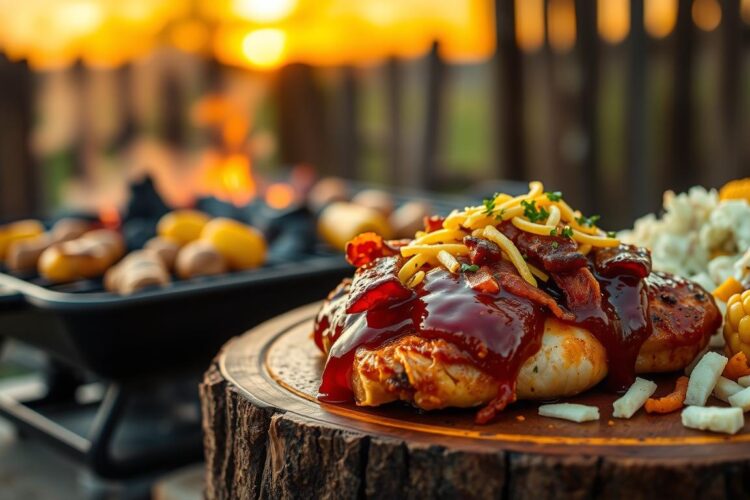
I reach for this bold, smoky plate when I want steakhouse Monterey comfort without leaving home. It’s a protein-packed, weeknight-friendly recipe that hits juicy, salty, and sweet in every bite.
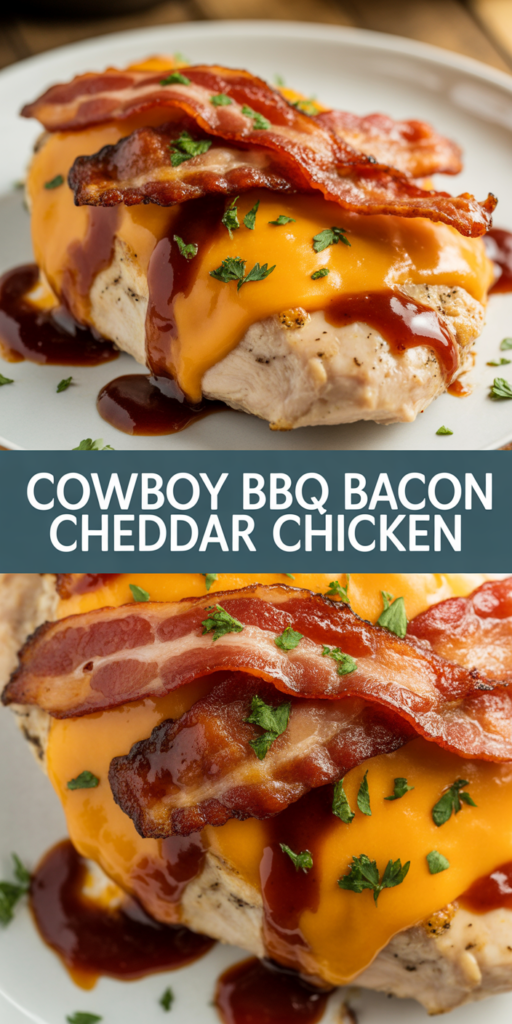
Imagine juicy baked breasts layered with crispy strips, sharp melted cheese, and a sticky-sweet glaze that tastes like a restaurant dish for under $10. I love that it reads like an indulgent plate but comes together with simple steps and pantry staples.
This is for busy weeknights, casual weekend cookouts, and any family craving an easy, restaurant-level dinner. The method is approachable: a two-step finish to keep the meat moist while preventing burnt cheese and soggy toppings.
I’ll show exactly what to buy, how to cook it, and how to check doneness so you nail it every time. Whether you bake it or use a grill-to-oven finish, this one feels like a reliable win.
Why I Make This BBQ Bacon Chicken When I Want Steakhouse Flavor at Home
When I want a steakhouse-style dinner at home, this loaded recipe is my shortcut to bold, familiar flavor.
Think smoky seasoning on the meat, a tangy-sweet glaze that caramelizes, sharp cheddar melted into crisp strips, and pockets of salty crunch. The contrast is what sells it: tender, juicy chicken underneath, bacon that stays crisp, and bubbly cheese on top.

My two-step finish is simple and forgiving. I bake the breasts until about 155°F, then add sauce, bbq bacon, and cheddar for the final few minutes. That stops overcooking, keeps the meat moist, and prevents burnt cheese.
Putting raw strips on too early releases water and fat that can steam the meat. I learned the hard way—raw bacon can make a pan watery and dull the whole dish. This method solves dry breasts, rubbery bacon, and scorched cheese so you get consistent weeknight results.
| Common Problem | What It Does | How Two-Step Fixes It |
|---|---|---|
| Dry breasts | Overbaked meat loses juices | Pull at ~155°F, finish under heat to reach 165°F |
| Rubbery bacon | Steamed by released juices | Cook bacon separately or add late so it stays crisp |
| Burnt cheese | Cheesy top scorches before meat done | Add cheddar near the end to melt without burning |
Quick Snapshot: Time, Difficulty, and What Makes It “Easy Cowboy Chicken”
I like dinners that feel special but finish in under an hour, and this one fits that bill. At a glance you get clear prep and cook minutes so weeknight planning is simple.

Two paths and a simple flow
Choose an oven-first route for reliable, low-effort results or start on the grill to get that grilled BBQ chicken dinner flavor before finishing in the oven. My secret weapon is a thermometer — no guesswork.
- Prep: 10–15 minutes
- Oven quick method: ~20 minutes to 155°F + 8–10 minutes finish (total minutes vary)
- Longer bake option: ~30 minutes + 10–15 minutes after saucing
- Grill-start: sear on the grill, then finish in a 350°F–375°F oven for even cooking
| Step | Minutes (approx.) | When to pick it |
|---|---|---|
| Oven-first | 30–40 minutes | Weeknights, indoor cooking |
| Grill-start | 35–50 minutes | Want smokiness, outdoor cooking |
Thin or pounded breasts cut minutes and help everything finish together. The two-step flow is: season → sear/grill (optional) → bake → top → finish → rest. That’s why I call it easy — common ingredients, minimal tools, and a repeatable temperature target for doneness make this recipe beginner-friendly.
Ingredients for Cowboy BBQ Bacon Cheddar Chicken
I sort the shopping list into three simple buckets so you can grab everything in one trip.
Chicken and seasoning
Use boneless, skinless chicken breasts for even cooking and quick prep. I pound or butterfly them so each piece has the same thickness. That keeps the meat juicy and speeds cook time.
For the rub I use garlic powder, smoked paprika, salt, and pepper. Optional onion powder and a pinch of brown sugar add a steakhouse-style kiss of caramel and depth.
BBQ, bacon, and cheesy toppings
Choose a good barbecue sauce for a sticky glaze. I cook bacon until nearly crisp so it adds crunch without steaming the meat. Use sharp cheddar — it melts well and stands up to smoky, salty flavors better than mild cheese.
Optional add-ons for extra flavor and heat
Add cayenne or sliced jalapeños for heat, or swap in pepper jack for more bite. Finish with green onions or parsley for freshness. For a twist, try diced pineapple or mushrooms to change the texture and flavor.
| Ingredient | Purpose | Swap / Note |
|---|---|---|
| Chicken breasts | Main protein; even thickness = juicy results | Pound or butterfly for uniform cooking |
| BBQ sauce | Sticky, sweet glaze that caramelizes | Use a tangy or smoky bottle to suit taste |
| Bacon | Crunch and smoky saltiness | Cook separately or add late to stay crisp |
| Cheddar | Bold melt that pairs with sauce and bacon | Sharp variety recommended over mild |
Exact ingredient measurements (shopping list)
To make shopping simple, I list exact measurements you can copy into grocery pickup notes. Quantities below serve 4 people and match the method in this recipe.
Core proteins and sauce
- 4 large boneless skinless chicken breasts (6–8 oz each)
- 8 slices bacon (about 2 slices per breast)
- 3/4 cup bbq sauce (use your favorite brand)
Cheese, oil, and seasonings
- 1 1/2 cups shredded sharp cheddar cheese
- 2 tablespoons olive oil
- 1 teaspoon garlic powder
- 1 teaspoon smoked paprika
- 1/2 teaspoon salt
- 1/2 teaspoon black pepper
Finishing garnish
- 2 tablespoons fresh parsley, chopped
| Item | Amount | Note |
|---|---|---|
| Chicken breasts | 4 large | Pound or butterfly for even cooking |
| Bacon | 8 slices | Cook until nearly crisp or add late to keep texture |
| BBQ sauce | 3/4 cup | Use sweet, smoky, or spicy to suit taste |
| Shredded cheddar cheese | 1 1/2 cups | Sharp cheddar recommended for bold flavor |
Tools I Use to Make Cheddar Bacon Chicken Recipe Night Foolproof
A few reliable tools cut out guesswork and keep weeknight cooking calm. I recommend items you can find in any home kitchen so the meal stays approachable.
Thermometer, skillet, and baking dish essentials
My instant-read thermometer is the single best tool I own for this recipe. It tells me exactly when to pull the meat so it stays juicy.
I use a large skillet to cook bacon separately. That step prevents the pan from steaming and keeps the strips crisp.
Other helpful gear
- 9×13 baking dish (or similar) — space pieces so the dish bakes, not steams.
- Cooking spray or a light grease to stop sticking and speed cleanup.
- Basting brush for even sauce layers and a meat mallet to pound breasts evenly.
| Tool | Purpose | Tip |
|---|---|---|
| Instant-read thermometer | Checks doneness | Pull at ~155°F, finish to 165°F |
| Large skillet | Cook bacon separately | Drain fat to avoid steaming the meat |
| 9×13 baking dish | Finish in the oven | Use cooking spray and space pieces evenly |
How I Prep the Chicken for Maximum Juiciness and Even Cooking
Even small prep steps make the biggest difference between dry meat and a juicy, confident dinner. I focus on even thickness, a simple smoky rub, and a short rest so heat moves evenly through the pieces. These steps add almost no extra time but change the result completely.
Pound or butterfly for even thickness
Cover each chicken breast with plastic wrap and gently pound to uniform thickness. Aim for about 3/4 inch so all pieces finish at the same time.
My smoky seasoning blend
Rub each piece with a teaspoon olive oil, then season evenly with garlic powder, smoked paprika, salt, and pepper. I season both sides so the flavor is balanced through the meat.
When to rest before cooking
After seasoning, let the pieces sit at room temperature for about 15 minutes while the oven heats. This short pause helps the internal temperature climb evenly when you start cooking.
| Prep Step | Why It Helps | Target time |
|---|---|---|
| Pound or butterfly | Prevents thin edges from drying and thick centers from undercooking | 5 minutes |
| Oil + rub | Helps season stick and promotes browning | 2 minutes |
| Rest at room temp | Evens internal temperature for predictable cook time | 15 minutes |
Step-by-Step Instructions for Cowboy BBQ Bacon Cheddar Chicken
I’ll guide you through a simple sequence that locks in juiciness and creates a bubbly, caramelized top.
Season the breasts
Pat the breasts dry, rub 1 tsp olive oil over each, then season both sides with garlic powder, smoked paprika, salt, and pepper. Press the rub so it sticks. Let them sit while you heat the pan or grill.
Sear for flavor (skillet or grill)
Heat a skillet over medium-high or preheat the grill. Sear 1–2 minutes per side until golden. This adds deep flavor before the oven stage.
Cook bacon separately
Cook bacon until nearly crisp, drain well, and blot with paper towels. Adding near-crisp strips later prevents the pan from steaming the meat during the bake.
Layer sauce, cheese, and bacon
Brush a thin layer of bbq sauce on each breast just before the first bake. Bake to 155°F, then add another brush of sauce, top with shredded cheese and the drained bacon strips. Apply sauce sparingly to avoid burning.
Finish, rest, and serve
- Bake or broil 6–10 more minutes until the final temp reaches 165°F and the top is melted and bubbly. Use broil 1–2 minutes if you want a quick golden finish.
- Rest 5 minutes before slicing so juices redistribute.
The result is juicy meat topped with crispy bacon, melted cheddar, and a sticky-sweet bbq sauce glaze—true comfort on the plate.
| Step | Temp target | Minutes (approx.) |
|---|---|---|
| Initial bake | Pull at 155°F | 15–25 minutes (depending on thickness) |
| Finish with toppings | Finish to 165°F | 6–10 minutes (+1–2 min broil optional) |
| Rest | Carryover warmth | 5 minutes |
Oven-Baked vs. Grilled: The Best Method for Your BBQ Bacon Chicken
Your weeknight schedule and outdoor setup usually make the call: oven for ease, grill for flavor. I’ll outline both so you can pick the path that fits your kitchen and the time you have.
Oven method at 350°F–375°F for reliable weeknight results
I use the oven when I want steady heat and predictable timing. Set it to 350°F–375°F and space pieces so air circulates. That controlled heat finishes the meat evenly without scorching the top.
Follow the two-stage bake: cook to about 155°F, add sauce, cheese and bacon, then finish to 165°F. This protects moisture and melts toppings cleanly. Expect initial bake time of 15–25 minutes and a final 6–10 minutes depending on thickness.
Grill-start, then oven finish for true grilled BBQ chicken dinner flavor
Start on a hot grill or grill pan for 1–3 minutes per side to get char and smoky notes. Then transfer to the oven to finish gently. The two-step idea still applies—cook most of the way first, then add sauce and toppings near the end.
Grill-start adds depth; oven finish adds control. Either method yields the same loaded BBQ bacon chicken dish with slightly different smoke and texture.
| Method | When to pick it | Typical minutes |
|---|---|---|
| Oven-baked (350°F–375°F) | Weeknights, predictable results | 15–25 + 6–10 |
| Grill-to-oven | Want smoky char, outdoor cooking | 2–6 sear + 12–18 finish |
| Key tip | Use an instant-read thermometer | Pull at 155°F, finish to 165°F |
Serving Ideas That Pair Perfectly with This Smoky, Cheesy Bacon Chicken
A thoughtful mix of hearty and fresh sides makes this meal feel like a full steakhouse dinner at home. I keep options simple so weeknights and cookouts are easy to plan.
Classic steakhouse sides
Creamy mashed potatoes and loaded baked potatoes are my top picks. The soft, buttery potatoes balance the tang of the sauce and the salty, cheesy bacon topping.
Also add corn on the cob or baked beans for sweetness and texture. Coleslaw brings crunch and a cool counterpoint to the rich flavors.
Lighter sides that cut the richness
For a brighter plate, I serve a garden salad or grilled vegetables. Roasted Brussels sprouts or a lemony slaw slice through the richness and help balance sodium.
- Choose one hearty carb (potatoes or sweet potato fries) + one crisp veg for an easy plate.
- Or pick two lighter sides for a fresher, lower-sodium feel at dinner.
| Side Type | Example | Why it works |
|---|---|---|
| Hearty carb | Mashed potatoes, loaded baked potatoes | Soaks up sauce and balances smoky, cheesy bacon flavor |
| Classic BBQ side | Corn on the cob, baked beans, coleslaw | Adds sweetness, crunch, and freshness to the dish |
| Lighter veg | Grilled veggies, garden salad, roasted Brussels sprouts | Brightens the plate and offsets sodium and richness |
Make-Ahead, Storage, and Reheating Without Rubbery Cheese
Prep smart and you can shave a lot of minutes off dinner without losing texture or flavor. Small, separate steps the day before make assembly quick and protect crisp bacon and melty cheese during reheating.
What I prep up to 24 hours ahead
I cook bacon until nearly crisp and cool it on paper towels. I shred the cheese and store it in a sealed bag to keep it fluffy.
I also mix the seasoning and, if I have time, pound and sear the breasts briefly, then refrigerate in an airtight container. That step saves time the next day and keeps ingredients ready.
Storage and reheating for best texture
- Store bacon, cheese, and sauce separately when possible to avoid soggy fat and clumping.
- Leftovers keep well in an airtight container in the fridge for up to 3 days.
- To reheat, preheat the oven to 350°F. Cover the dish with foil and warm for about 12–15 minutes until hot through.
Before the final warm, add a spoon of bbq sauce and a light sprinkle of fresh cheese. This refresh gives a glossy finish and avoids rubbery cheese or limp bacon.
| Step | Why | Time |
|---|---|---|
| Refrigerate components separately | Preserves crisp texture and cheese quality | Up to 24 hours |
| Oven reheat (covered) | Even heat, avoids chewy cheese | 12–15 minutes at 350°F |
| Microwave (last resort) | Fast but softens bacon and makes cheese rubbery | 1–2 minutes, uneven |
Note on nutrition: the recipe includes fat and saturated fat from bacon and cheese, plus sodium from sauce and seasoning. I keep portions moderate and suggest pairing with veggies to balance the plate.
Now It’s Your Turn to Make This Bold Cowboy Chicken Dinner Anytime
If you want bold, protein-forward comfort that tastes like a night out, try this tonight. Pick the oven-first path for ease or grill-to-oven for smoky char—the steps stay the same and stay simple.
Two quick success tips: use an instant-read thermometer so you don’t overcook, and rest the meat five minutes before slicing so it stays juicy. Finish with a light bbq drizzle, a sprinkle of chopped onions and parsley, and a few extra crumbles of cheese if you like.
Adjust the heat for the crowd—mild sauce for kids, spicy sauce or jalapeños for a kick. Make it, top it, and tell me which sauce you used and whether you baked or grilled. Enjoy.