This post contains affiliate links. I may earn a commission if you purchase through them at no extra cost to you.
I reach for this recipe when I want a cozy, no-fuss dinner that still feels like true comfort food. It’s my go-to layered beef and potato bake made from pantry staples, so it’s affordable and practical on busy nights.
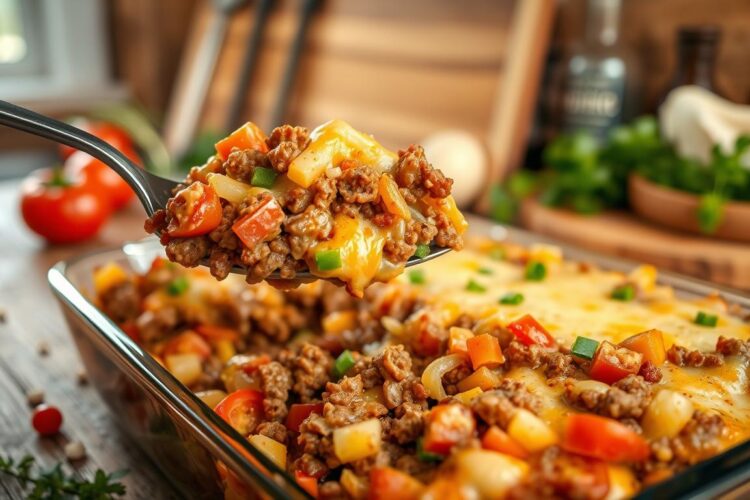
The end result is tender potatoes, savory ground beef, and a bubbly cheddar top that always draws everyone to the table. I’ll share an exact ingredient list with measurements and clear, step-by-step baking directions so you can prep fast and bake with confidence.
This hearty, belly-filling casserole is budget-friendly, easy to prep, and flexible. Add bell peppers, mushrooms, or green beans depending on what’s in your kitchen. It’s family-friendly and fills hungry people without many sides.
Storage is simple: refrigerate leftovers up to five days or freeze portions for up to three months. Read on and you’ll have a simple, satisfying meal that stretches your pantry and keeps dinner stress low.
Why I Make This Ground Beef Casserole When I Need an Easy Budget Dinner
When my week looks tight, this layered beef-and-potato bake is the first recipe I trust to fill everyone up.
I love that the core ingredients are pantry staples I usually have on hand. Canned soup, onions, shredded cheese, and potatoes combine into a creamy sauce that saves time and trips to the store.

Comfort-food vibes from simple ingredients
The mix of creamy sauce, tender potatoes, and seasoned meat gives a real comfort hit. It feels like homemade comfort food but requires minimal chopping and no fancy steps.
Family-friendly, filling, and flexible
- I can feed my family with little prep and a reliable bake time.
- The layered format cooks evenly and stretches meat across servings.
- It’s easy to swap a soup, try a different cheese, or add veggies for variety.
| Staple | Why I Keep It | Quick Swap |
|---|---|---|
| Potatoes | Fills out the dish and bakes tender | Canned sliced potatoes |
| Canned soup | Creates the creamy base fast | Homemade cream substitute |
| Shredded cheese | Gives the bubbly, golden finish | Colby Jack or Pepper Jack |
What This Hobo Casserole Recipe Tastes Like
Each serving promises a hearty mouthful of tender potatoes layered with savory beef and melted cheddar. I aim for a balance that feels like real comfort food without being heavy on the palate.

Tender potatoes and a creamy mixture
The potatoes cook fork-tender and soak up the creamy mixture as it settles between the layers. That slow melding gives every slice cohesive texture, not soupy or dry.
Bubbly, golden-brown top
The best part is the top—bubbly and golden-brown where the cheddar cheese melts and browns lightly. That browned edge adds a nutty, toasted note to each bite.
- Classic comfort flavor: savory beef, creamy sauce, and a rich cheddar finish.
- Texture: soft potatoes, hearty meat, and gooey cheese in every forkful.
- Seasoning: salt and pepper keep the profile balanced, never flat or too salty.
Expect a creamy, cohesive casserole that delivers a satisfying bite each time. The goal is fork-tender potatoes and a bubbly top every bake.
Ingredients for Easy Hobo Casserole with Ground Beef
A clear ingredient list helps me move from pantry to plate without guesswork. Below are exact ingredients and notes so you can shop fast or cook from what you already have.
Exact ingredient list
- 1 pound lean ground beef (or lean ground; drain if not lean)
- 4 cups thinly sliced potatoes (about 2 large russets or Yukon Gold)
- 1 medium onion, chopped
- 1 (10.5 oz) can cream of mushroom soup (or 1 cup homemade substitute, see below)
- 1/2 cup milk
- 2 cups shredded cheddar cheese
- 1 teaspoon salt
- 1/2 teaspoon pepper
- 1 clove garlic, minced (optional)
- 2 tablespoons chopped parsley (optional, for finish)
Best picks and quick swaps
I prefer russet for starch and Yukon Gold for buttery texture. Slice thin and even so the potato layers cook through at the same time.
| Ingredient | Best pick | Swap |
|---|---|---|
| Beef | Lean ground beef | Drain higher-fat ground |
| Potatoes | Russet or Yukon Gold | Canned sliced potato in a pinch |
| Cheese | Shredded cheddar | Colby Jack or Pepper Jack |
Cream of mushroom options
Use canned cream of mushroom for classic flavor. If you only have cream chicken, it works fine.
Quick homemade substitute: whisk 1 cup milk with 2 tablespoons flour and 2 tablespoons butter; simmer until thick. Stir into the soup layer as the cream base for the recipe.
Kitchen Tools I Use for This Layered Beef and Potato Bake
Having the right tools makes the layered bake turn out consistent and worry-free. I keep a short list of reliable items nearby so the dish bakes evenly and the potatoes finish tender in predictable minutes.
Key items and why they matter
- I use a standard 9×13-inch baking dish for family-style layering. It holds the layers without crowding and fits most ovens.
- Cover the dish with aluminum foil for the first part of baking. The foil traps steam so the potatoes cook through before the cheese browns.
- For potato slicing, a sharp chef’s knife or mandoline makes uniform slices. Even slices equal even cooking and stable oven time.
- Choose an oven-safe dish with at least 2-inch depth so layers don’t bubble over during cooking.
- Preheat the oven so the bake starts at temperature and the stated minutes stay accurate.
| Tool | Why I use it | Result |
|---|---|---|
| 9×13 baking dish | Family-size, even heat | Consistent layers |
| Aluminum foil | Traps steam early | Fork-tender potatoes |
| Chef’s knife or mandoline | Uniform slicing | Predictable cooking time |
How I Prep the Beef, Onion, and Creamy Sauce So Every Layer Has Flavor
I like to build flavor on the stovetop so every slice tastes seasoned and balanced. That hands-on step sets the tone for the whole bake and keeps each layer savory.
Browning the meat and softening the onion
I sauté the ground beef and diced onion together over medium-high heat for 5–7 minutes. Cook until the beef is no longer pink and the onion softens.
If the beef isn’t lean, I drain excess grease so the finished dish isn’t oily. Add garlic if you want a deeper note, but use it sparingly to avoid overpowering the bake.
Seasoning as it cooks for an even bite
I add salt and pepper while the beef browns. Seasoning early lets flavor soak into the meat instead of sitting only on top.
Making a smooth, pourable creamy mixture
Off the heat, I whisk the cream of mushroom soup with milk until it forms a smooth sauce. The pourable sauce slips between potatoes, beef, and onion.
That flow is why every forkful tastes balanced: the mixture flavors each layer and keeps the bake cohesive.
- Brown beef + onion 5–7 minutes.
- Drain grease if not lean.
- Whisk soup and milk to a pourable sauce.
| Step | Why | Result |
|---|---|---|
| Browning | Builds savory crust | Deeper beef flavor |
| Drain if needed | Removes excess fat | Less greasy bake |
| Pourable sauce | Even distribution | Consistent seasoning |
Step-by-Step: Layering and Baking the Hobo Casserole
Follow my simple layering order and you’ll get even cooking and a bubbly, browned top every time. I walk through oven setup, exact layering, and the fork test so beginners can bake with confidence.
Preheat and prep
I preheat oven to 400°F and lightly grease a 9×13 baking dish so heat distributes and nothing sticks. This small step saves time later and helps the edges brown evenly.
Layer order and why it matters
Start by arranging a single even layer of sliced potatoes across the dish. Potatoes go first so they sit closest to heat and cook tender in the stated minutes.
Add the seasoned meat and onions
Spread the cooked ground beef and softened onions over the potato base. Season lightly as you layer so each bite stays balanced and savory.
Pour the creamy mixture and top with cheese
Slowly pour the cream-of-mushroom-and-milk mixture so it soaks between layers rather than pooling. Finish with a generous layer of shredded cheddar for a bubbly, golden top.
Bake, uncover, and check doneness
- Cover the dish with foil and bake at 400°F for 25–30 minutes to steam the potatoes.
- Remove foil and bake an additional 5–8 minutes until the cheese browns and bubbles.
- Test in the center with a fork—don’t rely only on clock time; the potatoes should be fork-tender.
| Stage | Temp | Result |
|---|---|---|
| Covered bake | 400°F | Steam cooks potatoes |
| Uncovered finish | 400°F | Bubbly, browned top |
| Doneness check | — | Fork-tender center |
Oven times vary, so use the fork test as your final check. These instructions help the layers cook evenly and give you a dependable recipe result every time.
Tips for the Best Texture and Flavor (No Dry Potatoes, No Greasy Beef)
Good texture starts before the oven—small choices in slicing, sauce, and timing make a big difference.
How thin to slice potatoes for reliable bake time
I slice potatoes about 1/8 inch thick. Thin, even slices finish at the same time and avoid crunchy centers.
Preventing a watery casserole: sauce thickness and cheese timing
Keep the soup-and-milk sauce pourable but not runny. If it seems thin, whisk in a tablespoon of flour or simmer briefly to thicken.
Cover the dish for most of the bake to steam the layers. Add cheese for the last 5–8 minutes so the top browns without making the inside watery.
Shortcuts and grease fixes
For a real time saver, use canned sliced potatoes—they’re precooked and thin, so the bake often needs about 30 minutes to heat through and meld flavors.
Use lean beef or drain the pan well. Butter the dish lightly to prevent sticking and to add a small bit of richness.
| Problem | My Fix | Result |
|---|---|---|
| Dry potatoes | Thin slices, covered bake, enough sauce | Tender center |
| Watery texture | Thicker sauce, cheese at end | Creamy, not soggy |
| Greasy meat | Lean beef or drain pan | Rich, not oily |
Easy Add-Ins and Swaps to Stretch This Budget-Friendly Casserole
With a couple of pantry swaps, this layered dish adapts to what I already have at home.
I keep additions small so the bake time and texture stay reliable.
Veggies that work well
I add diced bell peppers for color and mild sweetness. I dice them small so they soften in the oven and blend into the layers.
Green beans are great too — use drained canned or lightly steamed fresh so they don’t water down the dish.
Mushrooms add savory depth, and thinly sliced carrots give a subtle sweet note that pairs nicely with the meat.
Cheese swaps and a bit of heat
For a milder melt I use Colby Jack. For more heat, I switch to Pepper Jack.
Either cheese keeps the top bubbly and helps the layers hold together.
Soup swap options
If I’m out of mushroom soup, cream of chicken works fine. The cream base still coats the potatoes and keeps the bake rich without extra effort.
- How I mix add-ins: fold small veggies into the meat layer so slices bake evenly.
- Keep portions modest — a cup of extra veggies stretches servings without changing timing.
- Focus on pantry picks to feed my family affordably while keeping flavor intact.
| Add-in | Why I use it | How I add it |
|---|---|---|
| Bell peppers | Sweetness and color | Diced small, layered with meat |
| Green beans | Bulk without cost | Drain well or steam, fold into layers |
| Colby/ Pepper Jack | Mild melt or extra heat | Top at end for browning |
Make-Ahead, Leftovers, and Freezer Tips for Busy Weeknights
For busy nights, I often prep this layered dish ahead so dinner becomes a simple pop-in-the-oven job. I assemble the tray the day before, cover it tightly, and refrigerate. That saves me evening time and keeps the meal practical for a family night.
Assemble ahead and bake later
I layer potatoes, seasoned meat, and the creamy mix the night before. If you bake straight from cold, add about 10–15 extra minutes; the center needs longer to reach fork-tender.
Alternatively, let the dish sit 30 minutes at room temperature before putting it in the oven to shave a few minutes off bake time.
Storing leftovers and freezer instructions
I cool leftovers, cover tightly, and refrigerate up to 5 days. Reheat covered in the oven until warm, then uncover a few minutes to refresh the top.
For longer storage, wrap portions or the whole dish well and freeze up to 3 months. Thaw overnight in the fridge before baking, or add 20–30 minutes if baking from frozen.
| Plan | Fridge | Freezer |
|---|---|---|
| Storage length | Up to 5 days | Up to 3 months |
| Bake timing | Bake as usual or +10–15 minutes if cold | Thaw overnight or add 20–30 minutes |
| Reheat tip | Cover then uncover to brown | Cover while warming, finish uncovered |
How I Serve This Easy Hobo Casserole for a Complete Family Dinner
I treat this layered bake as the main course and add a couple of quick sides so the meal feels complete. It already has beef, potatoes, and cheese, so I keep extras light to balance the comfort.
Simple sides that pair well
- A crisp green salad dressed with a tangy vinaigrette brightens the plate and cuts richness.
- Steamed broccoli or roasted green beans add color and a fresh bite that the kids enjoy.
- Warm dinner rolls or garlic bread help stretch the meal and scoop up any sauce.
I finish each plate with a tiny bit of freshly cracked pepper and add salt only if needed after tasting. A light sprinkle of chopped parsley on the top brightens the look and saves time.
| Side | Why it works | Prep time |
|---|---|---|
| Green salad | Balances rich cheese and beef | 5 minutes |
| Steamed broccoli | Adds fresh texture and color | 6–8 minutes |
| Dinner rolls | Stretches the family meal affordably | Warm from store or oven |
My Favorite Way to Bring This Hobo Casserole Recipe Back Into the Rotation
I keep this casserole on repeat because it mixes simple ingredients into reliable comfort that fits my weeknight rhythm.
My core method stays the same: layer thin potatoes, spread seasoned beef and onion, pour the creamy sauce, then bake until the center is fork-tender and the cheese bubbles.
The instructions are short and forgiving, so I can manage cooking on busy evenings. I often swap cheeses, swap canned soup, or fold in a cup of quick-steamed vegetables to keep recipes fresh.
I save and print this recipe as a template for other ground beef dinners. Bake it until the top is golden and bubbly, then serve straight from the oven for the best result.