This post contains affiliate links. I may earn a commission if you purchase through them at no extra cost to you.
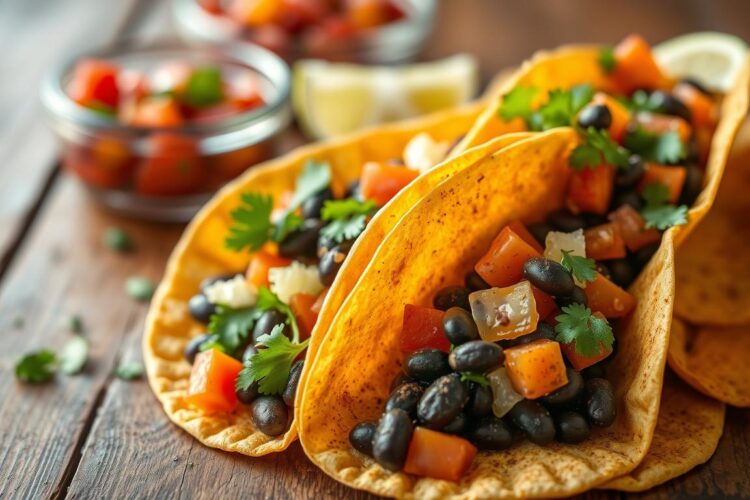
I love a quick, bold plant-forward meal that feels like both a taco and a quesadilla. These crispy, cheesy (or dairy-free) black bean-packed tacos bake up golden on a sheet pan or get browned fast in a hot skillet. I promise exact measurements, step-by-step instructions, and clear tips to keep tortillas from cracking.
On busy weeknights I use pantry staples—canned beans, spices, and tortillas—to make dinner that comes together fast. The oven method gives hands-off crisping on a sheet pan; the skillet path gives quick browning when I want speed. Lightly mashing the filling and oiling the tortillas help the edges turn golden while the interior stays melty.
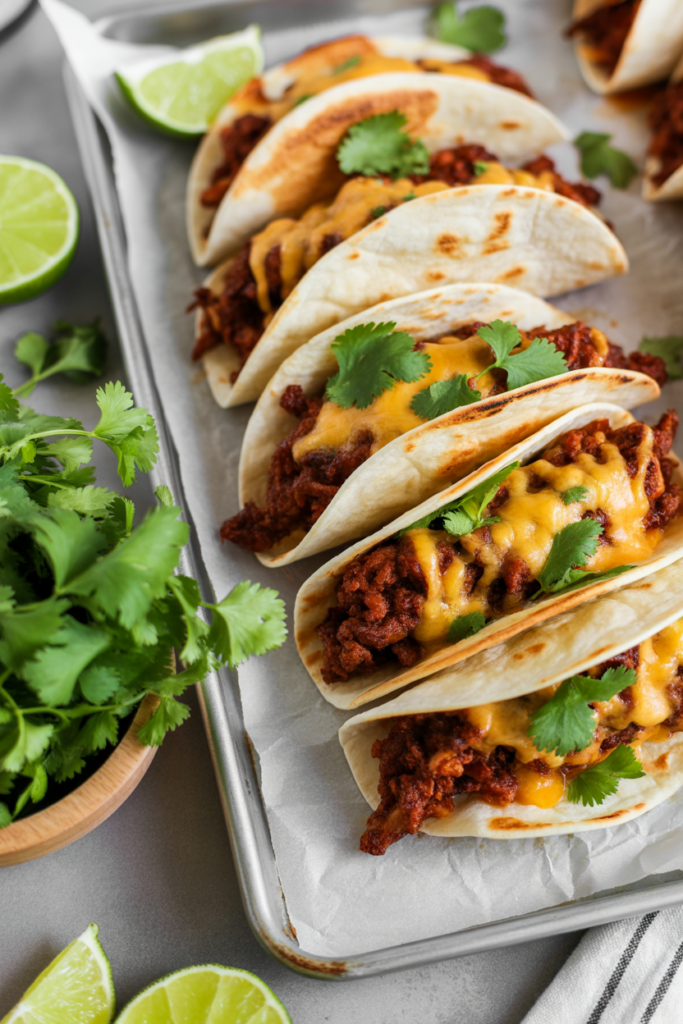
Finish with fresh cilantro and lime wedges, plus optional salsa or sour cream for dipping. I include practical tips to keep tortillas pliable, exact ingredient amounts, and a note about resting after cooking so every bite stays satisfyingly crunchy.
Why I Make These Crispy Black Bean Tacos on Busy Weeknights
On hectic weeknights I reach for this fast, flavor-forward meal that hits both crunchy and melty notes.
I keep the filling simple so assembly takes hardly any time and the crisping happens while I do something else. The result is part taco, part quesadilla with a warm center and a golden shell.

Pantry staples, big flavor
Beans, onions, garlic, and a basic spice mix pull bold flavor without specialty trips to the store. The protein makes the meal feel hearty and filling.
Oven-baked or pan-crisped—choose by schedule
- Oven: best when I need many tacos at once; set-and-forget crisping saves me minutes and hands-on time.
- Pan: my go-to for a quick single dinner; the skillet gives extra browned edges fast.
Quick decision guide
I’ll show the filling technique and the assembly order that prevents sogginess. That way, every taco stays crunchy and satisfying even after resting for a few minutes.
Ingredients I Use for Bold, Crispy Black Bean Tacos
I build the ingredient lineup so shopping is fast and assembly is even faster. I think in four buckets: tortillas + beans, aromatics, seasoning, and the fat that helps them brown.
Tortillas, beans, aromatics, and fats
I use small corn or small flour tortillas up front; corn tortillas need a little steam to avoid cracking. Canned black beans are my go-to—drain and rinse so the filling tastes clean. Onion and garlic are non-negotiable for layers of flavor. A little olive oil or neutral oil lets the tortillas brown and the filling sizzle.
Spices and seasoning options
You can sprinkle a measured taco seasoning mix, or make a DIY blend: 1 tsp cumin, 1 tsp chili powder, and 1/2 tsp smoked paprika for a smoky kick.
Cheese choices
Pick by melt: pepper jack for heat, Mexican blend for the classic vibe, or dairy-free shreds for a vegan option.
Finishes and sides
Finish with cilantro, lime wedges, salsa, and a spoonful of sour cream or crema to round the plate.

| Category | My Picks | Notes |
|---|---|---|
| Tortilla | Small corn or small flour | Steam corn slightly to prevent cracks |
| Beans | Canned black beans | Drain and rinse for best flavor |
| Seasoning | Store taco mix or DIY (cumin, chili, smoked paprika) | DIY gives better control of heat |
| Finish | Cilantro, lime, salsa, sour cream | Bright acids and cream balance richness |
My Exact Ingredient List With Precise Measurements
I give a clear, screenshot-ready ingredients block so you can shop and cook without guessing. Below are exact amounts for the filling, assembly, and serving that work for both oven and skillet methods.
Taco filling measurements
– 2 (15-ounce) cans black beans, drained and rinsed
– 1 medium yellow onion, diced (about 1 to 1 1/2 cups)
– 3 cloves garlic, minced
– 2 tablespoons olive oil
– 1 tablespoon taco seasoning (or 1 tsp ground cumin + 1 tsp chili powder + 1/2 tsp smoked paprika)
– 1/2 cup vegetable broth or water (swap: water is fine)
– 1 tablespoon lime juice
– 1/2 teaspoon fine salt (plus more if needed)
Assembly measurements
– 10 small corn or flour tortillas (about 6-inch)
– 1 cup shredded pepper jack or Mexican blend (about 4 ounces) OR 1 cup dairy-free shreds
Serving measurements
– 1/4 cup chopped cilantro
– 1 lime, cut into 6 wedges
– Optional: 1/2 cup salsa and 1/2 cup sour cream or crema for dipping/drizzling
- Quick swaps: broth can be water; cheese can be dairy-free; store taco seasoning or use the DIY spice line above.
- Notes for methods: quantities work for oven-baked or pan-crisped; no extra shopping needed depending on your chosen path.
| Category | Amount | Notes |
|---|---|---|
| Filling beans | 2 cans (15 oz) | Drain and rinse |
| Olive oil | 2 tbsp | Divide for sautéing and to oil tortillas |
| Tortillas & cheese | 10 tortillas / 1 cup cheese | Use corn or flour; dairy-free option listed |
Kitchen Tools I Grab Before I Start
Before I use the oven or heat a pan, I gather the simple tools that make assembly fast and the shells turn out golden. Laying gear out saves time and keeps the workflow steady once the filling is hot.
Sheet-pan method essentials
- Rimmed baking sheet — keeps oil contained and makes flipping cleaner.
- Pastry brush or spoon — I oil tortillas lightly so edges brown evenly.
- Thin spatula — lifts tacos cleanly without tearing the shell.
Skillet method essentials
- Large nonstick skillet or well-seasoned cast iron — even heat and fast browning.
- Tongs — safe, precise flipping for crisp edges.
- Sturdy spatula — I press gently to seal and get uniform color.
Small tool that matters
I keep a microwave-safe plate and a damp paper towel on the counter. A quick 30 seconds softens corn tortillas and prevents cracked shells when folding.
| Tool | Purpose | Result |
|---|---|---|
| Rimmed sheet | Contain oil; flip easily | Less mess, even baking |
| Nonstick skillet | Direct heat browning | Faster crisp in minutes |
| Tongs & spatula | Flip and press | Fewer tears, better browning on tacos |
Quick workflow tip: set all tools out before you start. Assembly goes fast, so having the brush, tongs, and plate ready saves a lot of time and keeps the results consistent across recipes.
How I Make the Black Bean Filling (Flavorful, Not Bland)
I start the filling on the stove so the flavors have a chance to deepen before assembly. Working in a hot skillet builds savory layers and keeps the texture right for folding.
Sauté the aromatics
Heat 1 tablespoon olive oil in a skillet over medium. Add 1 diced onion and 1/2 teaspoon salt. Cook until soft and lightly golden, about 4–5 minutes.
Toast garlic and spices
Add 3 cloves minced garlic and cook 30 seconds. Sprinkle in 1 tablespoon taco seasoning or my DIY mix (1 tsp cumin, 1 tsp chili, 1/2 tsp smoked paprika). Toast 30–60 seconds to bloom the spices.
Finish the mixture
Stir in 2 cans drained black beans and cook 1–2 minutes. Pour 1/2 cup broth or water to loosen the pan. Mash about one-third of the beans so the filling binds but keeps texture.
Brighten and taste
Simmer 2–3 minutes until thick. Turn off heat and stir in 1 tablespoon lime juice. Taste and add more salt or heat if needed before assembling.
| Step | What I Use | Time |
|---|---|---|
| Sauté onion | 1 tbsp olive oil, 1/2 tsp salt | 4–5 minutes |
| Toast spices | 1 tbsp seasoning | 30–60 seconds |
| Simmer & mash | 2 cans black beans, 1/2 cup broth | 2–3 minutes |
How I Assemble Tacos So They Crisp (Not Crack or Get Soggy)
I follow a short checklist so every taco holds together and browns evenly. The assembly steps are quick, but they matter. A few small moves stop soggy seams and torn shells.
Steam to keep tortillas pliable
I wrap 5–6 tortillas in a damp paper towel and microwave about 30 seconds. Then I keep them covered so they stay warm and flexible.
Oil both sides for golden edges
I brush a thin layer of oil on each tortilla. A light coat helps the shell brown in the pan or oven without getting tough.
Layer in the right order
I spoon about 3–4 tablespoons of bean filling on one half of each tortilla. Then I add about 2 tablespoons of cheese on top. The cheese melts into the filling and helps the fold seal.
Fold gently and position for best browning
Fold into a half-moon and press lightly. I place the cheese-side down on the hot surface so the edge seals and browns fast. Assemble just before cooking to avoid soggy tortillas.
| Step | Purpose | Time / Amount |
|---|---|---|
| Steam tortillas | Prevent cracks; keep pliable | 30 seconds; keep covered |
| Oil both sides | Promote even browning | Light brush per tortilla |
| Portion filling & cheese | Avoid overstuffing; seal edge | 3–4 tbsp filling, 2 tbsp cheese |
| Position cheese-side down | Seal and brown edge quickly | Place on pan or sheet for 1–2 minutes per side |
Oven-Baked Method: Golden, Crispy Tacos on a Sheet Pan
A hot oven turns assembled tacos into golden, sturdy handhelds with minimal fuss. I use the sheet-pan route when I want even browning and fewer hands on the stove.
Preheat oven hot for crisping (center rack)
I preheat the oven to 450°F and place a rack in the center. High heat crisps tortillas instead of drying the filling, so don’t skip this step.
Bake, flip halfway, and bake again until crisp
I lightly rub oil on a rimmed sheet pan, then arrange the folded tacos in a single layer with space for airflow. Bake for 8 minutes, then carefully flip each taco with a thin spatula.
Return the pan to the oven and bake another 8–10 minutes. Watch for browned edges, blistered spots, and bubbling cheese as the visual cues that signal doneness.
Rest a few minutes after baking to set the filling and boost crunch
I let the tacos rest on the sheet pan for 2–3 minutes after baking. This short time helps the filling set and gives the shell a final crisp.
Quick tips: don’t overload the bean mixture, and oil both sides of the tortillas before baking. That keeps seams from going soggy and ensures the edges brown evenly.
| Step | Temperature / Time | Visual cue |
|---|---|---|
| Preheat oven | 450°F, center rack | Oven at full heat |
| First bake | 8 minutes | Light browning starts |
| Flip & finish | 8–10 minutes | Golden edges, melted cheese |
Pan-Crisped Method: Skillet-Crispy Black Bean Tacos in Minutes
When I want a fast, pan-ready dinner, I reach for the skillet method to get golden shells in minutes.
I heat a large nonstick pan over medium heat so the tortilla browns steadily without scorching before the cheese melts. This steady medium heat gives even color and melts the filling just right.
Quick skillet steps
- I add 1–2 teaspoons of oil and swirl to coat the surface so the shell crisps without getting greasy.
- I place 1–2 assembled tacos in the pan and press gently for 10–15 seconds to seal the seam and improve contact.
- I cook about 2–3 minutes per side, flipping when the underside is golden and the taco feels firmer when nudged.
- I adjust heat as needed: lower if browning too fast, or nudge above medium if nothing is happening.
- I cook in batches so the pan isn’t crowded; that prevents steaming and keeps the tortillas crisp.
Serve now
I serve immediately while the cheese is stretchy and the shell is at peak crunch. A quick crema or cilantro-lime sauce on the side makes a perfect dip.
| Step | Setting | Time |
|---|---|---|
| Heat pan | Medium heat | Preheat 1–2 minutes |
| Cook per side | Medium | 2–3 minutes |
| Press to seal | Light pressure | 10–15 seconds |
How I Serve Them and Keep the Crunch for Leftovers
A quick garnish bar turns a simple tray of tacos into a lively, build-your-own meal. I set out chopped cilantro, lime wedges, a few salsas, and a bowl of sour cream so everyone customizes their plate.
For a fast dip, I whisk sour cream with a pinch of taco seasoning and a squeeze of lime. A basic spread with salsa and shredded lettuce makes a bright side that balances the rich filling.
I cool leftovers completely, then stack in an airtight container with a paper towel to absorb moisture. Stored in the fridge, they keep well for up to 3 days and sauces last about 3–4 days.
To revive crunch, I reheat on a sheet pan at 350°F for 8–10 minutes, flipping once. Or warm them briefly in a dry skillet a few minutes per side until hot and crisp.
I also freeze assembled, uncooked tacos in a sealed bag for up to six months; thaw and cook when you need a fast dinner. The result is the same promise: bold flavor, melty filling, and a quick, satisfying meal tonight or later.