This post contains affiliate links. I may earn a commission if you purchase through them at no extra cost to you.
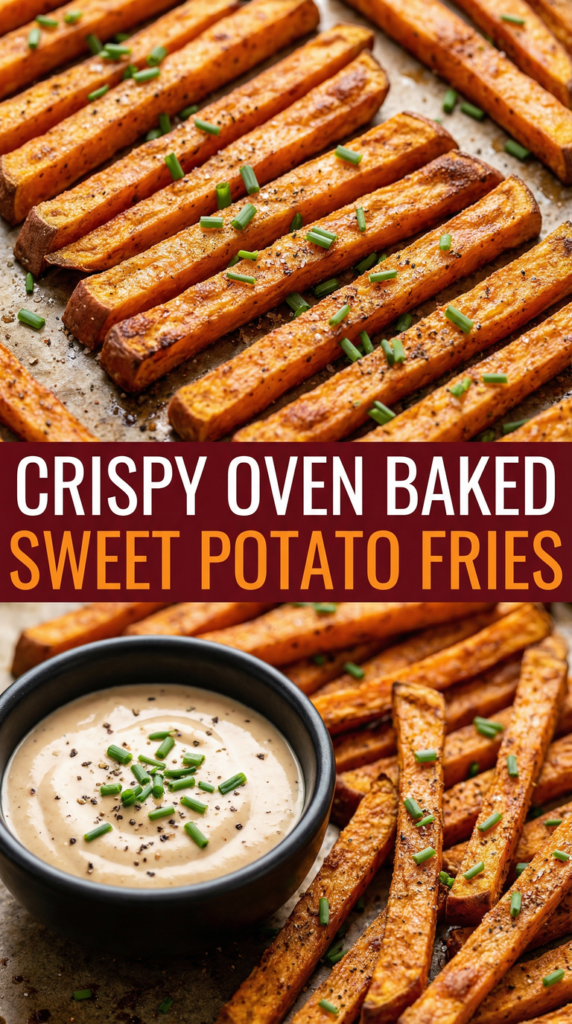
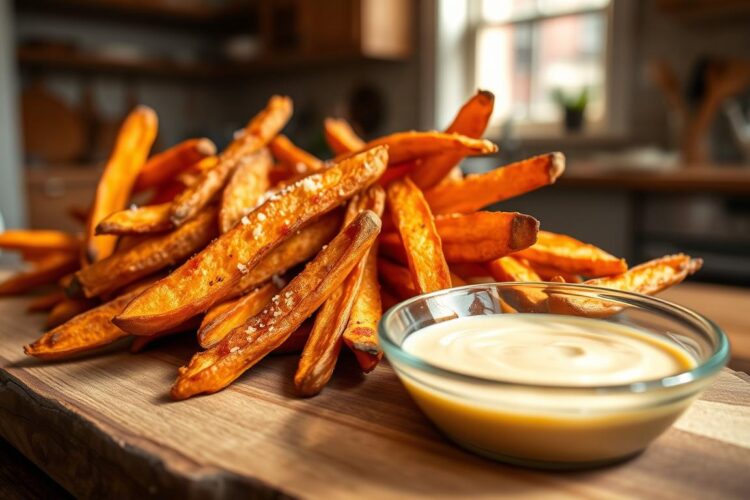
I’m sharing my go-to method for restaurant-level crunch at home without a deep fryer. These Crispy Oven-Baked Sweet Potato Fries deliver caramelized, golden edges and tender centers—no splatter, no lingering oil smell.
Sweet potato fries are harder to crisp than russets because they hold more water and sugar and less starch. My approach fixes that: high-heat roasting at 425°F, proper drying, and a light starch coating to boost browning.
I’ll walk you through slicing evenly, an optional quick soak, thorough drying, a light coat, and a hot bake with one flip. I also include a simple creamy dipping sauce using Greek yogurt or mayo and a few easy variations so the snack feels complete.
Expect clear measurements, step-by-step instructions, and timing for active prep plus bake time. Leave space between pieces on the pan—that spacing is part of the secret to crisp, bar-style results at home.
Why I Make These Oven-Baked Sweet Potato Fries Instead of Deep-Fried
I usually bake these at home because the method cuts cleanup and still delivers that bar-style crunch. Baking keeps things simple on weeknights: fewer steps, no hot-oil splatter, and a faster tidy-up. It also uses noticeably less oil, so there is less overall fat in the final plate.

A healthier, less-messy way to get that bar-food crunch at home
Baking reduces the amount of oil you need while preserving a toasted edge and soft center. It’s practical for busy evenings and family meals. These make a great side for burgers or grilled chicken, or a snack with a simple dip.
What makes sweet potatoes tricky to crisp
Unlike white potatoes, sweet varieties hold more water and more sugar and have less starch. The extra water makes them steam, the sugar browns quickly and can burn, and the low starch makes it hard to form a rigid crust.
The texture goal: caramelized edges outside, tender centers inside
My aim is a deep golden edge that firms up and a creamy center that does not dry out. To get that I remove surface moisture, maximize pan contact under high heat, and dust with a very light starch. A small nod to nutrition: they add fiber without turning this into a nutrition lecture.
- I choose baking most nights for ease and less mess.
- It uses less fat than deep-frying yet keeps bold flavor.
- These potato fries work as a casual side or a shareable dish.
Ingredients I Use for Crispy Oven-Baked Sweet Potato Fries
Below I break down the exact ingredients and why each one matters for texture and browning.

Sweet potato fries ingredients with exact measurements
- 2 large sweet potatoes (about 1.25–1.5 lb total), peeled or scrubbed
- 2 tablespoons cornstarch or arrowroot (for a crisper shell)
- 2 tbsp olive oil
- 1 teaspoon salt
- 1/2 teaspoon black pepper
Seasoning blend
- 1 teaspoon paprika or smoked paprika (choose mild or smoky)
- 1/2 teaspoon garlic powder
- Pinch cayenne (optional, for heat)
I list cornstarch (or arrowroot) because it helps form a light crust that browns well. A small amount of oil ensures even roasting and browning. I season lightly before baking and finish with a little salt or extra paprika after the oven to avoid bitter, burnt spices.
Optional garnishes
- Chopped chives or parsley for color and freshness
My Simple Creamy Dipping Sauce Option
A fast, creamy dip lifts the whole plate and only takes a minute to mix in one bowl.
Base and basic mix
Choose Greek yogurt for a tangy-light base or mayo for a richer, classic feel.
Stir 1/2 cup of your base with 1 teaspoon lemon juice, 1 small clove grated garlic, and 1 tablespoon finely chopped herbs.
Lemon brightens the mix, garlic gives savory bite, and herbs add fresh balance. Adjust salt to taste.
Easy flavor variations
- Spicy: add 1/4 teaspoon cayenne or a dash of hot sauce for heat.
- Smoky: stir in 1/2 teaspoon smoked paprika or a bit of chipotle paste.
- Extra-herby: double the herbs and add a teaspoon of fresh dill if you like.
Texture tip: thin the sauce with a splash of water or extra lemon for a drizzle, or keep as-is for dipping.
| Variation | Texture | Best serving moment |
|---|---|---|
| Greek yogurt (tangy) | Light and creamy | Weeknight sides or lighter plates |
| Mayo (rich) | Thick and silky | Game-day snacks or indulgent serving |
| Smoky or spicy | Bold, punchy | When you want extra flavor or heat |
I make this ahead and refrigerate for a few days. It turns a simple recipe into a full snack or a clever serving companion for dinner.
Tools and Prep Setup for Crispy Sweet Potato Fries
Before the oven heats, I set out a few essentials to keep the process tidy and fast. A consistent setup makes crisping repeatable in any kitchen.
What I grab
- Rimmed baking sheet — my main work surface and the base for roasting.
- Parchment paper to line the sheet for easy release and less scraping.
- Large bowl for tossing oil and seasonings so everything gets an even coat.
- Thin metal spatula to flip and loosen pieces without tearing them.
- Paper towels to pat the sticks dry and remove excess surface moisture.
Why I preheat
I always preheat oven fully to 425°F before the sheet goes in. Starting at a high temperature helps moisture evaporate quickly and encourages fast browning at the surface.
Use a middle rack and give the sheet room so air circulates. That temperature and a hot sheet mean better color and less steaming, and the right tools—especially towels and a slim spatula—make the crisp result easier to reach.
How I Cut Sweet Potatoes for Even, Crispy Fries
Choosing the right stick size is the easiest way I improve texture without extra tricks.
The ideal size I aim for
I target uniform sticks about 1/2-inch thick and roughly 2 1/2–3 inches long. That size boosts surface area so you get a browned edge while keeping the inside tender.
Why consistent thickness matters
Uneven pieces finish at different moments. Some will burn while others stay gummy. Uniform thickness syncs bake time so everything finishes together.
My quick, safe slicing method
- Trim the ends and decide whether to peel or scrub the skin. I often leave skin on for texture.
- Cut the tuber into lengthwise planks, about 1/2-inch thick.
- Stack a few planks and slice them into even sticks. Steady the piece with a flat side and use a sharp chef’s knife.
- Work slowly on the first cuts; speed follows once your guide cuts are set. This helps you make sweet potato sticks that bake evenly.
| Cut | Texture | Approx bake minutes |
|---|---|---|
| Thin (1/4″) | Very crisp, can dry out | 15–18 minutes |
| Half-inch (my pick) | Browned edge, tender center | 20–25 minutes |
| Thick (3/4″) | Soft interior, less browning | 25–30 minutes |
My Crispiness Method: Soak, Dry, and Coat the Fries the Right Way
A little prep goes a long way: soak, dry, and coat, and you’ll notice the difference in every batch.
I soak cut sticks in cold water only when I have time and want maximum crisp. Soak 30 minutes to an hour to pull surface starch and excess sugar. If I’m rushed, I skip this step and still get good results.
Drying so they roast, not steam
Drying is non-negotiable. I pat pieces very dry with paper towels or a clean kitchen towel until no surface moisture remains.
Coating order in my bowl
- In a large bowl I toss fries with 1–2 teaspoons olive oil so the oil clings and spreads evenly.
- Add 1–2 tablespoons cornstarch or arrowroot and toss to coat; the thin layer helps form a shell during baking.
- For an even cling without a dusty finish, I sometimes make a quick slurry: warm 1 tbsp water + 1 tsp cornstarch until yogurt-like, then toss with the fries.
Extra color and timing for spices
I add a pinch of baking soda to the starch (about 1/8 tsp) if I want faster browning and deeper roast flavor. Use sparingly.
To avoid burnt spices, I season very lightly before baking—salt and a touch of pepper—and add the rest of the spice blend right after the fries come out. That keeps the spices bright and prevents bitter char from oven heat.
| Step | Why it matters | Quick tip |
|---|---|---|
| Cold soak | Removes surface starch and some sugar for crisper edges | 30–60 minutes when you have time |
| Dry thoroughly | Prevents steaming so the surface browns | Use paper towels or a clean towel |
| Oil + starch coat | Oil helps browning; starch forms a light shell | Use a bowl to toss, try a slurry to avoid dust |
| Season after baking | Prevents burnt spices and keeps flavor bright | Finish with herbs or paprika right out of the oven |
Baking Instructions for Crispy Oven-Baked Sweet Potato Fries at 425°F
My trick is to treat the sheet like a map: give every piece room to breathe. I set the oven to 425°F and work in single layers so steam escapes and edges brown.
Layout and spacing
I spread sticks on a rimmed baking sheet with at least 1/2 inch between pieces. If one sheet will overcrowd, I use two sheets. Overcrowding is the fastest route to soft potatoes.
When and how I flip fries
I check thinner cuts at 12–15 minutes and thicker cuts closer to 20 minutes. Flip when the undersides are browned and pieces release easily.
To flip, I slide a thin metal spatula under a section, loosen the sticks, then turn them in groups to avoid tearing the coating.
Rotate, finish, and doneness cues
Halfway through the bake I swap rack positions and rotate pans front-to-back. Home ovens have hot spots, so this evens the color.
Expect a total bake of about 25–35 minutes. Done looks like golden, darkened edges, a firmer outside, and a tender center when pierced.
- Preheat oven to 425°F and heat sheets on the rack if you want extra browning.
- Arrange sticks in a single layer with space; use two sheets if needed.
- Bake, check at 12–20 minutes depending on thickness, then flip fries and rotate pans.
- Finish until edges caramelize and centers test tender, about 25–35 minutes total.
- Toss hot sticks with the seasoning blend so spices stay bright.
| Cut thickness | Check / flip at (minutes) | Approx total (minutes) |
|---|---|---|
| Thin (1/4″) | 12–15 | 15–20 |
| Half-inch | 15–20 | 25–30 |
| Thick (3/4″) | 18–20 | 30–35 |
Serving, Storing, and Reheating So They Stay Crispy
Serve these hot from the sheet: I let the fries rest 3–5 minutes so the exterior firms and the center stays tender. A brief rest also lets excess oil drain onto a paper-lined platter before plating.
I finish with a pinch more salt and a scatter of chopped chives or parsley. They pair best as a side for burgers, weeknight chicken, or as a snack with my garlic-lemon dip.
For leftovers, I cool fully, store airtight in the fridge up to 3 days, then reheat on a rimmed pan or sheet in a hot oven until the outside re-crisps. Avoid microwaving — it steams and softens the crust quickly.
Quick make-ahead: cut and keep pieces submerged in cold water in the fridge, then dry thoroughly before you bake. The core lesson of this recipe is simple: space the pieces, use high temperature, and season at the right time for the best result.