
This post contains affiliate links. I may earn a commission if you purchase through them at no extra cost to you.
I love meals that feel indulgent but stay low carb, and this is one of my go-tos for a cozy weeknight dinner. It delivers juicy meat, a creamy garlic parmesan sauce, and a golden cheese top that reads like restaurant fare but comes together fast.
I’ll walk you through a clear, easy recipe with exact measurements and timing so the chicken cooks evenly and stays tender. You can sear briefly in a skillet for crisp edges or use the oven at 350°F (180°C) for a hands-off bake.
My prep for the garlic butter is simple: melt butter, add minced garlic and chopped parsley, and cook three minutes. Bake the breasts 20–25 minutes, add cheese, broil to golden, then rest 10 minutes before serving.
Later I’ll share low-carb side ideas and storage tips so leftovers stay great. This dish works because high-fat dairy, parmesan, and garlic build big savory flavor fast.
Why I Make This Keto Garlic Parmesan Chicken on Busy Weeknights
When I have little time, I pick meals that deliver big flavor with almost no effort. This garlic parmesan version tastes rich and comforting, yet comes together in minutes.
I keep the sauce simple: butter, cream, and cheese create fat-rich richness instead of flour or starch. That keeps the carb count low and the texture creamy without extra work.
A quick sear or a hot oven gives the chicken a lightly crisp exterior before the sauce and cheese go on. Most of the cooking is hands-off, so I can prep a veggie side while it bakes.
My seasoning is pantry-friendly. Salt, pepper, paprika, and Italian herbs give bold flavor without sugary bottled sauces. It’s one of my most dependable recipes when I want something the whole table will enjoy.

| Win | Typical Time | Why it Works |
|---|---|---|
| Quick prep | 10–15 minutes | Simple steps and pantry seasoning |
| Hands-off cook | 20–25 minutes | Oven method frees up time for sides |
| Low carbs | Low per serving | Rich fat from butter and cheese keeps it satisfying |
What You’ll Love About This Garlic Parmesan Chicken
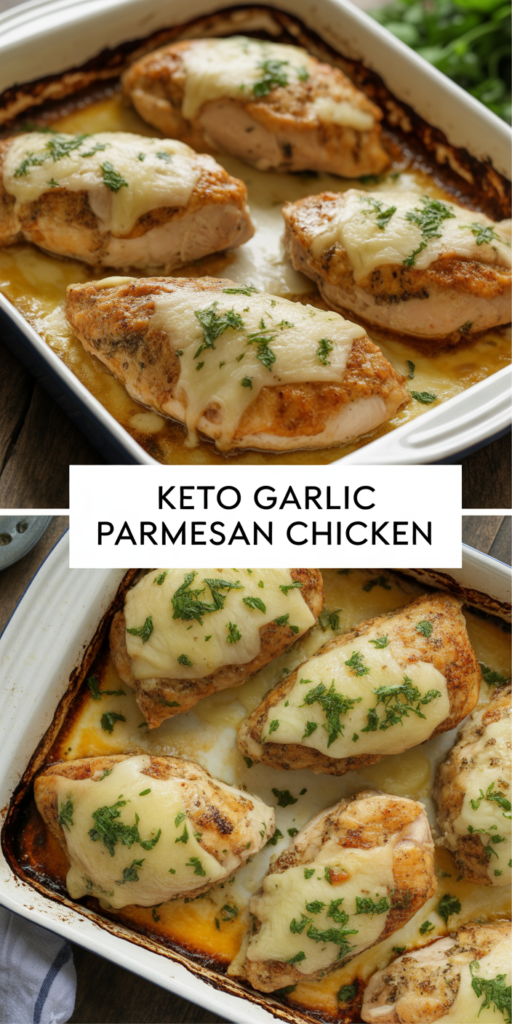
Imagine tender breasts cloaked in a silky sauce with a bronzed cheese crust—every bite is rich and simple.
Creamy sauce, golden cheese, and juicy chicken breasts
I aim for a lush, creamy sauce that clings to the meat and a melted cheese layer that browns just right. The reward is a golden top and juicy breasts beneath.
One-pan option or easy oven finish depending on time
When I need speed, I sear in a single skillet and finish in the pan for crisp edges in minutes. If I want less hands-on work, I move the skillet to the oven and let it bake until done.
- I want juicy chicken breasts under a creamy sauce with melted cheese browned on top.
- I choose skillet for speed, oven finish for easy cleanup and even doneness.
- Pounding or splitting breasts keeps them thin so they cook evenly and stay moist.
- The broiler is the reward step—quickly browns the cheese for a crisp, flavorful crust.
- This dish is rich in fat and taste, so it fills you up without heavy carbs.
- Serve with roasted veggies or low-carb noodles for a hearty dinner.

| Method | Typical Time | Key Reward |
|---|---|---|
| Skillet sear | 10–15 minutes | Crisp edges, fast service |
| Oven finish | 20–25 minutes | Evenly cooked, hands-off |
| Broil finish | 1–3 minutes | Golden-brown cheese top |
Ingredients I Use (Exact Measurements)
Below I list the exact ingredients I use so your shopping trip is quick and precise. This is a compact, screenshot-friendly guide you can follow step by step.
Chicken and fats
- 4 medium boneless skinless chicken breasts, split into cutlets
- 1 tablespoon olive oil
- 1/4 cup unsalted butter
Aromatics and seasonings
- 2 cloves garlic, minced
- 1/4 cup chopped fresh parsley (plus extra to finish)
- 1 teaspoon Italian seasoning, 1/2 teaspoon paprika
- 1/2 teaspoon salt and 1/4 teaspoon black pepper; adjust to taste
Cheeses and cream for the sauce
- 1 cup heavy cream
- 1/2 cup grated parmesan (or freshly grated parmesan cheese)
- 1 cup shredded mozzarella or another melting cheese
| Ingredient Group | Amount | Primary Use | Flexible Swap |
|---|---|---|---|
| Chicken | 4 medium breasts (split) | Main protein | Thighs (reduce cook time) |
| Fats | 1 tbsp olive oil, 1/4 cup butter | Sear and sauce base | Ghee or oil blend |
| Cheese & Cream | 1 cup cream, 1/2 cup grated parmesan, 1 cup mozzarella | Rich sauce and golden top | Half-and-half for lighter sauce |
| Seasonings | 2 cloves garlic, parsley, salt, pepper, paprika, Italian | Balanced savory flavor | Fresh herbs swap for dried |
Ingredient Notes and Smart Swaps (Without Raising the Carbs)
I choose ingredients that shape texture and flavor while keeping this dish low carb. Small swaps change how the sauce behaves and how the meat stays juicy.
Breasts versus thighs
I use chicken breasts most often because they cook quickly and are easy to split or pound for even thickness. Pounding keeps breasts from drying and shortens cook time.
If I want more forgiving meat, I’ll use thighs. Flattened thighs need a similar cook time and add a bit more fat and flavor.
Cheese choices and melting behavior
I prefer fresh parmesan cheese when possible — it melts smoother and tastes brighter. Pre-grated can thicken more and change sauce feel.
For the melt layer, mozzarella gives the classic pull and browning. If I’m out, provolone or fontina work and alter the browning and stretch slightly.
Cream swaps and sauce texture
Heavy cream makes a rich, clingy sauce. Half-and-half thins the sauce and needs more simmer time to reduce. Evaporated milk lightens texture but keeps carbs low when used sparingly.
| Swap | Effect on Texture | Carb Impact |
|---|---|---|
| Breasts (pounded) | Even cook, lean | Low |
| Thighs (flattened) | More forgiving, richer | Low |
| Fresh parmesan cheese | Smoother melt, bolder flavor | Low |
| Half-and-half instead of cream | Thinner sauce, longer reduce | Low |
Final tip: taste after the cheese melts. Salt levels shift quickly, so adjust seasoning at the end.
My Keto Seasoning Blend for Bold Flavor
A simple spice blend makes this dish pop without stealing the spotlight from the creamy sauce. I keep the mix tight so each note supports the rest of the pan and the melted cheese.
Core spices and when I use them
I rub the breasts with a little salt, black pepper, and a pinch of paprika before searing. That builds a flavorful crust and adds color during the initial cook.
What each spice does
- Salt — highlights savory notes and balances richness.
- Black pepper — adds a clean heat that cuts through fat.
- Paprika — brings warmth and a pleasant red tint.
- Italian seasoning — layers in herbaceous depth for a full-bodied taste.
I taste the sauce after the parmesan melts and adjust salt and pepper then. Garlic is already working hard in the base, so I avoid piling on strong seasonings.
Finish and versatility
Fresh parsley is my go-to finish. I sprinkle it right before serving to brighten the plate and lift the heavy cream sauce.
| Seasoning | Primary Role | When I Add It |
|---|---|---|
| Salt | Enhances all savory notes | Dry rub before sear; tweak after cheese melts |
| Black pepper & pepper | Sharpens and balances richness | With salt before cooking; final grind after tasting |
| Paprika / Italian seasoning | Color, warmth, and herb depth | Dry rub and mixed into sauce as needed |
| Parsley | Fresh brightness at finish | Sprinkle just before serving |
Tools I Recommend for Best Results
I rely on a few simple tools to get crisp edges, a bubbling sauce, and no guesswork on doneness.
Start with a heavy skillet or cast iron when I want the fastest sear and the best lightly crisp exterior. A hot pan gives color in minutes and builds flavor before the sauce goes on.
Why a baking dish and broiler help
A roomy baking dish holds the sauce and keeps the pieces in one layer for even baking in the oven. It also makes broiling the cheese effortless—fast browning without overcooking the meat underneath.
Doneness with a meat thermometer
I always use a meat thermometer so I can make sure the internal temperature hits 165°F. Relying on minutes alone can leave you underdone or dry, since thickness varies.
- Heavy skillet or cast iron — fastest sear and crisp edges.
- Baking dish — holds sauce, keeps even layers for the oven and broiler.
- Broiler — quick brown top without extra cook time.
- Meat thermometer — confirm a steady internal temperature of 165°F for safe, juicy meat.
- Air fryer — optional for quick crisping before finishing in the oven.
| Tool | Primary Benefit | When I Use It |
|---|---|---|
| Cast iron skillet | Fast sear, deep browning | Start on stove; finish in pan or transfer to oven |
| Baking dish | Even bake, sauce containment | Oven method at 350°F; broil for 1–3 minutes to brown |
| Meat thermometer | Accurate doneness check | Measure internal temperature to 165°F before resting |
How I Prep the Chicken for Even Cooking
Start by aiming for uniform thickness so the meat cooks evenly and stays juicy. I split thicker breasts into cutlets or pound them to about 1/2 inch. That reduces overall time and avoids an overcooked edge with a raw center.
Slicing and pounding for quick, even cooks
I slice breasts in half horizontally when I want thinner fillets. Pounding with a flat mallet evens out thickness fast. Each piece then hits the pan for the same minutes of cook time.
Dry surface and seasoning habits
I pat the meat dry with paper towels so it sears instead of steaming. I salt and add seasoning to both sides, then let the pieces rest a couple minutes while the pan heats. This helps the rub stick and builds a better crust.
Safety and oven predictability
Keep raw handling separate from sauce prep to prevent cross-contamination. Even prep also makes the oven method predictable, so you can hit your target timing window with confidence.
| Prep Step | Why I Do It | Result |
|---|---|---|
| Split or pound breasts | Uniform thickness | Faster, even cook |
| Pat dry | Removes surface moisture | Better sear, crisper edge |
| Season both sides; rest | Seasoning adheres; pan gets hot | Even flavor and nice crust |
How I Cook the Chicken: Sear or Bake
Cooking this dish comes down to two reliable paths: a hot skillet for speed or a calm oven for ease. Both deliver a crisp exterior and a juicy interior when I follow clear steps and watch the clock.
Skillet sear method for crisp edges in minutes
I heat a splash of olive oil with a bit of butter until shimmering. Then I sear the chicken about 5–6 minutes per side, depending on thickness, to build a brown crust.
After searing, I remove the pieces so they don’t overcook while I make the sauce. This gives the fastest time to table and great texture.
Oven-baked method at 350°F for hands-off cooking
I preheat the oven to 350°F and arrange the seasoned pieces in a baking dish. Bake for about 20–25 minutes until the meat reaches safe doneness.
This route frees me to finish sides while the oven does the work. It keeps the interior tender and the timing predictable.
When I use the broiler for that golden cheese finish
Once sauce and cheese are in place, I switch to broiler mode for a quick golden top. Broil 1–3 minutes while watching closely so the cheese browns, not burns.
Optional: briefly crisp in an air fryer before saucing, then move to an oven-safe dish to melt the cheese for a fusion of fast crisp and broiled color.
- Skillet: 5–6 minutes per side for sear, remove to rest.
- Oven: 350°F, 20–25 minutes in a baking dish.
- Broiler: 1–3 minutes to brown the cheese—watch constantly.
| Method | Typical time | Main benefit |
|---|---|---|
| Skillet sear | 10–12 minutes total | Fast crisp crust |
| Oven bake | 20–25 minutes | Hands-off, even cook |
| Broiler finish | 1–3 minutes | Golden, bubbly cheese |
How I Make the Creamy Garlic Parmesan Sauce
Getting the sauce right is quick if you follow a calm, step-by-step method. I keep the process simple so the sauce turns glossy and clings to the meat without any thickener.
Start with low heat and butter plus garlic
I melt unsalted butter over low heat, then add minced garlic. I cook the garlic gently for about 2–3 minutes, stirring so it becomes fragrant but never brown.
Add cream and grated parmesan to thicken
Next I lower the heat and pour in heavy cream. I whisk while the cream warms, then add grated parmesan a little at a time. In about 1–2 minutes the sauce thickens and turns silky.
Season so the sauce tastes savory, not flat
I season with a small pinch of salt and a few cracks of pepper, then taste after the cheese melts. Adjusting seasoning at the end keeps the balance bright and savory without over-salting.
Optional add-ins I like to use
For extra depth I sometimes sauté mushrooms or a spoonful of minced shallot first. A soft ounce of cream cheese stirs in well if I want more body. These add-ins change carbs slightly, so I use them sparingly.
| Step | What I Do | Cue |
|---|---|---|
| Melt butter & cook garlic | Low heat, 2–3 minutes, stir | Fragrant, not browned |
| Add cream & cheese | Whisk in heavy cream, then grated parmesan | Thickens in 1–2 minutes, glossy |
| Season & finish | Pinch of salt, crack of pepper, taste | Balanced savory flavor |
| Optional mix-ins | Sauté mushrooms/shallot or stir in cream cheese | Richer texture, more depth |
Finishing the Dish So the Chicken Stays Juicy
A few careful steps at the end make the sauce cling, the cheese brown, and the meat stay moist. My goal is to coat the protein in the creamy sauce and melted cheese without overcooking it.
Coating and topping for even coverage
I add the cooked breasts back into the pan or spoon warm sauce over baked pieces so every bite gets sauce. Then I top with shredded cheese and a light sprinkle of parmesan for full coverage that melts evenly.
Timing cues to watch
Look for the sauce bubbling gently at the edges. The cheese should be fully melted and just starting to crisp and turn golden. Use short bursts under the broiler and watch constantly so you don’t dry the meat.
Resting so juices redistribute
After broiling, I let the whole dish rest about 10 minutes before slicing. This step lets juices settle and the sauce thicken a bit, making cleaner slices and a juicier serving.
| Cue | What to check | What it means |
|---|---|---|
| Sauce | Bubbling at edges | Ready to coat and hold on the meat |
| Cheese | Golden, lightly crisp | Perfect melt without burning |
| Meat | Tender to touch; 165°F internal | Fully cooked but still juicy |
Serving Ideas: My Favorite Low-Carb Sides
A creamy main calls for sides that can carry sauce and add freshness; that’s how I build a full plate. I pick options that stay low carb and play well with the garlic parmesan sauce.
Veggie sides that soak up the sauce
I like roasted broccoli, sautéed spinach, or garlicky green beans. These vegetables soak up the sauce and add texture without extra carbs.
Salad and mash options
A simple side salad of arugula or romaine with a lemony vinaigrette cuts the richness and adds brightness to dinner.
For comfort, I make cauliflower mash as a low-carb stand-in for potatoes. It mimics the mouthfeel of mash and soaks up sauce just like the starchy version, minus the carbs.
Pasta alternatives for comfort-food vibes
When I want creamy pasta vibes I use zucchini noodles, hearts of palm pasta, or shirataki noodles. Plan for about 2 cups per serving if you want a generous base that stretches the recipe and the sauce.
- Plate: chicken first, spoon sauce over, then sprinkle parsley and a final pinch of parmesan.
- Serving on a veggie base makes the meal feel larger without adding carb-heavy starches.
| Side | Why it Works | Portion |
|---|---|---|
| Roasted broccoli | Crunchy, soaks sauce | 1 cup |
| Cauliflower mash | Comfort, low carbs | 3/4 cup |
| Zucchini noodles | “Pasta” feel, light | 2 cups |
Storage, Reheating, and Meal Prep Tips
Proper storage and gentle reheating keep this creamy sauce tasting like it was made moments before. Below I share how I pack leftovers, how long they keep, and quick prep moves that save time on busy nights.
How I store leftovers in an airtight container
I let the chicken and sauce cool slightly, then spoon them into an airtight container so the sauce won’t pick up fridge odors. Cooling first stops condensation that thins the sauce and makes the top soggy.
I label the container with the date. In my fridge it keeps well for about 3–4 days.
Reheating without splitting the cream sauce
My favorite method is gentle stovetop heat. Warm the contents over low heat, stirring until the sauce loosens and becomes silky again. If the sauce seems too thick, I add a splash of cream and stir slowly.
Microwave works in a pinch—use reduced power and heat in short minutes, stirring between bursts. This helps prevent the parmesan and cream from separating.
How many days it keeps and what to prep ahead
The dish holds in the fridge for up to 3–4 days. The sauce will thicken as it chills; a little warm water or cream brings it back to a glossy texture when reheating.
Make-ahead moves I use: mince garlic, grate the cheese, and mix the seasoning in a small container. That prep trims time on cook night and makes the protein feel like a fast meal the next day.
- Cool before you pack to avoid watery sauce.
- Store in a shallow container for faster chilling.
- Reheat slowly and add a splash of cream if needed.
| Action | What I Do | Why |
|---|---|---|
| Store | Use an airtight container, label date | Prevents odors; keeps texture |
| Fridge life | 3–4 days | Safe and flavorful within this window |
| Reheat | Low stovetop or moderated microwave (short minutes) | Preserves sauce and cheese texture |
| Meal prep | Grate cheese, mince aromatics, mix seasoning | Saves time; speeds weeknight cooking |
One last tip: this high-protein leftover shines over fresh sautéed zucchini noodles for a quick lunch that feels fresh and indulgent. Use these tips and the next serving will taste almost as good as the first.
Make It Tonight and Enjoy That Creamy Garlic Parmesan Comfort
You can have a golden, juicy main on the table in under an hour with very little hands-on time. This recipe proves rich, comforting food can be quick and low carb.
Follow the simple sear-or-oven method, or use the air fryer for a shortcut. Watch the seasoning and doneness cues so the meat stays tender and the cheese turns perfectly golden.
Finish with a sprinkle of fresh parsley and a little extra parmesan for a restaurant-style touch. Pair it with a simple low-carb side and enjoy the rich, fat-forward sauce that makes this dish so satisfying.
Save the recipe, add the ingredients to your next shopping list, and make it part of your weeknight rotation of reliable recipes.