This post contains affiliate links. I may earn a commission if you purchase through them at no extra cost to you.

I love bold, glossy flavors that taste like takeout but come from my kitchen. This recipe hits sweet-spicy, savory, and garlicky notes thanks to a gochujang sweet-spicy marinade that caramelizes in a hot pan.
It’s a complete weeknight meal that also works for meal prep. I cook the protein fast, then build bowls with crisp vegetables and rice so leftovers are easy to reheat.
My approach is simple: marinate for depth, sear for caramelization, and finish with a sticky glaze so every bite clings to rice and veg. I’ll give exact measurements, a clear sauce breakdown, and step-by-step instructions for marinating, pan-cooking, and glazing.
Make-it-your-own—swap greens, crunchy veg, or grains. The sauce is the non-negotiable flavor bomb. Gochujang is easy to find in most U.S. grocery aisles and worth the buy.
Quick roadmap: ingredients with measurements → sauce and marinade notes → cooking steps → assembling bowls → storage and reheating tips.
Why I Keep Coming Back to This Sweet-Spicy Korean-Inspired Chicken Bowl
This recipe keeps pulling me back because it balances bold heat and sticky sweetness with clear layers of savory depth. The mix of fermented paste, tang, and aromatics makes each bite feel complete without extra fuss.

Bold gochujang flavor with soy, garlic, ginger, and rice vinegar
Gochujang shines here because it’s spicy-sweet and fermented. Mixed with soy sauce, garlic, ginger, and rice vinegar it adds instant depth and complexity.
The result is savory and tangy with a sweet spicy finish that keeps the chicken flavor rich, not one-note hot.
Perfect for quick weeknight dinners, meal prep, and easy home cooking
I make this on busy nights because once the chicken marinates, the skillet work is fast. It’s ideal for batch cooking.
Cook a tray of protein, portion with rice, and store toppings separately so textures stay crisp for grab-and-go lunches.
Make-it-your-own bowls with crisp veggies and your favorite rice
I keep a “clean out the fridge” mindset: romaine, cucumber, shredded carrots, cabbage, or sprouts all balance the rich sauce. Crisp vegetables brighten each bite.
Steamed white rice is classic, but purple rice, multigrain, or quinoa work great when I’m prepping multiple bowls.
Ingredients I Use for Maximum Flavor (With Exact Measurements)
I rely on exact measurements so the marinade and glaze hit the same note every time. Below are the options and the measured pantry items I keep on hand for consistent results.

Chicken and marinade base
- 1.5 lb boneless, skinless thighs (or 1.5 lb chicken breast), cut into bite-size pieces
- 3 cloves garlic, minced
- 1 tablespoon grated fresh ginger
- 3 tablespoons gochujang sauce
- 2 tablespoons reduced-sodium soy sauce or tamari
- 1 tablespoon rice vinegar
- 1 tablespoon honey or brown sugar
- 1 teaspoon toasted sesame oil
Spicy sauce and glaze
- 2 tablespoons gochujang sauce (extra for glazing)
- 2 tablespoons soy or tamari
- 1 tablespoon rice vinegar
- 1 tablespoon honey
- 2 tablespoons water (to loosen)
- Optional: 1 teaspoon gochugaru for more heat
- Optional slurry: 1 teaspoon cornstarch + 1 tablespoon cold water
Serving components and garnishes
- 1 cup steamed white rice per bowl (or 3 cups cooked for 3 bowls)
- 2 green onions, thinly sliced
- 1 teaspoon toasted sesame seeds per bowl
- Neutral cooking oil: 2 tablespoons (avocado or vegetable) for searing
| Component | Amount | Notes |
|---|---|---|
| Protein | 1.5 lb | Thighs juicier; breast for leaner chicken rice servings |
| Marinade base | 3 tbsp gochujang, 2 tbsp soy, 1 tbsp vinegar | Mix and marinate 1–8 hours |
| Glaze | 2 tbsp gochujang, 1 tbsp honey | Sear and finish in pan for glossy coating |
| Garnish | 2 green onions, 1 tsp sesame seeds | Portion per bowl for neat plating |
| Optional add-ins | 1 tsp gochugaru, 1 tsp cornstarch + water | Add heat or thicken sauce |
Scaling note: to double for meal prep, double protein and rice but keep the sauce ratio identical. That preserves balance when you reheat portions.
My Spicy Korean Chicken Bowl Marinade and Sauce, Explained
I build the sauce to layer flavor quickly so busy weeknights stay simple. Each ingredient has a clear job: punch, balance, gloss, or boost. I explain how they behave so you tweak confidently by taste and time.
What gochujang does in a marinade versus a glaze
Gochujang is a fermented red pepper paste with sweet, savory, and umami notes. It’s not just heat like hot sauce; it adds depth and body.
In a marinade it soaks into the meat, seasoning through. In the pan the paste reduces, caramelizes, and turns sticky—perfect for a glossy finish.
Choosing soy sauce or tamari
I use reduced-sodium soy sauce most often because gochujang already brings salt. Lower sodium keeps the final sauce bold without briny edges.
Use tamari as a gluten-free swap; it tastes richer but still affects salt balance the same way.
Honey versus brown sugar
Honey gives a shiny glaze and a floral lift. Brown sugar adds deeper, molasses-like caramel notes when it heats.
I pick honey when I want a glossy, sweet spicy finish; brown sugar if I want a darker caramel flavor.
Finishing oils and controlled heat
Sesame oil is potent, so I add a teaspoon at the end for nutty aroma. Don’t cook it at very high heat or it will lose its fragrance.
To raise heat without flattening flavor, I stir in a pinch of gochugaru. It boosts spice while keeping the sauce balanced.
| Ingredient | Role | When to Add |
|---|---|---|
| Gochujang | Umami, sweetness, base heat | Marinade start; extra in glaze for stickiness |
| Reduced-sodium soy / Tamari | Salt, depth | With marinade to control sodium |
| Honey / Brown sugar | Gloss and caramel | Glaze stage; adjust to taste |
| Sesame oil | Finish for aroma | Added off heat, just before serving |
| Gochugaru | Layered heat | Pinch during sauce test; increase as desired |
How I Prep the Chicken So It Stays Tender and Caramelized
I start by treating the raw protein so each bite ends up juicy with caramelized edges. Good prep saves cooking time and helps the glaze cling to every piece.
Thighs versus breast: my go-to choice
I usually pick thighs because they stay forgiving and moist under high heat. If I use breast, I keep pieces uniform and watch them closely so they don’t dry out.
How I cut for fast, even searing
I trim excess fat, pat the meat dry, then slice into even bite-size chunks. Larger pieces stay juicier; very small dice cook in minutes but can dry if left alone.
Marinating time and safe storage
I add chicken to the marinade and toss thoroughly so every piece is coated. For noticeable flavor, I marinate at least 1 hour; for deeper seasoning I go up to 8 hours.
For meal prep I will dice and marinate up to 3–4 days in the fridge, kept sealed and resting in its juices. You can also cook ahead—properly stored, pre-cooked portions last 3–4 days.
Keep reduced-sodium soy in mind if you plan long marination, and never reuse raw marinade unless you boil it first. The goal is browned edges and a tender center, which smart prep sets up perfectly for the next step: pan cooking.
Cooking the Chicken in a Pan Without Drying It Out
A hot, well-preheated pan is the difference between glossy, caramelized meat and tired, steamed pieces. I use simple cues and tight timing so the meat stays tender and the sauce sticks.
Pan-searing vs. quick stir-fry
I sear in batches when I want deep caramelization and char. That means using a cast iron or heavy skillet and working in small groups.
If I’m short on time I stir-fry bite-size pieces for an even, fast finish. Smaller cuts take about 5–7 minutes total over medium-high heat.
Avoid overcrowding so the meat sears, not steams
- Preheat the pan until oil shimmers; use a neutral oil and about 1 tablespoon for a single batch.
- Leave space between pieces and resist constant stirring for the first minute so browning forms.
- Cook in batches and hold finished pieces briefly on a tray while you finish the rest.
Cook-time cues and heat management
Use medium-high heat for quick browning, then drop to medium when the glaze has sugar so it won’t burn. Small pieces finish in minutes; larger chunks need a couple minutes per side.
| Method | Heat | Time cue |
|---|---|---|
| Pan-sear (batches) | Medium-high | Brown 2–3 min per side, then finish |
| Stir-fry (small pieces) | Medium-high | About 5–7 minutes total, stir often |
| Cast iron for char | High short, then medium | Watch sugars; reduce heat to finish |
Doneness and next steps
Check that the internal temp reaches 165°F or that juices run clear. I save pan drippings — they help the glaze cling — then add sauce and finish briefly so the chicken is glossy but not overcooked.
Spicy Korean Sauce and Glaze That Turns Glossy and Thick
I mix the sauce in a bowl before it ever hits the pan so each ingredient is balanced and ready. Gochujang brings depth and fermented heat. Soy supplies the savory backbone. Garlic and ginger add bright punch. Rice vinegar lends lift, and honey or brown sugar gives that sweet spicy bbq note.
How I glaze until it’s sticky and caramelized
Once the pan has fond, I add the sauce and let it reduce. The sugars caramelize and the mixture goes glossy. I toss the pieces so the sauce coats evenly. Watch the bubbling—gentle simmer, not a hard boil—so it lacquer without burning.
Optional cornstarch slurry for a thicker finish
For a clingier glaze I whisk 1 teaspoon cornstarch with 1 tablespoon cold water until smooth. I add the slurry to the side of the pan and stir for 1–2 minutes while the sauce thickens. This produces a less runny, clingy finish that holds up for meal prep.
Dialing heat and quick fixes
- Raise depth: add more gochujang; add a pinch of gochugaru for sharper heat.
- Too spicy → a touch more sweetener or a splash of vinegar.
- Too sweet → a splash of soy or vinegar.
- Too thick → whisk in a little water or a splash of stock.
| Action | Why | When |
|---|---|---|
| Mix sauce first | Balance flavors before cooking | Before pan step |
| Reduce gently | Creates glossy glaze | After sauce hits hot pan |
| Add slurry | Thicker clingy texture | When sauce is bubbling gently |
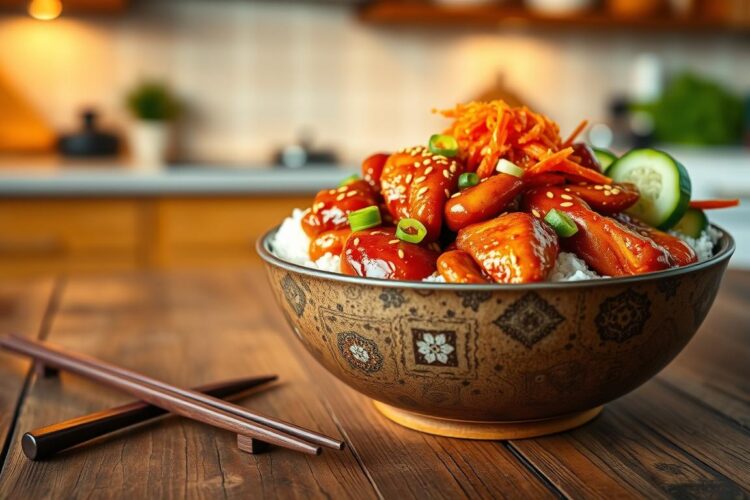
Assembling My Spicy Korean Chicken Bowl
A well-built bowl should balance warmth, crunch, and a punch of sauce in every spoonful. I start with steamed white rice as the base and portion so each serving stays satisfying without overwhelming the other components.
Steamed rice and grain swaps
I use 1 cup steamed white rice per serving for classic texture. For meal prep, I often swap purple rice, japgokbap (Korean multigrain), or quinoa to keep bowls interesting across the week.
My favorite toppings
Chopped green onions add bright bite. Toasted sesame seeds lend a nutty crunch that contrasts the glossy sauce.
If I want more saucy richness, I spoon an extra tablespoon of gochujang sauce over the hot protein right before adding toppings.
Veggies that keep the bowl fresh
I layer hot glazed chicken over rice, then pile cool, crunchy vegetables—cucumber, shredded carrot, and romaine—for a cooling counterpoint.
Swap freely: napa cabbage, kale, broccoli, spinach, sprouts, jicama, or even apple or pear for a sweet crunch. For meal prep, keep wet ingredients like cucumber and avocado separate until serving so textures stay crisp.
- Portioning tip: roughly 5–6 oz cooked chicken per bowl.
- Sauce: 1–2 tbsp of glaze per serving, adjust to taste.
- Build order: rice → hot protein → cool veggies → green onions → toasted sesame seeds.
| Component | Amount per bowl | Why |
|---|---|---|
| Steamed rice | 1 cup | Neutral base that soaks up sauce |
| Cooked chicken | 5–6 oz | Enough protein for a hearty meal |
| Veggies | 1 cup mixed | Freshness and crunch |
Make it your own: once the rice, chicken, and sauce are done, the rest is flexible and fast. I mix and match grains and vegetables to keep my meal prep varied and tasty.
Make-Ahead, Storage, and Reheating Tips for Busy Weeks
For busy weeks I set up the core sauce and protein so assembling fresh bowls takes minutes.
My go-to: mix the sauce and marinade ahead, dice the chicken and refrigerate up to 3–4 days, and prep crunchy veggies for 1–2 days. Make the marinade a week ahead if you like; it stores well.
Store cooked chicken in its juices in the fridge for 3–4 days to keep it tender. Keep rice chilled or batch-cook it once for the week. Avocado should wait until day-of to avoid browning.
Reheat in short bursts in the microwave (30–60 seconds) or warm in a pan over medium heat with a splash of water or oil for 2–4 minutes. Make sure the chicken heats through but doesn’t overcook.
I pack rice and chicken together, put veggies and sauce on the side, and add soy sparingly since sodium concentrates over time. Once the protein and sauce are ready, I can build a fresh bowl in minutes whenever I want a quick meal.