This post contains affiliate links. I may earn a commission if you purchase through them at no extra cost to you.
I love this one-pan dinner because it feels like takeout but comes together in weeknight minutes. It’s fast, high-protein, and perfect for busy evenings or simple meal prep. I usually have it ready in about 20–30 minutes, with easy cleanup and only one skillet to wash.
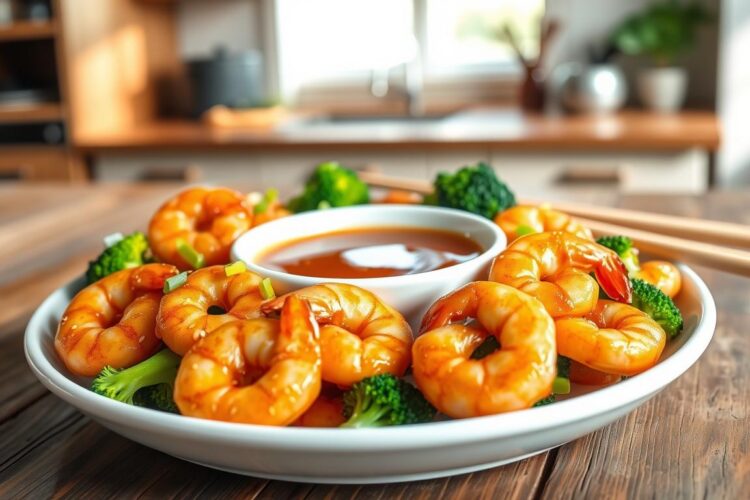
Plump shrimp get coated in a sticky, glossy glaze while bright green florets stay crisp-tender with light char marks. The contrast of textures — juicy seafood and firm vegetables — gives each bite a balanced pop of flavor.
This recipe uses pantry staples and minimal prep. I mix the sauce, cook the vegetables, add the shrimp, then toss until everything is shiny and saucy. It works in a skillet or on a sheet pan, with fresh or frozen ingredients, and swaps easily for gluten-free or low-carb needs.
Serve it over rice, noodles, or a low-carb bowl for a complete meal the whole table will enjoy. If you want a quick, reliable dinner that tastes special, this is my go-to.
Why I Make This Honey Garlic Shrimp and Broccoli on Busy Weeknights
I turn to this speedy skillet meal when I need dinner done fast without scrimping on taste. It solves the “what’s for dinner?” problem with minimal prep and just one pan. Leftovers keep well for 3–4 days in a sealed container, which helps my weekly plan.

Sweet, savory, and garlicky balance in a sticky, glossy sauce
The sticky sauce moment is my favorite. I watch the honey, soy, garlic, and a splash of acid reduce until the glaze clings to every bite. That sweet and savory contrast—sweet from honey, umami from soy, bright notes from garlic—gives sharp, layered flavor with little effort.
High-protein, fast, and meal-prep friendly
Shrimp cooks in minutes, so this meal is ready in the time it takes to steam rice. Protein makes the plate feel filling even on a short schedule. It reheats gently without losing texture, so it works great for lunches or quick dinners during a busy weeknight.
| Benefit | Why it Helps | Storage |
|---|---|---|
| One-pan cooking | Less cleanup saves evening minutes | Cool then seal; fridge 3–4 days |
| Fast cook time | Shrimp finishes quickly; broccoli chars fast | Reheat gently to keep texture |
| Meal-prep friendly | Components reheat well for lunches | Use airtight containers for best results |
What This Dish Tastes Like: Sticky Honey Garlic Shrimp With Charred Broccoli
The first forkful balances a bright, sticky glaze with a quick sear that keeps textures lively.

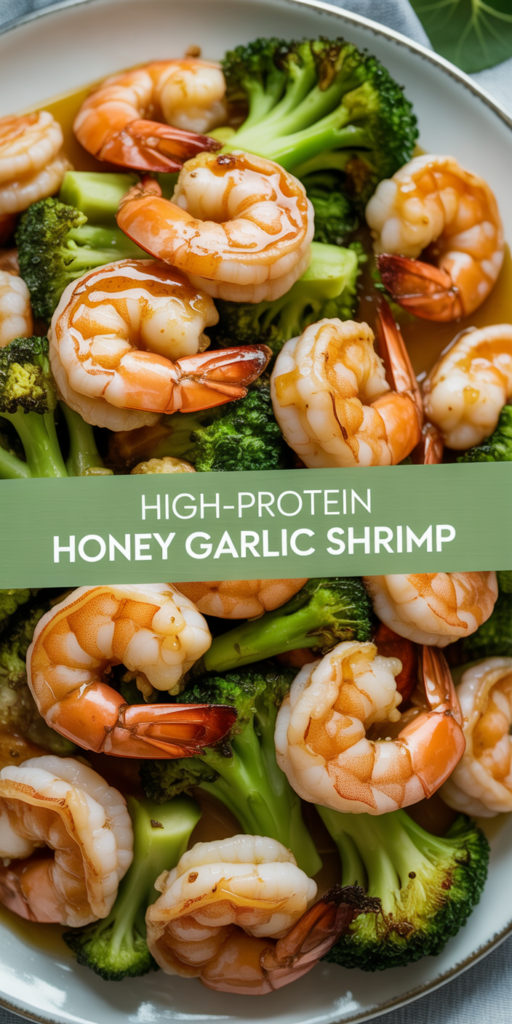
Plump, succulent pieces with a tender bite
I aim for shrimp that are juicy and springy. Each piece wears a glossy honey garlic sheen that feels bold but balanced.
The garlic comes through as a warm, savory note without hiding the seafood’s natural sweetness.
Bright, crisp-tender florets with caramelized edges
The broccoli stays vivid green with just enough give to be tender-crisp. Light char marks add a roasted depth that plays well with the glaze.
Texture and heat that keep you coming back
The contrast—soft, saucy seafood against crisp-tender veg—makes this addictive. A pinch of red pepper flakes brings heat that flips the profile to sweet-spicy.
| Element | What I Look For | Result on the Plate |
|---|---|---|
| Shrimp | Quick sear, juicy interior | Springy texture with sticky glaze |
| Broccoli | Tender-crisp, charred edges | Bright green florets with roasted notes |
| Sauce | Thick, glossy glaze (not watery) | Takeout-style comfort, homemade finish |
Time, Tools, and Prep Notes for a Quick Shrimp-and-Broccoli Dinner
Keeping a clear prep routine turns a busy weeknight into a 20–30 minute win. I map out active minutes, set cookware ready, then move fast so dinner finishes before evening winds down.
How I plan the clock
The active cook time is about 20–30 minutes if I skip long marinating. If I do marinate, I let the shrimp rest at least one hour in a portion of the sauce to deepen flavor. Either way, total time stays flexible for busy nights.
Best cookware for results
I reach first for a skillet — cast iron for char, nonstick for easy release. A sheet pan is my go-to when I want hands-off cooking; roast at 450°F for fast, even browning.
Prep shortcuts that save the most
- I thaw frozen shrimp quickly, rinse if needed, then pat fully dry so it sears instead of steaming.
- Pre-cut florets cut my prep time; a quick rinse in lukewarm water and thorough patting helps caramelize edges.
- Fresh minced is best, but ready-to-mince garlic saves minutes on hectic nights. I also measure sauce components while the pan heats so I don’t waste time mid-cook.
| Task | Typical minutes | Best pan |
|---|---|---|
| Prep (thaw, dry, cut) | 8–10 | Skillet prep area |
| Cook broccoli | 4–6 | Cast iron or sheet pan |
| Sear shrimp | 3–4 | Hot nonstick or cast iron |
Ingredients and Exact Measurements for the Honey Garlic Sauce and Stir-Fry
Here’s a precise ingredient list so you can shop once and cook without guessing. I list the protein and veg first, then the sauce, thickener, and finishing touches. Use low-sodium options where noted to control sodium.
Shrimp and broccoli
- 1 lb large shrimp, peeled and deveined
- About 4 cups broccoli florets (fresh or thawed-and-dried frozen)
Sticky sauce base
- 1/3 cup honey (or low-carb honey alternative)
- 1/4 cup soy sauce or tamari (low-sodium preferred)
- 1 Tbsp sesame oil
- 1 Tbsp rice vinegar
- 4 cloves garlic, minced
- 1 tsp grated ginger
- 1/4 tsp kosher salt (optional) and 1/4 tsp black pepper
Thickener and heat
- 1 Tbsp cornstarch or 1 Tbsp arrowroot
- 2 Tbsp cold water to make the slurry (or 1 tsp arrowroot + 2 Tbsp water)
- Optional: 1/4–1/2 tsp red pepper flakes for heat
Garnishes and serving
- 1 tsp sesame seeds and 2 Tbsp chopped green onions
- Serve over steamed rice, noodles, or cauliflower rice for a low-carb bowl
| Item | Measure | Note |
|---|---|---|
| Soy sauce | 1/4 cup | Use low-sodium to reduce sodium |
| Cornstarch / Arrowroot | 1 Tbsp + 2 Tbsp water | Gives a glossy, takeout-style finish |
| Ginger | 1 tsp | Fresh for best flavor |
Ingredient Swaps I Use (Low-Carb, Gluten-Free, and Pantry-Friendly)
Small swaps let me adapt this recipe for low-carb, gluten-free, or pantry-only nights without fuss. I aim to keep the glossy finish and quick cook time while cutting sugar or gluten when needed.
Sweetener swap
I use regular honey for the classic sticky glaze, but I often swap in a low-carb honey alternative to cut sugar while keeping sweetness. Use it cup for cup at first, then taste and adjust by teaspoon if needed.
Soy swap
Low-sodium soy sauce keeps sodium under control. When I need gluten-free, I switch to tamari; it gives the same savory soy depth without wheat.
Thickener swap
Cornstarch gives a glossy, takeout-style sauce. Arrowroot works well as a one-to-one substitute and suits paleo or gluten-free kitchens. I add the slurry slowly so the texture thickens just enough to coat the spoon.
- I keep core ingredients on hand so I rarely need a special grocery run.
- Swaps can slightly change texture, so I adjust slurry and taste for balance.
| Classic | Swap | Effect |
|---|---|---|
| honey | low-carb honey alternative | Less sugar, similar sweetness; adjust by teaspoon if needed |
| soy sauce (regular) | low-sodium soy or tamari | Lower sodium or gluten-free with similar savory fat notes |
| cornstarch | arrowroot | Clearer, glossy finish; works well for paleo/gluten-free |
How I Make Honey Garlic Shrimp and Broccoli in One Pan
I follow a short, clear pan routine so the glaze stays shiny and every bite is balanced. The method focuses on quick sears and a final toss so the sauce clings without overcooking the protein.
Mix the sauce in a bowl and set some aside
I whisk the sauce in a bowl, then set aside about half. If I plan to marinate, I toss raw shrimp with one portion for up to 1 hour and keep the reserved sauce clean for finishing.
Cook the broccoli until tender-crisp with light char marks
I heat the pan over medium-high, add a splash of oil, then cook florets 5–8 minutes. I stir just enough to get char without burning, then move them to a plate.
Add shrimp and sear fast so they stay juicy
I add shrimp in a single layer and sear about 1 minute per side. I work in batches if needed to avoid steaming in the pan.
Toss everything in the sticky sauce until glossy and coated
Return veg to the pan, pour in the reserved sauce, then whisk in the slurry. I toss 2–3 minutes until the glaze is sticky and glossy. I finish with pepper, a pinch of heat if needed, and serve right away.
- Whisk sauce; set aside half.
- Sear broccoli 5–8 minutes; remove.
- Sear shrimp 1 min per side; return everything and toss 2–3 minutes.
| Step | Time | Note |
|---|---|---|
| Prep & whisk | 5 minutes | Reserve half of the sauce |
| Cook broccoli | 5–8 minutes | Tender-crisp with char |
| Sear shrimp & finish | 4–6 minutes | Toss with sauce until glossy |
Sheet Pan Option When I Want Even Less Cleanup
When I want the simplest clean-up, I pull out a sheet pan and let the oven handle the cooking. This method saves time and keeps me out of the kitchen during the busiest minutes.
High-heat roast for quick browning, then finish with shrimp
I preheat the oven to 450°F so veggies get caramelized instead of steamed. I spread florets in a single layer, toss with a little oil, salt, and pepper, and roast for about 12 minutes.
While the broccoli roasts, I pat thawed frozen shrimp dry and toss it with sauce so it’s ready. After the first roast, I add the shrimp and return the pan for 8–10 more minutes at high heat. Shrimp needs only a short finish to turn pink and firm.
- Keep pieces in one layer so heat circulates and you get browning, not sogginess.
- If the pan looks liquidy, spoon off or reduce that liquid on the stove for a thicker glaze.
- This way is great when I want minimal hands-on prep and easy cleanup.
| Step | Time | Note |
|---|---|---|
| Roast broccoli | ~12 minutes | High heat for caramelized edges |
| Add shrimp | 8–10 minutes | Short finish so shrimp stays tender |
| Drain or reduce juices | 2–3 minutes | Spoon off water or boil to thicken |
How I Serve It: Rice, Noodles, or Low-Carb Bowls
I usually plate this skillet right over warm rice so every bite soaks up the glossy sauce. That simple set-up makes dinner feel finished with little fuss.
Best bases I reach for
I pick brown rice when I want more fiber, jasmine for the classic takeout vibe, and cauliflower rice when I’m cutting carbs. Rice noodles are my go-to when I want something slurpable.
How I build bowls for meal prep
I layer grains on the bottom, add the saucy shrimp broccoli mix, then finish with extra sauce just before eating. That keeps textures fresh and prevents sogginess when I pack lunches.
- Family-style platter works when guests are over.
- Portion into containers for grab-and-go lunches.
- Quick sides: cucumber salad, pickled carrots, or steamed edamame.
Finishing touches that matter
A sprinkle of sesame seeds adds nutty crunch. I chop green onions for bright, fresh notes. A pinch of red pepper flakes brings gentle heat.
| Serving Option | Why I Choose It | When I Use It |
|---|---|---|
| Brown rice | More fiber and chew | Weeknight dinners for staying full |
| Cauliflower rice | Low-carb swap with similar presentation | When I want lighter bowls |
| Jasmine rice or noodles | Classic texture and comfort | When I want a takeout-style meal |
| Sides & Garnishes | Cucumber salad, edamame, sesame, green onions | To round out the plate or boost freshness |
Meal Prep and Storage Tips That Keep Shrimp Tender
I plan how I store dinner the minute it comes off the stove so my next meal still feels special. Good storage preserves texture, flavor, and the glossy sauce without extra fuss.
How I store leftovers in the fridge for 3-4 days
I cool the pan for a few minutes, then transfer portions to airtight containers. Keeping the protein and vegetables coated in sauce helps prevent drying out.
How I reheat without overcooking the shrimp
Shrimp overcooks fast, so I warm leftovers gently. In the microwave I zap in short bursts, stirring between, until just hot.
On the stove I use a skillet over low heat with a splash of water. That loosens the glaze and takes only a few minutes to warm through.
Best containers for grab-and-go lunches
I portion into single-serve containers so I avoid reheating the whole batch. BPA-free glass or leakproof plastic containers work best for fridge-to-microwave convenience.
- I treat this as a protein-forward meal for easy weekday lunches.
- Pairing with rice or cauliflower rice rounds out the plate and saves time when packing.
- After reheating, a tiny drizzle of sesame oil or chopped green onions refreshes flavor.
| Tip | Why it Helps | Timing |
|---|---|---|
| Airtight container | Prevents moisture loss and odor transfer | Store up to 3–4 days |
| Short microwave bursts | Limits overcooking of protein | 30–45 seconds, stir, repeat |
| Low-heat skillet | Restores glaze without toughness | 2–4 minutes with a splash of water |
Make It Again Anytime: Freezer Tips, Frozen Shrimp, and Frozen Broccoli
I separate components when I freeze this meal so texture holds up. I portion the sauce into its own container, freeze raw shrimp and florets apart, and label each pack with the date. That keeps shrimp from getting mushy in marinade and makes dinner assembly fast.
If I freeze after cooking, I cool completely, pack in a freezer-safe container or bag, and use within 1–2 months for best texture. For reheating, thaw frozen shrimp in the fridge, rinse if needed, and pat dry so it sears instead of steaming. Thaw frozen broccoli to room temp and dry it well before roasting or searing to regain browned edges.
I also note nutrition: shrimp is a nutrient-dense seafood with iron and vitamins and is low in fat when I limit oil. Choosing low-sodium soy or tamari helps keep overall sodium in check when cooking from frozen.