This post contains affiliate links. I may earn a commission if you purchase through them at no extra cost to you.
I promise a simple, reliable way to get golden brown, ultra-crispy crust with a fluffy, tender center—so you can curb your fries craving without deep-frying. This is my go-to side dish for busy weeknights and game-day plates because the prep is straightforward and the results feel restaurant-level.
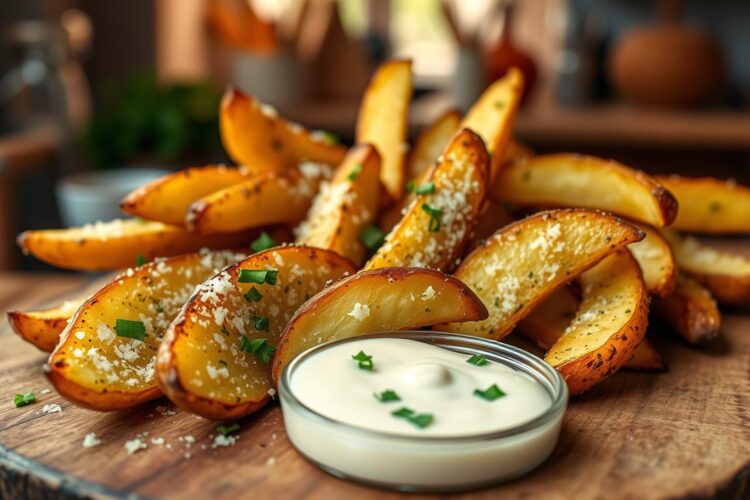
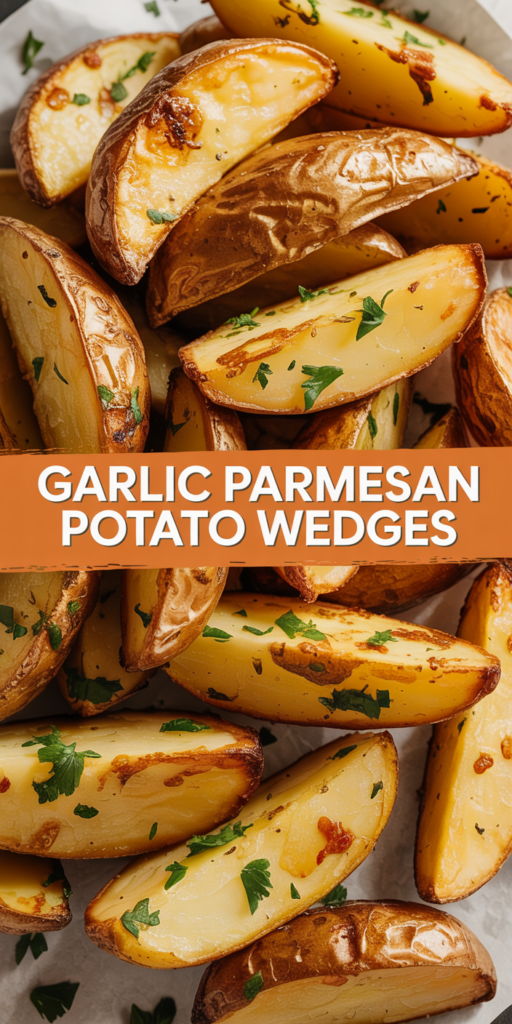
Expect bold garlic flavor, salty grated parmesan cheese, and a bright parsley finish that lifts every bite. These oven-baked, air-fryer friendly slices crisp on the outside and stay soft inside, making them perfect beside burgers or pork.
I’ll walk you through cutting the pieces, tricks for extra crunch, oven versus air fryer timing, and how to store and reheat so texture stays snappy. The shape works: more surface area for seasoning and cheese to cling to, with thick centers that remain tender.
Why I Make These Garlic Parmesan Potato Wedges Instead of Fries
When I want something hearty and crisp without deep-frying, I reach for thick-cut wedges every time.

Golden brown, ultra-crispy outside with a fluffy, tender center
The thicker cut gives a crunchy shell and a soft, pillowy interior. That contrast makes each bite satisfying.
I get more surface area for browning without sacrificing the tender middle. The result is a reliably crisp outside and a fluffy inside every time.
Bold garlic flavor, salty Parmesan richness, and a fresh parsley finish
A strong rub of garlic and grated parmesan melts into the crust and sticks to every ridge. The salty cheese adds savory depth.
Finely chopped parsley brightens the richness. It keeps the overall taste from feeling too heavy.
Perfect side dish for weeknight dinners, game-day snacks, and dipping
I serve these with burgers, pork tenderloin, or a simple dipping sauce like ranch or fry sauce. They work as a steady side for busy nights and party platters alike.
- Texture: ultra-crispy outside, soft inside
- Use: weeknights, game day, parties
- Finish: fresh parsley and extra parmesan cheese
| Occasion | Best Pairing | Why it Works |
|---|---|---|
| Weeknight dinner | Burgers | Hearty texture complements main and fills plate fast |
| Game day | Ranch or fry sauce | Thicker pieces hold up to dipping and stay dippable |
| Party platter | Pulled pork or BBQ | Bold flavor and sturdy shape make them crowd-pleasers |
Ingredients I Use for Crispy Parmesan Potato Wedges
The right mix of starch, oil, and cheese turns simple slices into a reliably crunchy side.
What I add and why
- 4 medium russet potatoes (or 3–4 Yukon Gold) — russet for crisp edges, Yukon Gold for creamier interior.
- 3 tablespoons olive oil (or avocado oil for higher smoke point).
- 1 tablespoon minced garlic or 2 teaspoons garlic powder (powder burns less at high heat).
- 1/4 cup grated Parmesan cheese plus 2 tablespoons for finishing.
- 1 teaspoon kosher salt and 1/2 teaspoon black pepper.
- 1 teaspoon paprika and 2 teaspoons Italian seasoning (optional) for extra seasoning.
- 1 tablespoon chopped fresh parsley for garnish.

| Ingredient | Amount | Why I Use It |
|---|---|---|
| Russet potatoes | 4 medium | Best texture for crisp, golden edges |
| Olive oil (or avocado) | 3 tbsp | Coats and crisps evenly without heavy greasiness |
| Grated Parmesan cheese | 1/4 cup + 2 tbsp | Creates a salty, savory crust that browns well |
How I Cut Potatoes Into Even Wedges That Cook at the Same Time
Cutting evenly is the simplest trick that turns a good batch into a great one.
My go-to method: half lengthwise, then slice into equal pieces
I start by slicing each potato in half lengthwise so the halves sit flat. Then I lay the flat side down and cut each half into three or four equal wedges, depending on the size.
For large russets I aim for eight wedges per potato. That size gives similar thickness so every piece finishes with consistent cooking.
Skin-on vs. peeled — my preference and why
I usually keep the skin on. It saves prep time and helps wedges hold their shape when baking or air-frying.
Peeling is fine if you want a softer bite. Either way, keep a large bowl nearby so cut pieces don’t brown while you finish slicing the rest.
- Even sizing prevents thick pieces from staying raw and thin ones from burning.
- Arrange wedges in a single layer on the pan, cut-side down when possible for better browning.
| Step | Why it matters | Quick tip |
|---|---|---|
| Slice in half lengthwise | Creates a flat surface to stabilize cutting | Use a steady knife and press down gently |
| Cut halves into equal wedges | Ensures consistent cooking across the batch | 3–4 wedges per half for medium tubers |
| Keep skin on (optional) | Better structure and faster prep | Peel if you prefer a softer texture |
My Secret for Extra-Crispy Oven-Baked Potato Wedges
Removing surface starch and managing moisture are the two steps that guarantee a crisp shell and a tender center.
Soak or hot-water blanch to remove starch
I give two simple options: a 10-minute soak in hot water or a hot-water blanch (water hot but not boiling) for about 10 minutes. This releases excess starch so the outside browns faster and more evenly on baked potato wedges.
Drying matters: how I prevent steaming
After the soak I pat pieces very dry with towels. If they go into the oven wet they steam and lose crunch. I press until the surfaces feel dry.
Spacing and coating for crisp edges
I spread wedges in a single layer on the pan with space between each piece. Then I coat every piece with oil and seasoning so the parmesan potato flavor reaches every ridge.
- Do not overcrowd the pan — leave breathing room for browning.
- Optional finish: broil 1–2 minutes at the end, watch closely to avoid burning cheese.
| Technique | Timing | Why it helps |
|---|---|---|
| Hot-water blanch or soak | 10 minutes | Removes surface starch for faster browning |
| Aggressive drying and single layer | Prep time 2–3 minutes | Prevents steaming so edges crisp on the pan |
| Quick broil finish | 1–2 minutes | Extra golden crust without drying the interior |
Follow these steps and your baked potato wedges should come out golden, crunchy, and fluffy inside. I use the same approach for parmesan potato wedges to keep texture consistent every time.
How I Make Garlic Parmesan Potato Wedges in the Oven
I use a high oven temp and a light oil coat to lock in crisp edges while the centers stay soft and tender.
Oven temperature and bake time
I preheat the oven to 425°F and bake for 25–30 minutes. That high heat is what gives a golden, crunchy surface without drying the middle.
If your oven runs hot, you can try 375°F for the same 25–30 minutes; expect slightly less crispness but still a tender interior.
Seasoning and cheese coating for even flavor
I toss the cut pieces first with oil, salt, pepper, and a mixed seasoning blend. Then I add grated cheese and toss again so the bits stick and don’t clump.
This two-step coat spreads flavor evenly and helps the cheese form a thin, savory crust during baking.
Finish timing: parsley and extra grated cheese
Halfway through baking I turn the pieces or rotate the pan to even out browning. Look for deep golden edges and a fork-tender center to know they’re done.
I scatter chopped parsley after the pan comes out of the oven for bright freshness. I also sprinkle extra grated cheese while the pieces are hot so it melts lightly and clings.
- Preheat oven to 425°F and prep a single-layer pan.
- Toss slices with oil, seasoning, and grated cheese; spread with space between pieces.
- Bake 25–30 minutes, turn once at halfway, watch for golden edges and fork-tender centers.
- Remove, add parsley and extra grated cheese, then serve warm.
| Step | Temp / Time | What to watch for |
|---|---|---|
| High-heat bake | 425°F — 25–30 minutes | Golden brown edges, crisp surface |
| Lower-temp option | 375°F — 25–30 minutes | Less crisp but tender inside |
| Finish | Cool 1–2 minutes | Parsley for freshness; extra grated cheese melts on hot pieces |
Air Fryer Garlic Parmesan Potato Wedges (Fast, Crispy, and Easy)
The air fryer makes these slices extra-crispy in far less time while keeping the inside soft and tender. I use it when I want deep-fried-style crunch with minimal oil and quick cleanup.
Why I preheat the air fryer for better crispiness
I always preheat the air fryer for about 10 minutes so the basket starts hot. A hot start seals the outside quickly and prevents sogginess from slow warming.
That instant blast of heat helps the cheese and seasoning form a golden crust rather than steaming the interior.
Air fryer time and temperature approach: start lower, finish hotter
My two-stage method cooks pieces through and then boosts browning for a crunchy finish.
- Optional: hot-water blanch for 10 minutes, then dry thoroughly.
- Preheat air fryer ~10 minutes.
- Cook 8 minutes at 360°F, shake the basket or toss gently.
- Increase to 400°F and cook 5 more minutes for extra crisp.
Shaking between stages prevents sticking and ensures even browning on all sides.
Batch cooking tips so the wedges don’t steam
Do not overcrowd the basket. I cook in single layers so air flows around each piece. If you pile them, trapped moisture creates steaming instead of crisp edges.
I coat the pieces evenly with oil, minced herb, and grated cheese so flavor sticks to every ridge. Finish with extra cheese and chopped parsley right before serving.
| Step | Temp | Minutes |
|---|---|---|
| Preheat | — | 10 |
| Stage 1 | 360°F | 8 |
| Stage 2 | 400°F | 5 |
Serving Ideas: My Favorite Dips and Mains to Pair With These Potato Wedges
A well-seasoned batch transforms into a dippable, comforting side in minutes. I treat these as a flexible side that works for casual nights and party platters.
Dipping sauces I reach for
I keep a handful of sauces ready so the crisp pieces stay the star. My go-to lineup: ketchup, ranch, fry sauce, and spicy mayo.
Each sauce adds a different contrast: tangy ketchup for kids, cool ranch for crowd-pleasing creaminess, fry sauce for savory balance, and spicy mayo when I want heat.
Easy mains that make a complete plate
These are an ideal side for burgers and pork tenderloin. The salty, cheesy crust holds up next to rich mains.
I also serve them with BBQ pulled chicken sandwiches for a fast weeknight meal. The sweet-smoky sauce is a great foil to the salty crust.
Don’t overlook hearty soups like beef barley or lentil soup. The crisp texture adds bite and helps a bowl feel more filling.
- Keep sauces warm or chilled as needed so dipping is easy.
- Finish with extra parmesan cheese and chopped parsley right before serving for brightness and visual pop.
- These are my better-than-fries side when I want thicker, fluffier bites with bold flavor.
| Serve With | Why It Works | Sauce Suggestion |
|---|---|---|
| Burgers | Hearty match that balances richness | Ketchup or ranch |
| Pork tenderloin | Firm protein meets salty, cheesy crust | Fry sauce or spicy mayo |
| BBQ pulled chicken | Sweet-smoky contrast to savory coating | Ranch or fry sauce |
| Beef barley / lentil soup | Crisp texture makes soup a fuller meal | Spicy mayo for a flavor lift |
Storing and Reheating Potato Wedges So They Stay Crispy
My goal when saving leftovers is simple: protect the crisp crust. I let the pieces cool on a wire rack so trapped steam doesn’t make them soggy.
Then I tuck cooled potato pieces into an airtight container and refrigerate. I aim to eat them within 2–3 days for the best texture and flavor.
To re-crisp, I spread the batch on a sheet pan and warm them in a 350°F oven until hot and crunchy again. The oven gives even heat and restores the crust well.
Short on time? The air fryer brings back crunchy edges faster than the microwave. Avoid microwaving if you care about crispness — it will soften the crust and dull the parmesan bite.
Expect reheated pieces to be a touch softer than fresh, but the seasoning and overall appeal hold up nicely in this recipe.