
This post contains affiliate links. I may earn a commission if you purchase through them at no extra cost to you.
I love a quick low carb baking trick that feels like comfort food. These are my go-to drop “bread” when I want warm, satisfying bites without wheat or sugar.
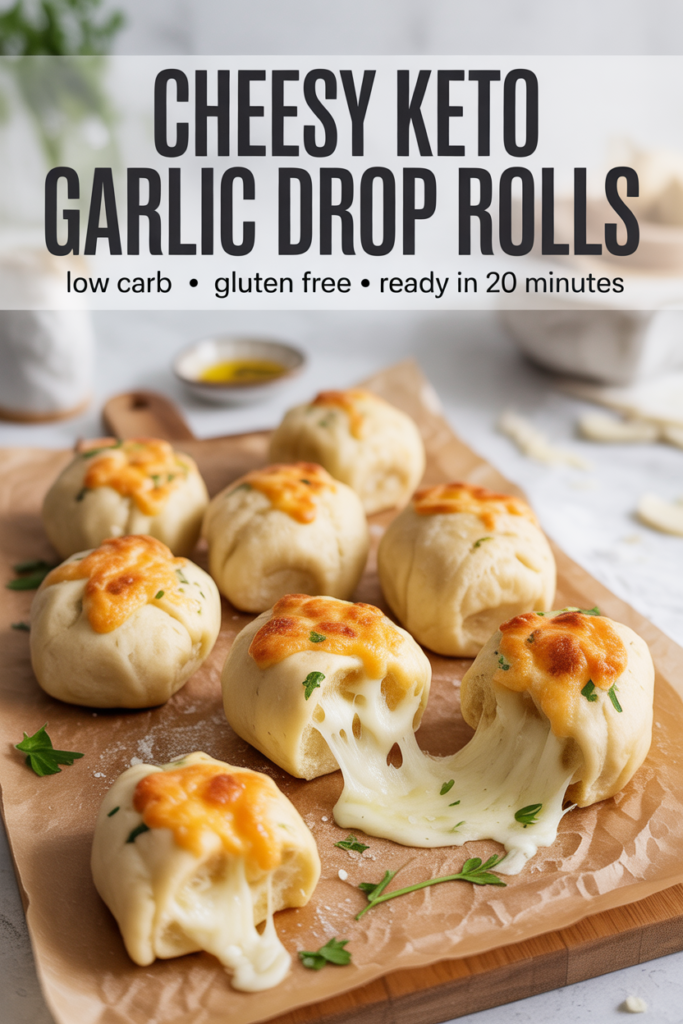
The tops turn golden-brown with a lightly crisp edge. Inside they stay soft and fluffy, with little pockets of melted cheese and a bold garlic note that lifts each bite.
There’s no kneading, shaping, or stress — just mix, scoop, and bake at about 350°F until puffed. I often brush them with garlic butter while warm for that bakery-like aroma and extra savor.
These easy biscuits are great with eggs for breakfast, as a side to chili, or to round out a simple weeknight meal. I use common staples like almond flour, baking powder, eggs, butter, sour cream, and shredded cheese, so the recipe is beginner-friendly and reliable.
Why I Make These Cheesy, Golden-Brown Keto Garlic Rolls on Busy Nights
On hectic evenings I need a simple, comforting bread substitute that comes together in one bowl and vanishes fast. I can mix the batter, scoop to the pan, and have warm, biscuit-like bites in under 30 minutes.
I rely on this recipe when I want a low carb side for soup or chili, or a quick breakfast companion with eggs. The total time from prep to table can be under 30 minutes, so it fits tight weeknight schedules.
- I mix everything in a single bowl, so cleanup is quick and the method is beginner-friendly.
- “Drop” means no kneading or shaping — scoop sticky batter onto a sheet and let the oven do the work.
- I always preheat oven early so the batter goes straight in for better rise and texture.
- The batter should be thick and sticky; that’s normal and forgiving if you’re new to baking.

Cheesy Keto Garlic Drop Rolls: What to Expect From the First Bite
When I break one open hot from the oven, the aroma hits before the taste does. Warm butter, baked cheese, and a garlic note fill the air and make these feel like restaurant-style garlic biscuits.

Soft interior, lightly crisp exterior
The outside forms a thin, golden-brown edge that gives a gentle crunch. Inside, the crumb stays soft and fluffy, not dry or crumbly.
Savory garlic-forward flavor with molten cheese pockets
I fold freshly shredded cheese into the dough so small melted bites appear in every piece. The savory garlic flavor is front and center, and brushing with melted butter plus garlic powder and parsley intensifies that hit right away.
Fresh-from-the-oven aroma and visual cues
- Tops showing a light golden-brown color mean they’re ready to come out.
- The warm, aromatic mix of butter and baked cheese sells the “real biscuit” vibe.
- Think keto cheddar notes and classic garlic biscuits in a quick, single-bowl form.
Ingredient Notes for a Foolproof Keto Dough (No Wheat Flour, No Sugar)
Nail the pantry items and this low-carb dough behaves every time. I keep the rule simple: no wheat flour and no sugar. Almond flour provides structure while keeping carbs low and adding a bit of protein and fat.
Almond flour vs almond meal — measuring tips
Almond flour is finely ground blanched almonds; almond meal is coarser and may include skins. I spoon the almond flour into the cup, then level it. That prevents a dry, crumbly dough and keeps my almond flour recipe consistent.
Baking powder and seasoning basics
I use aluminum-free baking powder to avoid any metallic aftertaste when I rely on a good rise. A light hand with powder gives lift without bitterness.
Garlic powder and salt build a savory baseline. Add dried herbs like Italian seasoning or parsley to nudge the flavor toward classic garlic-bread notes.
Cheese, wet ingredients, and optional add-ins
- Cheese: mozzarella melts into stretch; cheddar cheese adds sharpness. I shred my own for better melt and fewer additives.
- Wet: eggs bind, melted butter and sour cream keep the interior tender and moist.
- Optional: a pinch of xanthan gum improves structure and reduces crumble; parsley or Italian seasoning add freshness.
Exact Ingredients and Measurements I Use (Keto-Friendly and Consistent)
I keep a tight, consistent ingredient list so every batch turns out the same. Below are the exact keto-friendly ingredients I measure for reliable texture and flavor. No wheat flour or sugar in this list.
Dry ingredients
- 1½ cups blanched fine almond flour
- 2 tsp baking powder
- 1 tsp garlic powder
- ¼ tsp salt
- Optional: ½ tsp xanthan gum for firmer structure
Wet ingredients
- 2 large eggs
- ⅓ cup full-fat sour cream
- 3 tbsp melted butter
Cheese and topping
- ¾ cup shredded cheddar cheese (or shredded mozzarella—see notes)
- Garlic butter topping: 2 tbsp melted butter + ½ tsp garlic powder + ½ tbsp finely chopped parsley
- Optional: ½ tsp Italian seasoning or extra parsley
| Cheese | Flavor | Texture |
|---|---|---|
| Cheddar cheese | Sharp, savory | More bite and golden pockets |
| Mozzarella | Milder, milky | Stretchy, softer melt |
| Mix | Balanced | Best of both worlds |
These precise cups and spoons keep the ingredients predictable. I find full‑fat dairy and shredded cheese give the best tender crumb and melt. Use this list to prep before you mix so the recipe goes smoothly.
Kitchen Tools I Grab Before I Preheat the Oven
Before I preheat, I line up the few tools that make this bake foolproof. Setting everything out first keeps the one-bowl workflow moving and reduces mistakes.
Basic mixing gear
I use a large mixing bowl for the dry ingredients, a whisk to blend them, and a spatula for folding. This simple setup keeps mixing quick and tidy.
Bakeware options
A parchment-lined baking sheet gives rustic biscuits with uneven tops. For neat, even pieces I grease a 12-cup muffin pan instead.
Portioning and measurement
A large cookie scoop or ice cream scoop helps portion about 3 tablespoons per roll so the bake time stays predictable in minutes. I also keep a set of measuring cups and spoons close—small errors in almond flour or baking powder change results fast.
- large mixing bowl, whisk, spatula
- baking sheet (parchment) or greased muffin pan
- cookie scoop (~3 tbsp) and measuring cup/spoons
Gather these, preheat oven to the recipe temp, and you’ll be ready to drop batter and bake without pause.
How I Make the Batter in One Bowl (Beginner-Friendly Mixing Method)
I start with one bowl and a clear plan so the batter comes together fast.
Preheat and prep
I preheat oven to 350°F and line a baking sheet or grease muffin cups. This avoids scrambling when the sticky batter is ready.
Whisk dry ingredients
In the bowl I whisk almond flour, baking powder, garlic powder, salt, and optional xanthan gum. Whisking evens out rising agents and seasoning so each piece bakes the same.
Mix wet ingredients
In a second small bowl or the same bowl after the dry, I beat eggs, sour cream, and melted butter until mostly smooth. Small sour cream lumps are fine; they melt during baking.
Combine into a thick batter
I fold wet into dry and stir just until a thick, sticky dough forms. The batter should not be pourable. This texture is right for drop-style baking and keeps the interior tender.
Fold in cheese last
I fold shredded cheese in at the end so pockets of melt stay visible after baking. Then I scoop the dough and bake. The whole mixing step takes only a few minutes.
| Step | Time | Doneness Cue |
|---|---|---|
| Preheat & prep | 5 minutes | Oven at 350°F; sheet ready |
| Whisk dry | 1–2 minutes | Evenly blended almond flour and baking powder |
| Mix wet & combine | 2–3 minutes | Thick, sticky batter; not pourable |
| Fold cheese | 1 minute | Visible shredded cheese pockets |
Follow these simple steps and the recipe feels foolproof. No kneading or shaping—just scoop and bake.
Drop, Bake, and Brush: The Step-by-Step Baking Instructions
I time my baking so the batter becomes golden and fragrant by table time. Below I walk through scooping, spacing, bake minutes, and the finish that makes these biscuits smell irresistible.
Portioning and spacing for even bake
I scoop about 3 tablespoons of batter per piece so each bakes the same. That yields roughly nine biscuits on a standard baking sheet or a filled 12-cup muffin pan with a few cups left empty.
Space drops about 1½ to 2 inches apart on the baking sheet so hot air browns the tops instead of steaming them.
Bake time, oven cues, and doneness checks
Preheat the oven to 350°F and bake for about 18–22 minutes. Look for lightly golden tops and set centers.
Use a toothpick test: it should come out clean from the center. The baked-cheese aroma and browned edges mean they’re done.
Garlic butter topping and brushing tips
Mix 2 tbsp melted butter, ½ tsp garlic powder, and ½ tbsp chopped parsley while the biscuits bake. Brush tops biscuits while warm so the butter soaks in and the garlic hits hard.
| Step | Measure | Cue |
|---|---|---|
| Portion | 3 tbsp each | Even mounds |
| Bake | 18–22 minutes | Lightly golden tops |
| Finish | Garlic butter brush | Warm, shiny surface |
Serving Ideas I Love (Breakfast, Savory Side, or Easy Keto Meal)
I find these warm biscuits suit many simple meals. They make breakfast feel hearty, yet remain low carb enough for most plans.
Breakfast and savory sides
I plate a warm biscuit with bacon and eggs when I want a quick, filling morning meal. The cheese and garlic notes pair well with fried eggs or creamy scrambled eggs.
They also lift bowls of soup or chili. A single biscuit turns a light bowl into a full, comforting dinner.
Make sandwich bread or quick snacks
I slice them horizontally to use as low carb sandwich bread. Fill ideas I use: turkey + mayo, ham + cheddar, or a simple chicken salad.
Because they have good protein and fat from eggs, butter, sour cream, and cheese, they feel rich while keeping net carbs far below classic biscuits. This makes the recipe a handy swap when you want bread without the carbs.
| Pairing | Why it works |
|---|---|
| Bacon & eggs | Hearty, classic breakfast plate |
| Soup or chili | Adds texture and savory depth |
| Sandwiches | Handheld, low-carb bread alternative |
Storing, Reheating, and Helpful Recipe Tweaks for Next Time
Storing and reheating correctly makes these bites feel just baked again. I keep instructions simple so you can enjoy them without fuss.
How I store leftovers
I place cooled biscuits in a sealed, airtight container and refrigerate. This keeps the interior soft and prevents fridge odors from changing the flavor.
Quick reheating options
For 1–2 biscuits I microwave about 20 seconds for a fast warm-up. If I want crisp tops, I warm them in a 325°F oven for 6–8 minutes.
Easy flavor swaps and small fixes
Use mozzarella for stretchy melt or sharp cheddar cheese for more bite. Add extra garlic powder or dried herbs for a garlic-bread twist.
Texture troubleshooting
If dough is too wet to scoop, add 1–2 tablespoons almond flour. If it’s too dry, stir in a little more sour cream or an extra egg yolk. Spoon-and-level your flour to avoid errors; baking powder should be aluminum-free to prevent a metallic taste.
| Storage | Time | Reheat |
|---|---|---|
| Fridge (airtight) | 3–4 days | Microwave 20s or oven 6–8 min |
| Freezer (sheet then bag) | Up to 3 months | Thaw, then oven 8–10 min |
| Room temp (short) | Same-day only | Microwave 10–15s |
Affiliate links: As an Amazon Associate I earn from qualifying purchases. Nutrition note: net carbs and calories vary by brand and serving size; fiber affects net carb totals. These values are estimates—I’m not a certified nutritionist; consult a professional for medical advice. Don’t forget to pin this recipe so you can find it next time.
My Favorite Way to Enjoy These Warm, Cheesy Garlic Rolls
There’s nothing like pulling a tray from the oven when the tops glow and the cheese peeks at the edges. That first warm breath of baking scent always makes me smile.
I brush each biscuit with melted butter mixed with a touch of garlic and parsley. That quick finish is what gives these the true garlic biscuits basket vibe and lifts every bite.
For the simplest serve, I split one, add a pat of butter, and eat it hot so the cheese pockets are still melty. This recipe stays low carb and fits busy nights—mix in a bowl, scoop, and bake.
If you have almond flour and baking powder on hand, make a double batch next time. My family always asks for more, so doubling the tray saves me from the scramble.