This post contains affiliate links. I may earn a commission if you purchase through them at no extra cost to you.

I reach for these Keto Cream Cheese Pumpkin Bars any time I want full pumpkin season vibes without the fuss of a whole pie. They give big fall flavor in a simple square pan that slices cleanly for holiday plates and potlucks.
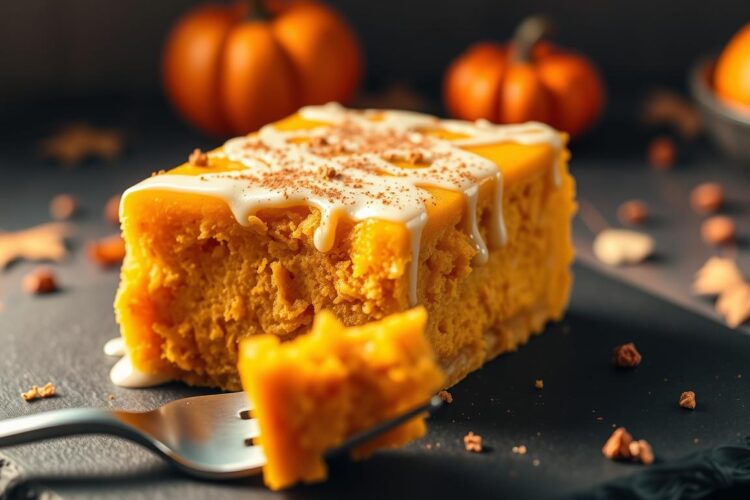
The base is a moist, dense pumpkin spice cake that tastes like traditional fall baking. I top it with a thick, smooth frosting and a light dusting of cinnamon for a perfect finish.
This low-carb dessert feels indulgent but is made with sugar free-style swaps so people often don’t guess it’s keto. The method is friendly: easy mixing, a quick bake, and a short chill for neat edges.
Read on and I’ll walk you through clear ingredients, precise measures, and step-by-step instructions so you can bring these bars to your next gathering with confidence.
Why I Make These Keto Pumpkin Bars Every Fall
I bring these to every autumn gathering because they deliver cozy spice and a rich, tangy topping without the pie fuss.

Pumpkin spice flavor with tangy cream cheese frosting
Warm fall spices meet a silky frosting that cuts the sweet edge. The balance of spice and tang keeps the flavor lively and familiar.
Moist, dense cake-style bars that slice clean
The base bakes soft and tender, yet dense enough to hold neat slices for sharing. That texture echoes a cheesecake-like mouthfeel and invites “one more square” moments.
A low-carb holiday dessert nobody guesses is sugar free
I love how this dessert tastes indulgent while staying lower in carbs. Guests enjoy it exactly as directed, and chopped walnuts or pecans add a welcome crunch.
- One-pan prep and quick mixing make it an easy fall baking shortcut.
- Chill before slicing for bakery-neat edges and clean servings.
What to Expect: Moist Pumpkin Spice Base + Thick Creamy Frosting
Think of a tidy square of dessert that combines soft, spiced cake with a dense, silky topping for easy sharing.
The base is cakey but dense — more like a thin pumpkin cake than a fluffy cupcake. It stays intact when cut, so slices look neat on a platter.

The spice profile is cinnamon-forward, with a gentle nutmeg and clove hum when I use pumpkin pie spice. That warm aroma makes the kitchen smell like autumn.
The frosting is thick, smooth, and creamy, with a classic tang that balances sweetness. Chill the finished tray so the topping firms for cleaner cuts.
- Cakey yet dense base that holds shape when sliced
- Warm cinnamon-led spice mix with subtle nutmeg and clove notes
- Thick, tangy frosting that tames the sweetness
- Light dusting of cinnamon on top for aroma and a bakery finish
- Tastes like pumpkin pie meets cheesecake in bar form — easy to serve
Quick Overview: Time, Pan Size, and Oven Temperature
Before you mix ingredients, I cover the basic timing and pan choices so the bake goes smoothly from start to finish.
Preheat and pan prep
I always preheat oven 350°F (177°C) before assembling batter. I line an 8×8 or 9×9 pan with parchment for an easy lift-out and cleaner edges.
Bake time and doneness cues
Bake the tray at oven 350°F about 30–35 minutes in most pans. In a slightly shallower 9×9 you may see good results at 25–30 minutes. Start checking a few minutes early to avoid overbaking.
Use the toothpick test: a clean toothpick from the center and a surface that looks set (not jiggly) mean the bars are done. Pull them as soon as they pass the test to keep the texture moist.
Cool completely before frosting. I let the base reach room temperature so the topping stays thick and does not melt. After frosting, a short chill gives the neatest slices in just minutes.
| Pan Size | Typical Bake Time (minutes) | Doneness Cue |
|---|---|---|
| 8×8 | 30–35 | Toothpick clean; surface set, no jiggle |
| 9×9 | 25–30 | Toothpick clean; slightly faster edges |
| Shiny vs dark pan | Adjust −2 to +5 minutes | Watch surface and toothpick for best timing |
Tools I Use for Pumpkin Bars (No Fancy Equipment Needed)
I keep my toolkit simple so the bake stays stress-free and the results stay reliable. A few common items cover the whole process from mixing to neat slices.
Mixing and measuring
I use two mixing bowls — one for wet ingredients and one for dry — plus measuring cups and spoons. Accurate measures matter because this low-carb recipe is sensitive to ratios.
Mixing and spreading
A hand mixer makes the batter silky and the frosting fluffy. You can whisk by hand with a good effort, but the hand mixer speeds things and gives a smoother finish.
- Whisk and rubber spatula for folding and scraping.
- Parchment sling to lift the whole slab from the pan for tidy slicing.
- Offset spatula (or butter knife) to smooth the cream cheese topping evenly.
| Tool | Purpose | Handheld Alternative |
|---|---|---|
| Mixing bowl (large) | Combine wet ingredients | Glass bowl |
| Mixing bowl (small) | Whisk dry ingredients | Metal bowl |
| Parchment sling | Lift cooled tray cleanly | Greased pan edge |
| Offset spatula | Spread frosting evenly | Butter knife |
Pumpkin Bar Ingredients (Exact Measurements, Keto-Approved)
Start with exact amounts for the base; that balance keeps the texture moist and sliceable. Below I break the list into dry and wet so shopping and mixing stay simple.
Dry ingredients
- 1 cup superfine blanched almond flour
- 2/3 cup granulated monk fruit/allulose blend (or similar low-carb sweetener)
- 2 tsp baking powder
- 1 tsp pumpkin pie spice (or 3/4 tsp cinnamon + 1/4 tsp nutmeg)
- 1/2 tsp fine sea salt
Wet ingredients
- 1 cup pumpkin puree (use pure pumpkin, not pie filling)
- 2 large eggs
- 1/4 cup melted butter or coconut oil
- 1 tsp vanilla extract
- 2 oz cream cheese, softened and mixed with the fat
I prefer a monk fruit/allulose blend for moisture and clean sweetness. If you want deeper flavor, a brown sugar-style low-carb sweetener works well in the same cup measure.
| Sweetener | Why I use it | Result |
|---|---|---|
| Monk fruit/allulose blend | Retains moisture, minimal aftertaste | Soft, sliceable texture |
| Brown sugar-style low-carb | Richer, caramel notes | Deeper flavor, slightly darker crust |
| Pure erythritol | Granular, can be dry | Not recommended alone for this ratio |
Note: measuring 1 cup of puree matters more than counting cans. The list is balanced to keep carbs low while preserving cake-like texture in this fall recipe.
Cream Cheese Frosting Ingredients (Exact Measurements)
Good frosting starts with measured ingredients and a method that avoids grit. I keep this topping thick and tangy so it reads like a cheesecake-style finish, not a thin glaze.
- 6 oz cream cheese, softened to room temperature
- 1/3 cup powdered monk fruit/allulose blend (powdered sweetener prevents grit)
- 1 tsp vanilla extract
- 1 tbsp heavy cream — optional, add slowly only if needed to loosen
I use powdered low-carb sweetener because it dissolves smoothly. That keeps the frosting creamy and prevents a grainy sugar bite.
The goal is a thick, spreadable texture that holds shape like classic cheesecake frosting. The tang from the cheese balances the sugar and brightens the pumpkin layer beneath.
If the frosting feels stiff, I add the heavy cream by teaspoons until it spreads easily. Stop when the topping is spreadable but not runny — you want neat slices after a short chill.
How I Make the Pumpkin Batter
I start the batter with warm, melted fats so the mix comes together silky and lump-free. I work in a single mixing bowl for the wet stage, then use another for the dry ingredients to keep things tidy.
Melt fats and smooth the soft cheese
I melt butter with the soft cream cheese in short microwave bursts, stirring between each burst until smooth. You can use a double boiler if you prefer gentler heat.
Beat the wet mix until silky
Into the warm mix I add pumpkin puree, eggs, and vanilla. I beat until the wet mix looks glossy and uniform; the texture should be pourable but thick.
Whisk dry ingredients for even spice
In a separate bowl I whisk almond flour, baking powder, sweetener, salt, and spice so the flavor is even throughout the batter.
Combine without overmixing
- Fold the dry mix into the wet in two additions.
- Stir on low until just combined; stop when no dry streaks remain.
- The batter should be thick, scoopable, and evenly colored.
| Cue | What to look for | Fix |
|---|---|---|
| Too thick batter | Clumpy, dry pockets | Check flour measure; add 1 tbsp puree or cream |
| Too loose batter | Runs from spoon | Fold in 1–2 tbsp almond flour |
| Uneven color | Streaks of dry flour | Mix gently until uniform |
Baking the Pumpkin Bars Until Perfectly Set
I smooth the batter into the pan so the whole tray bakes evenly from edge to center. A level surface prevents high edges and a dense middle, and it helps the frosting sit flat later.
Smoothing the top for uniform bake
Use an offset spatula or the back of a spoon to even the layer. Work quickly so the batter stays slightly warm and settles smoothly.
How long to bake and doneness cues
- Preheat the oven to 350°F and place the pan in the center rack.
- Bake about 30–35 minutes. If you use a dark pan, start checking at 25 minutes.
- Look for a surface that appears set and not shiny. The center should not wobble.
- Insert a toothpick in the middle — it should come out clean or with a few moist crumbs.
- Avoid overbaking; once the bars pass the “just done” line they dry quickly, which hurts texture and carb-sense in this recipe.
Cooling so the frosting stays thick
Let the tray cool completely in the pan on a wire rack. If you used parchment, lift the slab after it reaches room temperature and place it on the rack to finish cooling.
| Step | Minutes | Visual Cue |
|---|---|---|
| Bake | 30–35 | Top set; no wobble |
| Check (dark pan) | 25+ | Edges pull slightly from pan |
| Cool | Until room temp | Surface firm; ready for frosting |
Cooling completely is essential. A cold base keeps the frosting thick like a cheesecake topping and makes neat, sharp slices when you serve these pumpkin bars.
Mixing the Cream Cheese Frosting Smooth and Fluffy
A few simple steps turn soft cheese and sweetener into a thick, cheesecake-style topping. I keep the method short so the frosting is glossy and easy to spread.
How I get that thick, spreadable consistency
First, I work with fully softened cream cheese. Cold lumps make the whole mix gritty, so room temperature matters.
I beat the cream cheese with powdered sugar substitute and vanilla in a clean bowl until it looks glossy and lump-free. I scrape the sides often so everything blends evenly.
The target is a frosting thick enough to hold soft swirls but loose enough to spread without tearing the pumpkin layer beneath. That cheesecake-like texture makes slices neat and rich.
When I add heavy cream (and how little you actually need)
- Check texture after sweetener blends: if it feels stiff, add heavy cream.
- Add in teaspoon splashes, mixing fully between each splash.
- Stop when the topping spreads smoothly but still holds shape; a little cream goes a long way.
| Cue | Amount | Effect |
|---|---|---|
| Stiff frosting | 1 tsp cream | Loosens for spreading |
| Too loose | None; chill | Firm up for slicing |
| Perfect balance | 1–2 tsp total | Cheesecake-like hold |
My final tip: taste as you go. The frosting should read rich but not overly sweet for this recipe. Chill briefly before slicing so the topping stays put.
Assembling the Layers for Keto Cream Cheese Pumpkin Bars
Once the tray cools, I focus on building clean layers that look as good as they taste. I wait until the base reaches room temp — never frost while warm — so the topping keeps its shape.
Frosting the cooled base in an even layer
I only frost after the base has cooled completely. Warmth will thin the cream cheese topping and blur the layer between cake and frosting.
I use an offset spatula to spread the frosting into a smooth, even layer. That gives straight corners and a consistent thickness across the pan.
Chilling for cleaner slicing and neater edges
After frosting, I refrigerate the tray for at least 30 minutes so the topping firms. Chilling turns the texture into a cheesecake-like bite while the pumpkin layer stays moist.
This short rest makes cutting sharp squares or slimmer bars far easier and keeps edges tidy for serving.
Finishing touch: a light dusting of cinnamon
Just before serving I dust a little cinnamon for warm spice aroma. For crunch, I sometimes sprinkle chopped pecans or walnuts over the top.
| Step | Time (minutes) | Result |
|---|---|---|
| Frost when cool | — | Clean layer, no melt |
| Chill | 30 minutes | Cheesecake-like hold for neat bars |
| Finish | 1–2 | Cinnamon dust and optional nuts |
This final assembly keeps texture and flavor true to the recipe and makes every slice feel seasonal and polished.
Keto Cream Cheese Pumpkin Bars for Holidays, Potlucks, and Meal Prep
For potlucks and meal prep, I make this tray because it stays moist and serves a crowd without fuss.
How I cut them into squares or slimmer portions
I usually cut the pan into nine large squares for plated dessert service. For bigger gatherings, I slice the slab into 16 medium pieces so everyone gets a tidy square.
When I need more servings, an 8×8 yields about 18 slim bars. I chill the tray for at least 30 minutes so the topping firms before I slice.
- I love this as a low carb holiday dessert because it’s easy to transport and portion.
- Slice right after chilling so the frosting won’t drag and edges stay sharp.
- Wipe the knife between cuts for bakery-like sides that look polished on a platter.
- These keep well for meal prep; the flavor deepens after a day chilled and the texture stays moist for several days.
| Cutting Style | Servings (8×8) | Best For |
|---|---|---|
| 9 large squares | 9 | Plated dessert, special servings |
| 16 medium pieces | 16 | Family gatherings, casual buffet |
| 18 slim bars | 18 | Potlucks and sharing trays |
This is one of my most reliable pumpkin recipes when the baking calendar gets busy. It’s simple to portion, and guests always ask for the method.
Ingredient Swaps and Flavor Variations (Still Low Carb)
A few smart swaps let you tweak flavor while keeping the bars moist and low carb. I change one ingredient at a time so I can judge the effect on texture and taste.
Fat choices and avoiding coconut flavor
Use butter for a rich, classic finish. It adds depth and a golden crust.
If you prefer extra moisture, use coconut oil. Pick refined coconut oil to avoid a coconut taste.
Sweetener swaps and frosting notes
I favor a monk fruit/allulose blend for a sugar-like result and good moisture. A brown sugar-style low-carb sweetener gives deeper, caramel notes.
For frosting, powdered sweetener prevents grit and keeps the texture smooth.
Toppings and why coconut flour is a no-go here
Chopped spiced pecans or walnuts add crunch and a holiday look. They pair well with warm spice and the almond flour base.
Do not swap in coconut flour for flour measured here. Coconut flour is very absorbent and will make the bars dry and crumbly in this ratio.
| Swap | Effect | When I Use It |
|---|---|---|
| Butter | Rich flavor, firmer crust | Classic taste |
| Refined coconut oil | More moist, neutral flavor | When I want extra tenderness |
| Monk fruit/allulose blend | Sugar-like, moist | Main sweetener |
| Brown sugar-style sweetener | Deeper caramel notes | When I want darker flavor |
Storage, Freezing, and Make-Ahead Tips
Storing and freezing the finished slab correctly saves time and keeps slices neat. Below I share how I keep the topping stable and the base moist so the finished squares feel like a fresh bakery treat.
Refrigerator storage for frosted squares
Because the frosting contains cream cheese, I store the frosted bars in an airtight container in the fridge for food safety and best texture.
They keep well for up to 1 week. Unfrosted pieces can sit 2–3 days chilled before topping.
Freezer method for best texture
For longer storage I freeze the slab, not individual slices. First chill the frosted tray so the topping firms fully.
- Wrap tightly in plastic wrap, then a layer of foil to prevent freezer burn.
- Freeze up to 3 months for best quality.
- To thaw, move to the refrigerator overnight and leave the wrap loose so the frosting does not stick.
When I frost if I’m prepping ahead
I bake and let the base cool completely the day before. If I want the prettiest top, I frost the next morning before guests arrive.
Chilling after frosting gives a cheesecake-like hold and makes slicing cleaner. These simple tips keep this low carb recipe easy to prep and serve.
| Item | Storage | Best Practice |
|---|---|---|
| Frosted slab | Refrigerator, up to 1 week | Airtight container; chill before wrapping |
| Unfrosted base | Refrigerator, 2–3 days | Cool completely; cover loosely |
| Frozen slab | Freezer, up to 3 months | Chill, wrap plastic + foil, thaw overnight in fridge |
Nutrition Notes: Net Carbs, Serving Size, and Recipe Card Details
I explain how I calculate net carbs and why the number shifts with different sweeteners. I keep this short so you can pick a portion that fits your plan.
How I estimate net carbs
I total the recipe carbs, then subtract fiber and applicable sugar alcohols from sweeteners. For blends that include allulose or erythritol, I subtract those where the label allows.
Different brands list carbs differently, so the final net carb figure changes by ingredient choice and serving size.
Practical serving guidance
I often cut the tray into 16 smaller squares for a lower-carb option or 9 larger pieces for a richer serving. Smaller portions drop the carbs per piece and make it easier to fit into a low carb day.
- Smaller portion: 1/16 piece ≈ ~2 net carbs (typical with monk fruit/allulose blend).
- Larger portion: 1/9 piece ≈ ~3.1 net carbs in some calculations.
- Results depend on almond flour brand, sweetener blend, and exact cup measures in the ingredients list.
| Factor | Effect on net carbs | What I do |
|---|---|---|
| Sweetener type | Can lower carbs if sugar alcohols are subtracted | I note the brand and adjust calculations |
| Almond flour brand | Carb count varies by fiber and processing | I use the package label when I plug numbers into a calculator |
| Serving size | Big impact on carbs per piece | I list both 9 and 16 serving options in the recipe card |
Check product labels and use the recipe card to copy exact ingredients and serving breakdown into your favorite nutrition calculator. This section is for transparency, not medical advice, and helps you make the numbers work for your keto pumpkin plan.
One More Batch for the Season: My Favorite Way to Serve These Pumpkin Bars
One more batch becomes a habit: the balanced spice and firm, cheesecake-like frosting keep me coming back each fall. I usually serve a chilled square straight from the fridge with a fresh cinnamon dusting so the topping stays thick and holds its shape.
For guests I add a tiny pinch of pumpkin pie spice and a few chopped nuts for crunch and contrast. A cup of coffee or an after-dinner decaf makes this a cozy, no-fuss treat that reads like real baking.
This keto pumpkin version is repeatable. With simple almond and flour staples, a touch of butter and vanilla, and reliable bake time, I save the recipe, share the post, and tuck it into my rotation all season.