This post contains affiliate links. I may earn a commission if you purchase through them at no extra cost to you.
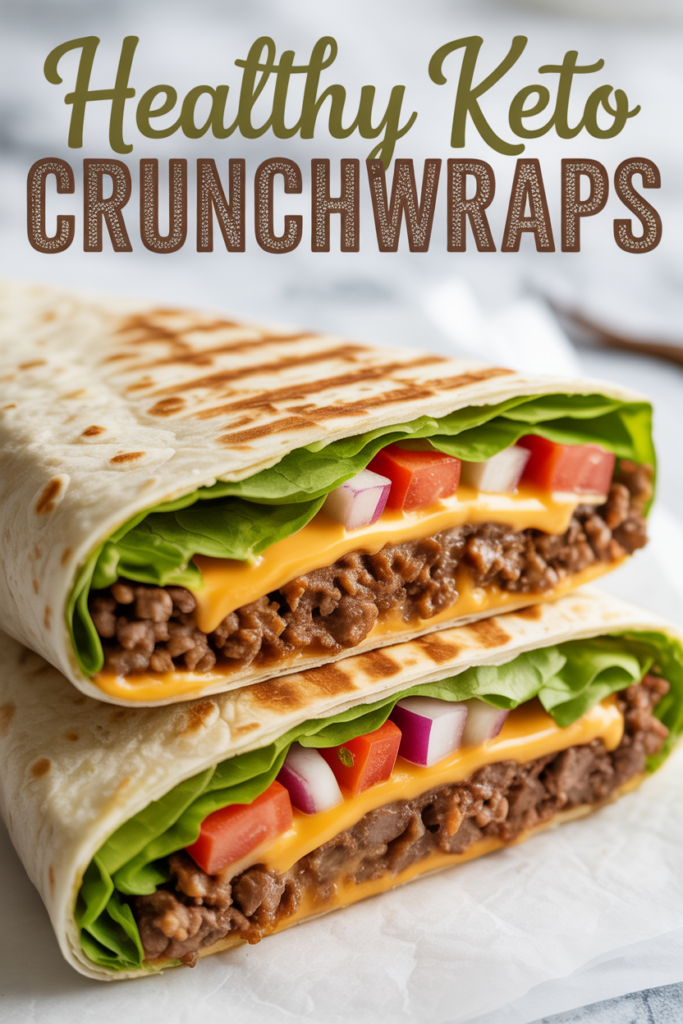
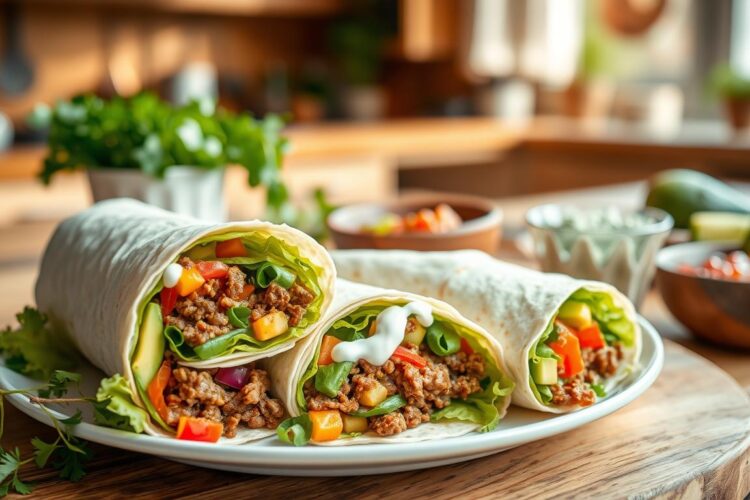
I’m sharing my take on a low-carb recipe that channels the Taco Bell vibe without the carb load. I built this keto crunchwrap to give you a golden, lightly charred tortilla, a crunchy cheese crisp, and a warm, seasoned beef center that melts together like the real thing.
The method is simple and reliable for weeknight meals or meal prep. I use large 10″ keto tortillas (La Banderita or Ole Xtreme) and a small 4.5″ inner round like Mission Zero Carb when I want zero-carb options. Baking the cheese crisp at 375–400°F for 6–9 minutes gives the perfect crunch.
You’ll find exact ingredient amounts and step-by-step searing tips with avocado oil so the exterior crisps while the inside stays molten. Net carbs can fall to about 5–8 g depending on your tortilla and sauce choices, making this a satisfying, low-carb swap for Taco Bell fans.
Why I Crave These Keto Crunchwraps Right Now
I crave this lighter wrap because it delivers the same deep taco pleasure without the carb drag. The 10-inch tortilla folds into a neat triangle and seals with a small 4.5-inch inner round so nothing leaks while frying.

A low-carb twist with a golden, lightly charred exterior
The exterior gets pressed until golden-brown with flecks of char. That signal tells me the cheese is molten and the ground meat is hot inside.
Crispy outside, warm and savory inside — perfect for lunches, dinners, or meal prep
I stack seasoned meat, melted cheddar, crisp lettuce, diced tomatoes, and red onion under a crunchy cheese disk. Every bite balances creamy and crunchy textures.
- Same nostalgic crunchwrap supreme feel but with far fewer carbs — the fast-food version can top 71 g carb, while this method cuts that dramatically.
- Quick to assemble, fast to cook, and ideal for batch meal prep.
- Balanced cheese keeps it melty without greasy excess, and a touch of sour cream brightens the layers.
| Feature | Fast-Food Classic | My Low-Carb Method |
|---|---|---|
| Net carbs | ~71 g | ~5–8 g |
| Tortilla size | Large flour | 10″ keto tortilla + 4.5″ seal |
| Crunch method | Fried shell | Cheese crisp + seared tortilla |
| Core filling | Seasoned meat, cheese, lettuce | Seasoned ground meat, cheddar, lettuce, tomatoes |
Exact Ingredients You’ll Need
Gather these ingredients and amounts before you start so assembly goes fast and consistent. I list the components by role to keep prep tidy.

For the seasoned ground beef
1 lb ground beef, 2–3 tablespoons low-sugar taco seasoning, and 2/3 cup water. Simmer until saucy and well seasoned. Add a pinch of kosher salt if needed.
For the keto “tostada” cheese crisp and tortillas
1 cup shredded cheddar divided into four 4-inch circles. Bake at 375–400°F for 6–9 minutes until edges brown and centers crisp. Use four 10-inch keto tortillas for the outer wrap and four 4.5-inch rounds (or Mission Zero Carb 4.5″) to seal the center.
Fresh layers, cheeses, sauces, and oil
2 cups shredded lettuce, 1 cup diced tomatoes, 1/4 cup finely diced red onion. For melt and glue: 1 cup shredded cheddar plus 1/2–3/4 cup cheese sauce or queso. Finish with 1/2 cup sour cream. For searing: 2–3 tablespoons avocado oil.
| Component | Amount | Purpose |
|---|---|---|
| Ground beef mix | 1 lb, 2–3 tbsp seasoning, 2/3 cup water | Seasoned, saucy filling |
| Cheese crisp | 1 cup cheddar (divided) | Crunchy tostada layer |
| Tortillas | 4 × 10″ outer + 4 × 4.5″ rounds | Wrap and center seal (see brands) |
| Fresh & sauces | 2 cups lettuce, 1 cup tomatoes, 1/2 cup sour cream | Freshness and cool balance |
Suggested brands: La Banderita 10″ (5 g net carbs), Ole Xtreme Wellness 10″ (7 g net carbs), Mission Zero Carb 4.5″ (0 g). These let you control carbs and texture for a better crunchwrap supreme-style result.
How to Make Keto Crunchwraps Step by Step
Follow these simple steps and I’ll walk you through making a golden, sealed triangle that holds melty filling and a crunchy cheese layer.
Cook the filling: In a large skillet over medium-high heat, brown 1 lb ground beef, breaking it up as it cooks. Stir in 2–3 tablespoons taco seasoning and about 2/3 cup water, then simmer 2–4 minutes until slightly thickened and glossy.
Bake the cheese crisp: Preheat the oven to 375–400°F and line a baking sheet with parchment paper. Mound about 1/4 cup shredded cheese into a 4-inch circle and bake 6–9 minutes until browned at the edges. Cool until firm and crunchy.
Layer and fold: Use one 10-inch tortilla for the outside and a 4.5-inch round for the center seal. Spread 1–2 tablespoons cheese sauce in a 4–5 inch circle, add about 1/2 cup hot taco meat, top with the cooled cheese crisp, a thin smear of sour cream, a sprinkle of shredded cheese, lettuce, tomatoes, and red onion. Cap with the small round and pull outer edges to form a tight triangle.
Sear or air-fry: Heat 1–2 teaspoons avocado oil in a skillet over medium heat and place the wrap seam-side down. Cook 2–3 minutes per side until golden-brown with light char. For a lower-oil option, air fry at 375°F for 3–4 minutes per side, checking at the 3-minute mark.
Rest and serve: Let the wrap rest 3–5 minutes so the cheese sets. Slice in half for a clean cross-section and serve hot.
| Step | Action | Time | Notes |
|---|---|---|---|
| Cook filling | Brown ground beef, add seasoning & water | 2–4 minutes | Use a skillet; finish until glossy |
| Bake crisp | Make cheese circles on parchment paper | 6–9 minutes | Cool until firm for crunch |
| Sear or air-fry | Sear in avocado oil or air fry | 2–3 min per side (skillet) / 3–4 min (air fry) | Seal seam down to avoid leaks |
| Rest & slice | Let set, then halve | 3–5 minutes | Keeps layers intact and cheese melty |
Keto Crunchwraps: My Pro Tips for Maximum Crunch and Melt
With the right tortilla and a tight fold, you get that restaurant-style char and no leaks. I pick large 10-inch keto tortillas for flexibility; La Banderita (5 g net) and Ole Xtreme Wellness (7 g net) are my go-tos. If a wrap feels stiff, a 5–10 second warm-up softens it for folding without tears.
I use a 4.5-inch inner round (Mission Zero Carb) as a center patch. It seals the filling so nothing oozes when I sear over steady medium heat with just a thin film of avocado oil. That avoids a greasy finish and delivers crisp charred spots.
Layer order matters: cheese sauce first, hot meat, cheese crisp, then cool items like sour cream and lettuce. This hot-cold-hot sequence keeps steam away and preserves crunch while letting shredded cheddar melt into the layers.
| Choice | Why it matters | My tip |
|---|---|---|
| 10″ tortillas | Flexibility for folding | Warm briefly if stiff |
| 4.5″ inner round | Prevents leaks | Use Mission Zero Carb for net control |
| Sear method | Crunch without excess fat | Preheat pan; use thin oil film |
| Layering | Melt vs. crisp balance | Cheese sauce → meat → crisp → cool |
Smart Swaps and Flavor Variations
Changing the protein or sauce is an easy way to reinvent the handheld while preserving that crisp center and melty cheese. I like to switch things up depending on the meal or mood, and small swaps keep the base technique intact.
Protein swaps I use
For a lighter profile, I swap ground beef for ground chicken or turkey and season them the same way, adding a splash of water as they simmer to keep moisture. For mornings, seasoned breakfast sausage plus a thin layer of softly scrambled eggs turns this into a great breakfast option.
Cheese and sauce choices
If I’m out of queso or nacho sauce, I double down on shredded cheddar or Monterey Jack so the melt remains excellent. I also vary sauce heat—mild queso for family nights, spicier nacho sauce when I want more kick.
Heat, freshness, and finishing touches
To get a keto taco vibe I add jalapeño coins, a shower of cilantro, and a squeeze of lime. A dollop of sour cream over the cheese crisp cools the spice and helps protect crunch. Avocado slices or quick guacamole add creamy fat that pairs perfectly with the crisp shell.
- I cook 85/15 or 90/10 beef, then drain lightly so layers stay juicy but not soggy.
- Extra red onion or shredded lettuce adds color and texture that shows well when sliced.
- No matter the riff, I keep the structure the same—crisp center, melty cheese around it, and cool toppings near the top.
| Swap | Why | Quick tip |
|---|---|---|
| Ground chicken/turkey | Lighter flavor, lower fat | Add a splash of water while simmering |
| Breakfast sausage | Breakfast-friendly, savory | Add scrambled egg under the cheese crisp |
| Queso / Nacho / Shredded cheese | Controls melt and heat | Double shredded cheese if no sauce |
Make-Ahead, Storage, and Reheating
A little advance work turns a fiddly assembly into a three-minute finish that still crisps right up. I batch components so building and searing takes minimal time and keeps texture consistent.
Meal prep components that save time
I cook the meat and shred cheese ahead, then portion into containers. That saves prep time during the week and keeps net carbs predictable by using the same tortillas and sauces.
Best way to reheat for crispiness
To reheat, air fry at 375°F for 3-4 minutes or bake 5-8 minutes. These minutes restore the exterior without drying the center.
If I must use a skillet, I preheat a dry pan over medium heat and flip once to regain a light char.
What freezes well—and what doesn’t
I never freeze assembled wraps; thawing ruins the cheese crisp. Freeze extra tortillas stacked between parchment paper or loose sheets of paper for 1–2 months.
Cheese tostadas keep at room temp up to three days in an airtight jar. Sauces stay separate until sear time to avoid soggy layers.
- I label containers with dates so rotation is simple.
- Portion meat and fresh toppings separately and finish on the spot for best crunch.
- Keep sauce light when prepping to protect texture during reheating.
| Item | Storage | Best reheat |
|---|---|---|
| Assembled wrap | Refrigerate up to 5 days | Air fryer 3-4 minutes |
| Tortillas | Refrigerate 1 week / freeze 1-2 months | Warm then fold |
| Cheese tostadas | Room temp, airtight, 3 days | Re-crisp in oven or air fryer |
Nutrition at a Glance and What to Serve on the Side
Here’s a simple nutrition snapshot plus side ideas so your dinner stays crunchy, warm, and balanced.
Low-carb macros vs the classic fast-food option
One fast-food crunchwrap from Taco Bell can exceed 71 g carbs. My low-carb version lands around 5–8 g net depending on tortilla choice and sauces.
Protein stays hearty from the seasoned beef, while fat comes from cheese and avocado for lasting satiety. I track net by subtracting fiber and skipping sugary sauces.
Best sides that keep the plate macro-friendly
- Guacamole (a cup with veggie sticks or keto tortilla chips) adds creamy fat and a fresh counterpoint.
- Cheesy cauliflower rice is warm, low in carbs, and echoes the wrap’s spices.
- A simple lettuce and avocado salad with lime keeps things crisp and light.
- For a buffet-style spread, add salsa verde, pickled jalapeños, and a light crema for dipping.
| Item | Fast-food | My low-carb plate |
|---|---|---|
| Carbs | ~71 g | ~5–8 g net |
| Protein | Moderate | High from seasoned beef |
| Fat | Higher and often from frying | Controlled: cheese, avocado, avocado oil |
Ready to Sizzle: Bring Bold, Low-Carb Crunch to Your Table
Finish strong with a handheld that browns fast in a large skillet and makes weeknight meals feel special. Gather the ingredients, warm a 10-inch tortilla, and place the 4.5-inch round over the center to seal the layers.
Sear seam-side down in a skillet with a slick of avocado oil for 2–3 minutes per side, then let the wrap rest 3–5 minutes before you slice it in half. Re-crisp in the air fryer at 375°F for a few minutes if needed.
This recipe yields a triangular, golden-brown crunchwrap with melty cheese sauce, seasoned ground beef, sour cream, and fresh toppings. Try it for quick lunches, dinners, or meal-prep lunches—and then make it again.