This post contains affiliate links. I may earn a commission if you purchase through them at no extra cost to you.
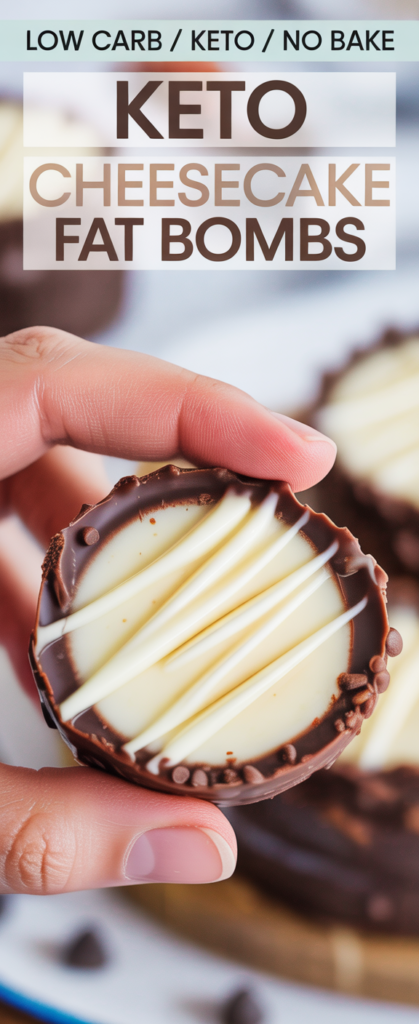
I’m sharing a simple, no-bake recipe for keto cheesecake fat bombs that gives you a real cheesecake-like center and a crisp sugar-free chocolate shell.
This low carb dessert bite is a 3 ingredient keto dessert you can make in minutes and stash in the freezer. It tastes creamy and balanced—not overly coconut or greasy—and it delivers a satisfying chocolate crunch.
Quick highlights: three ingredients, no oven, freezer-friendly, and make-ahead. I designed this as an easy keto snack for anyone who keeps fat bombs on hand to curb sweet cravings.
I’ll give exact measurements, tools, step-by-step directions, troubleshooting tips, and storage guidance next. Expect straightforward steps and minimal prep time so you can get to the best low carb keto treat fast.
Why I Make These Low Carb No Bake Dessert Bites When Sweet Cravings Hit
These freezer-ready bites are my go-to when I want a quick dessert without the oven. I can mix, form, and freeze a batch in minutes and know a satisfying snack is within reach.

A beginner-friendly easy keto snack you can keep in the freezer
I recommend these to anyone new to higher keto fat intake because they’re portioned and portable. Keeping a tray in the freezer helps me resist late-night sweets or a mid-afternoon craving between meetings.
What makes these taste like real cheesecake (not just coconut or butter)
Many recipes lean too hard on coconut or heavy butter notes and lose that familiar cream cheese tang. I use a cream cheese-based center for a softer, sweeter mouthfeel and a true cheesecake flavor.
- Creamy center + firm chocolate shell = a satisfying texture contrast.
- Fast prep, reliable portion control, and simple ingredients.
- They solve the “too coconut” problem while staying low carb and dessert-like.
| Problem | Typical Result | How I Fix It |
|---|---|---|
| Coconut-forward taste | Too sweet or oily | Cream cheese base for balance |
| Long bake times | Discourages making snacks | No-bake, fridge or freezer set in minutes |
| Portion confusion | Overeating | Bite-size pieces for easy control |
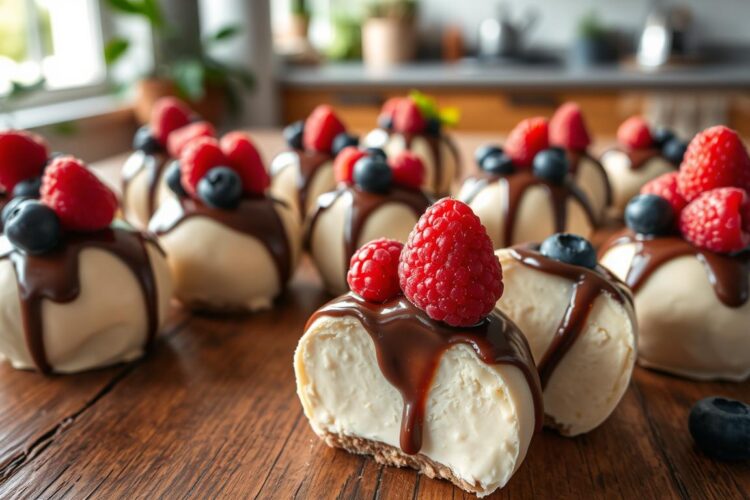
Keto Cheesecake Fat Bombs
These little no-bake bites pair a smooth cheesecake-style center with a thin, crackling sugar-free chocolate shell.

Creamy cheesecake center with a rich sugar-free chocolate shell
I keep the interior a true cheesecake texture: soft, tangy, and smooth rather than oily or waxy. The cream cheese base gives a balanced, dessert-like mouthfeel that melts gently on the tongue.
The exterior is a thin, dark-chocolate coating that firms up when chilled. It snaps cleanly on each bite, so you get contrast—silky center, crisp shell—every time.
Sweetness that tastes balanced (not bitter or overpowering)
I aim for a gentle sweetness that supports the cream and chocolate without masking them. Using powdered erythritol or powdered monk fruit cuts bitterness and avoids a gritty texture.
Though the formula is simple, the result feels like a real dessert, not a compromise. Eat these cold so the shell stays crisp and the center stays firm—ideal for sugar free chocolate fat bombs and a classic keto cheesecake treat.
| Feature | What I Want | How I Achieve It |
|---|---|---|
| Center texture | Silky, not greasy | Cream cheese base, whip smooth |
| Shell | Thin, snappy | Melt sugar-free chocolate, chill briefly |
| Sweetness | Balanced, no bitter aftertaste | Use powdered sweetener, taste as you go |
3 Ingredient Keto Dessert Ingredients List With Exact Measurements
Below I list the exact three ingredients and measurements you need to make these no-bake dessert bites reliably every time.
Cream cheese
8 oz (226 g) full‑fat cream cheese, softened to room temperature. I use full‑fat for the best texture and flavor. Softening prevents lumps and makes the mix silky.
Powdered erythritol or powdered monk fruit sweetener
3 Tbsp powdered erythritol (confectioners-style like Swerve) or 3 Tbsp powdered monk fruit, adjusted slightly to taste. Powdered sweetener dissolves into the cream cheese and avoids a gritty bite.
Sugar-free dark chocolate chips or melted sugar-free chocolate for coating
1 cup (about 170 g) sugar-free dark chocolate chips OR one 6 oz (170 g) sugar-free dark chocolate bar, melted for coating. I look for “sugar-free” labels and dark chocolate for balanced sweetness.
- Short list with exact measurements for consistent results.
- Powdered sweetener matters—no crunchy texture and no bitter aftertaste.
- Choose sugar-free chocolate chips (or a bar) designed for low carb desserts.
| Ingredient | Amount | Why it matters |
|---|---|---|
| Cream cheese | 8 oz (226 g) | Gives creamy body and true cream cheese keto flavor |
| Powdered erythritol/monk fruit | 3 Tbsp | Dissolves smoothly for even sweetness |
| Sugar-free dark chocolate | 1 cup chips or 6 oz bar (170 g) | Forms the snappy, low carb coating |
Kitchen Tools I Use for the Easiest Cheesecake Fat Bombs
A few basic tools are all I need to turn three ingredients into neat, freezer-ready snacks. I focus on items that speed up mixing and keep shaping simple so I can make fat bombs in minutes.
Mixing bowl and spatula (or hand mixer)
I start with a sturdy mixing bowl and a silicone spatula. For extra smoothness I use a handheld mixer to whip the mixture until it is silky.
Parchment-lined sheet pan vs silicone mini cupcake pan
A parchment-lined sheet pan is great if I want loose balls or squares that I can roll or cut after freezing. A silicone mini cupcake pan makes uniform, neat mini portions that pop out cleanly once frozen.
- Small cookie scoop: optional for even sizing and faster coating.
- Heatproof bowl for melting chocolate and a fork or dipping tool for coating.
- I set an assembly line: tray ready, chocolate melting, and a chilled tray to speed the workflow.
| Tool | Best for | Why I use it |
|---|---|---|
| Mixing bowl | Blending ingredients | Room to mix without spills |
| Hand mixer | Smoothing mixture | Fewer lumps, faster results |
| Mini cupcake pan | Uniform mini portions | Easy release and tidy edges |
| Parchment sheet | Balls or squares | Simple, flexible shaping before freezing |
How I Make This Sugar Free Chocolate Fat Bomb Recipe Step by Step
I keep the hands-on prep short so chilling does the heavy lifting. Below are clear steps I use to get a smooth cream cheese center and a snappy chocolate shell every time.
Soften and blend
Leave the cream cheese at room temperature for about 30 minutes so it becomes easy to stir. Softening prevents lumps and gives a silky mixture.
Whip the base
- Beat the room-temperature cream cheese with powdered sweetener until completely smooth. Scrape the bowl so sweetness distributes evenly.
- Check the texture; it should hold shape but still be soft enough to scoop.
Shape and chill
Scoop or press the mixture into small balls or mini squares for consistent portions. Place them on parchment or in a silicone mold and freeze briefly—10–15 minutes—so centers firm up for easier dipping.
Melt and coat
Melt sugar-free chocolate gently in short bursts or over low heat until silky. Dip each piece, let excess drip off, then return to the tray.
Set and store
Chill until the shell is fully set and crisp. Once firm, keep the bites cold in the freezer or fridge in an airtight container so they hold shape and texture.
Troubleshooting: If chocolate thickens, warm it a few seconds and stir. If centers soften while coating, refreeze for 5–10 minutes and try again.
| Step | Key timing | Tip |
|---|---|---|
| Soften cream cheese | ~30 minutes room | Room-temp gives lump-free mix |
| Freeze before coating | 10–15 minutes | Firmer center = cleaner dip |
| Melt chocolate | Short bursts, low heat | Be patient to avoid scorching |
Key Tips for Smooth Texture and a Snappy Chocolate Coating
I focus on a few simple steps that improve the center and the shell without adding fuss. These tricks keep the mixture silky and the coating clean and snap-worthy.
Why powdered sweetener matters
Powdered sweetener dissolves into cream for a smooth mouthfeel. Granulated sugar substitutes can stay slightly gritty, especially when chilled.
How I get a silky center
Mix longer than you think and scrape the bowl often. A hand mixer helps, but steady stirring and checking texture works too.
Preventing soft centers and messy dipping
I freeze the pieces briefly—10 to 15 minutes—so they firm up before coating. I work in small batches and return pieces to the freezer if the room feels warm.
Melting chocolate without scorching
Melt chocolate gently in short bursts or over a double boiler. Stir every 20–30 seconds and stop when most bits are melted; residual heat finishes the job.
- Visual cues: chocolate should look glossy; centers should be firm to the touch before dipping.
- If the coating is too thick, an optional teaspoon of coconut oil or butter thinned into the chocolate will help—this is optional and keeps the base recipe intact.
- Chill dipped pieces so the shell sets quickly and stays crisp.
| Issue | Quick Fix | Why it works |
|---|---|---|
| Gritty sweetener | Use powdered sweetener | Dissolves into the mixture for no grit |
| Soft center, messy dip | Freeze 10–15 minutes | Firmer center = cleaner coating |
| Scorched chocolate | Melt low, stir often | Prevents burning and keeps gloss |
Flavor Notes and Texture: What These Fat Bombs Taste Like
The first mouthful tells you everything—crisp shell, then a soft, tangy center that melts like a tiny slice of cheesecake.
Cheesecake-like creaminess on the inside
I built the center to taste of true cream and cheese, not just straight fat or coconut. It has a mild tang and a smooth, spreadable texture that feels like a dessert spooned into a bite-sized piece.
Dark chocolate “crunch” on the outside
The outer layer snaps cleanly, giving a satisfying contrast to the soft interior. Sweetness is balanced so the treat tastes indulgent, not artificial.
- First bite: shell cracks, then the inside melts into a cheesecake-like cream.
- Center = tangy-sweet dairy; not oily or coconut-forward.
- Serve fridge-cold for a softer bite, freezer-cold for a firmer, candy-like snap.
- It’s a keto fat-forward snack that still feels like a true dessert and is smoother than many typical fat bombs.
| Aspect | Result | Tip |
|---|---|---|
| Texture | Snap + silky center | Freeze briefly before dipping |
| Flavor | Tangy dairy, balanced sweet | Adjust powdered sweetener to taste |
| Serving temp | Fridge = soft, Freezer = firm | Pick based on desired snap |
Easy Variations That Still Keep It a Low Carb Keto Treat
If you want easy tweaks that keep this low carb treat intact, I have a few simple swaps and coating ideas you can try.
Chocolate-lovers’ option (optional): Double-dip for a thicker shell. Let the first coat firm, then quickly dip again so the outer layer is richer and more candy-like. This keeps the center scoopable while raising the snap level.
More crunch (optional): Sprinkle a pinch of chopped sugar-free chocolate chips on each piece right after the final dip. It adds texture without changing the base method.
Sweetener swaps and what changes
Use powdered erythritol for a clean taste; it dissolves and avoids grit. Powdered monk fruit blends can be sweeter and sometimes leave a different aftertaste. Either works as long as the sweetener is powdered—no change to the steps.
Keep changes small so the cheesecake center stays front and center. These variations are optional and meant to enhance, not replace, the basic three-ingredient recipe.
| Variation | What it does | How to apply |
|---|---|---|
| Double-dip shell | Thicker, firmer coating | Let first coat set, then dip again |
| Chopped chocolate chips | Extra crunch and texture | Sprinkle on wet coating, press lightly |
| Powdered erythritol | Clean sweetness, no grit | Use as listed in original recipes |
| Powdered monk fruit | Sweeter, slightly different aftertaste | Adjust amount to taste, keep powdered form |
How I Store Fat Bombs So They Stay Firm and Fresh
Proper storage is the secret to preserving a firm center and that satisfying chocolate snap. I store my treats cold so the center stays set and the shell keeps its bite.
Refrigerator vs freezer storage times
For quick grab-and-go, I keep a small batch in the refrigerator. They chill until set—typically 1–2 hours—and stay good for about one week in the fridge.
For longer keeping and a firmer snap, I move pieces to the freezer. Freeze until fully solid, then transfer to a container for storage.
Best containers and how to prevent sticking
I use airtight containers to block fridge smells and avoid freezer burn. Layer pieces with parchment between rows so nothing glues together.
My workflow: freeze pieces spread out on a tray until solid, then pack them tightly but with parchment layers into the container.
| Storage | Texture | Tip |
|---|---|---|
| Refrigerator | Soft, ready in 1–2 hours | Eat within ~1 week |
| Freezer | Very firm, candy-like snap | Tray-first freeze, then pack |
| Portioning | Smaller pieces set faster | Plan servings to control carbs |
One last note: treat them as chilled snacks. I find they taste best straight from cold storage and make a reliable low‑carb keto post-snack when cravings hit.
How I Serve These Keto Snacks (Dessert, Quick Bite, or Post-Dinner Treat)
I find these little chilled treats perfect for finishing a meal or for a quick pick-me-up between tasks. They work as a tiny dessert, a movie-night nibble, or a post-dinner treat when I don’t want to bake a whole pie.
Portion ideas for a quick sweet fix
I usually eat one piece for a small sweet hit. Two pieces feel more like a dessert portion if I want something more indulgent.
Because these are fat-forward with modest protein, I treat them as an add-on, not a full meal. Adjust portions to fit your macros and appetite.
When to eat them straight from the fridge vs the freezer
From the fridge they give a softer, creamier chew that resembles a tiny cheesecake bite. From the freezer they’re firmer and have a candy-like snap that’s clean to handle.
If a frozen piece feels too hard, I let it sit 2–3 minutes at room temperature for the best creamy texture before biting in.
- Quick bite: 1 piece for an afternoon slump or movie snack.
- Post-dinner treat: 2 pieces to replace baking an entire dessert.
- On-the-go: keep in a small cooler or insulated bag so they don’t soften.
| Storage state | Texture | Best use |
|---|---|---|
| Refrigerator | Softer, creamy | Immediate dessert or gentle chew |
| Freezer | Firm, snappy | Clean handling, candy-like bite |
| Slight thaw (2–3 min) | Perfect cheesecake feel | Ideal balance of snap and cream |
Make a Batch Today and Keep These No-Bake Keto Treats on Hand All Week
Whip up this three-ingredient recipe now and stash chilled bites for instant sweet satisfaction. I make a full batch, freeze most, and keep a few in the fridge so I always have low-carb fat bombs ready.
Optional add-ins like vanilla, peanut butter, a dab of butter, or a spoon of coconut oil are easy to try. Be aware coconut-based swaps can add a noticeable coconut flavor that some people love and others avoid.
Adjust sweetness and coating thickness to taste—the method stays the same. The result is a creamy cheesecake-style center with a rich, snappy sugar-free chocolate shell.
Next step: mix, shape, chill until set, and store properly. Make a batch today and enjoy one straight from the fridge or freezer whenever cravings hit.