This post contains affiliate links. I may earn a commission if you purchase through them at no extra cost to you.
I keep this garlic chicken wrap recipe in steady rotation because it checks every box: high protein, simple ingredients, and comfort-food taste without the carb crash.
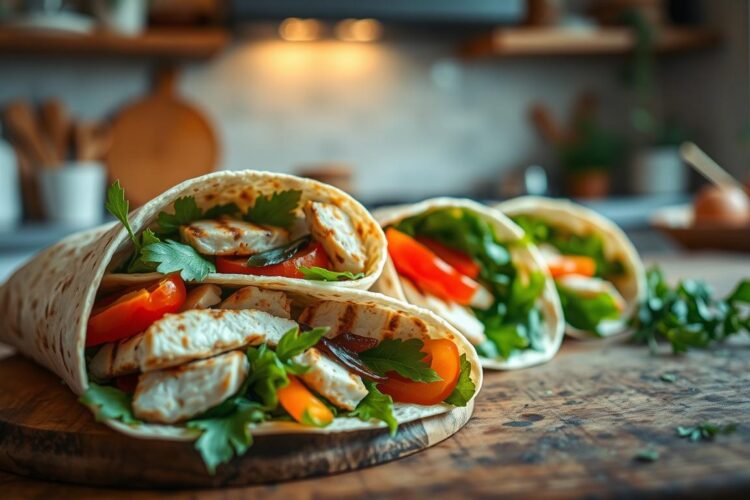
One bite is a contrast of textures — a crisp, golden outside and a gooey, cheesy garlic center with tender chicken inside. Pan-frying gives a light char and covering the pan speeds melting so the cheese gets perfectly sticky.
This is my go-to easy low carb lunch or quick dinner. Active time is short; most of the time is hands-off while the pan works. In under 20 minutes you have a satisfying meal that travels well for meal prep.
Below I lay out exact ingredients, step-by-step directions, tips for a cheesy garlic finish, smart variations, and common mistakes to avoid. I write this from my kitchen using grocery-store staples so you can repeat it with confidence.
Why I Make These Low Carb Chicken Wraps on Repeat
What keeps me making these again and again is the crunch-to-cheese ratio in every bite. I want a fast meal that still feels rich and family-friendly. These hits are what matter to me: texture, protein, and easy prep without tasting like diet food.
Crispy outside, cheesy and savory inside
I aim for a golden, crisp shell while the inside stays gooey and savory. Each bite gives a satisfying crunch and a stretchy, melty center.
The filling is garlic-forward and comforting, layered with Italian seasoning and melty mozzarella or Monterey Jack for real cheesy garlic appeal.
A high-protein option that works for lunch or dinner
I use chicken breast plus a measured amount of cheese so the wrap fills me up for hours. I pack these for work lunches or plate them with a salad for dinner.
Meal prep friendly without tasting “meal prep”
I prep the sliced chicken ahead, then assemble and crisp the wraps right before eating. Rolling them tight keeps them portable and neat for on-the-go lunches.

| Feature | Why it matters | How I use it |
|---|---|---|
| Texture | Crunch plus stretch makes each bite exciting | Pan-sear until golden, then cover to melt the cheese |
| Protein | Keeps you full and satisfied | Use grilled breast or rotisserie for speed |
| Prep & portability | Tastes fresh even when prepped | Store sliced chicken, assemble and crisp before eating |
What to Expect: Flavor, Texture, and Prep Time
Expect bold, savory bites with a crisp shell that holds a melty, cheesy center. I season the meat so the garlic notes come forward but stay balanced by Italian seasoning and a sprinkle of parsley.

Garlic-forward chicken with melty mozzarella vibes
The filling is garlic-forward and hearty. Two minced cloves mingle with seasoning so each bite tastes savory, not sharp.
“Melty mozzarella vibes” means gooey, stretchy cheese that binds the filling and keeps the bite tidy. Use enough cheese to glue the slices without soggy excess.
Golden tortillas with light char marks
I warm tortillas briefly to prevent cracking and to make rolling easier. Pan-frying yields a golden and crispy shell with light char, not burn.
Control is simple: medium heat and the right pan. Cook minutes per side usually fall in the 2–4 range depending on your heat so browning happens before drying.
- Flavor goal: bold garlic chicken balanced by herbs and fresh parsley.
- Texture goal: crisp outside, gooey inside, tender chicken when you bite.
- Time estimate: about 10–15 minutes active prep and 6–8 minutes cook time for grilling and crisping.
| Goal | Key Cue | Timing |
|---|---|---|
| Cheesy melt | Stretchy, cohesive filling | Cover pan briefly while cheese melts (30–60 seconds) |
| Golden exterior | Even char marks, no black spots | 2–4 minutes per side on medium heat |
| Tender chicken | Juicy interior, no dryness | Grill until cooked through, then rest 3 minutes |
Ingredients for Low Carb Garlic Chicken Wraps
I focus on three clear groups so assembly and shopping stay simple. Below I preview the ingredients I use and why each choice matters for texture and flavor.
What I look for in tortillas
I choose tortillas that are flexible, sturdy, and large enough to roll without tearing. Mission Carb Balance is a common US option I buy when I want ease and hold.
- Thickness matters: thin ones crack, very thick ones take longer to brown.
- Pick wraps that crisp evenly for a golden exterior.
Chicken and seasonings I use
My core is chicken breast seasoned with minced garlic and Italian seasoning. I add a splash of olive oil to help browning and to seal flavor.
I finish the seasoning with a pinch of salt so the filling stays punchy and clean.
Cheese and the fresh finish
I prefer freshly shredded mozzarella or Monterey Jack because they melt smoothly. A little cheddar adds sharpness if I want it.
I sprinkle chopped parsley for brightness and sometimes toss in sliced onion or a handful of spinach for texture and greens.
| Feature | Effect | Notes |
|---|---|---|
| Tortilla thickness | Browning | Medium is best for crisp and roll |
| Cheese type | Melting | Mozzarella/Monterey Jack shred fresh |
| Oil choice | Flavor & sear | Use olive oil for grilling and crisping |
Exact Ingredient Measurements (What I Use)
Below I list the exact ingredients I use for four servings so you can shop and cook without guessing. Keep each item handy during assembly.
4 large low-carb tortillas
2 medium boneless, skinless chicken breasts
1 tablespoon olive oil
2 cloves garlic, minced or grated
1 teaspoon Italian seasoning
1 cup shredded mozzarella or Monterey Jack cheese
1 tablespoon fresh parsley, chopped
Salt and black pepper, to taste
Fresh grated garlic gives a bolder hit with fewer cloves. Shredding cheese from a block improves melt because it lacks anti-caking starch.
I often set up a simple bowl or plate station: one for sliced chicken, one for cheese, and one for herbs. This keeps assembly quick and tidy when I crisp the tortillas.
| Item | Measure | Why it matters |
|---|---|---|
| Low-carb tortillas | 4 large | Flexible and sturdy for rolling and crisping |
| Chicken breasts | 2 medium | Lean protein; slice after resting for tender bites |
| Olive oil | 1 tablespoon | Helps sear the meat and crisp the outside |
| Mozzarella or Monterey Jack | 1 cup shredded | Enough cheese for a gooey interior without sogginess |
How I Make This Garlic Chicken Wrap Recipe
Follow my order of steps to get a juicy interior and a golden, charred exterior every time. I keep the method simple so a first-timer can finish in under 30 minutes.
Season the chicken for bold garlic flavor
I coat the breasts with olive oil, grated garlic, Italian seasoning, salt, and pepper. That builds a strong savory base that stands up to melted cheese.
Grill the chicken until juicy and cooked through
I preheat a skillet or grill pan over medium heat. Cook about 3–4 minutes per side, adjusting for thickness until the meat reaches doneness.
Rest and slice the chicken the right way
Rest 3 minutes, then slice against the grain. Thin slices keep the filling tidy and prevent long shreds when you bite.
Assemble and grill for the best cheese melt
Layer a little cheese, then chicken, then more cheese so the filling melts into a glue. Roll tight and place seam-side down in the hot pan.
Grill the tortillas until golden with char marks
Use a touch of oil and cook 2–3 minutes per side on medium heat. Don’t move the wrap too soon; let browning form before flipping. Cover briefly to finish melting the cheese.
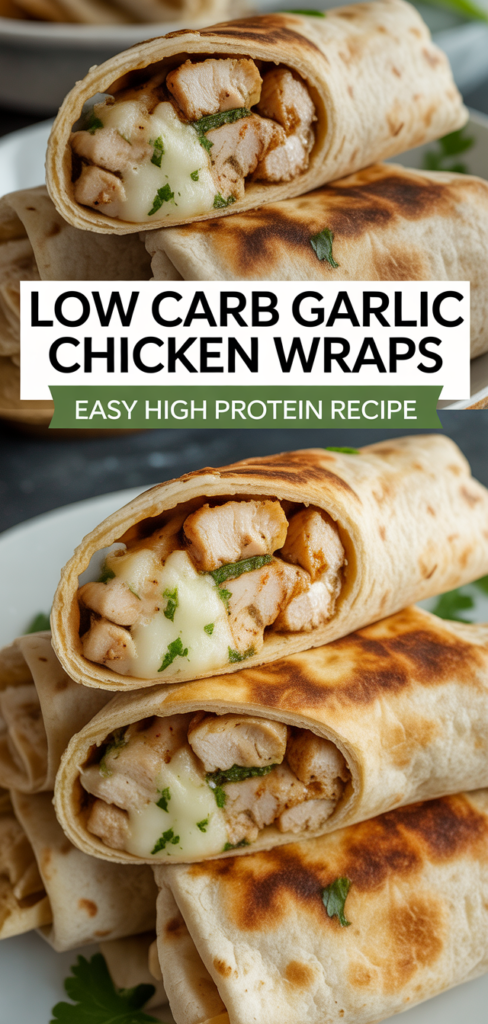
Slice to show the cheesy cross-section
Slice on a diagonal to reveal the gooey center and crispy outside. Serve hot so the cheese stays stretchy.
| Step | Action | Timing |
|---|---|---|
| Season | Oil, garlic, Italian seasoning, salt | 2 minutes prep |
| Grill | Skillet or grill pan, steady medium heat | 3–4 minutes per side |
| Finish | Seam-side down, cover briefly to melt cheese | 2–3 minutes per side |
My Best Tips for an Easy Low Carb Lunch That Doesn’t Fall Apart
A few small technique tweaks make these wraps sturdy, melty, and stress-free for lunch.
How I keep tortillas from cracking or tearing
I warm tortillas 10–15 seconds under a damp paper towel in the microwave. That softens edges so they roll without splitting.
I also avoid overfilling. Too much filling pops seams and stops the outside from getting that golden crunch.
Cheese placement for maximum melt and “glue”
I add a thin layer of cheese under the chicken and another on top. The cheese melts into the tortilla and locks the mixture in place.
Don’t use cold shredded cheese straight from the fridge. Let it sit a few minutes so it melts evenly.
Heat control so the wrap crisps before the chicken dries out
I cook on medium in a skillet. If the exterior browns too fast, I lower the heat so melting finishes before the meat dries.
Watch minutes per side rather than cranking the heat. After cooking, I let the wrap rest for one minute so the cheese sets and the first bite stays tidy.
- Tuck sides, roll tight, place seam-side down for flipping.
- Use a small brush of oil on the pan edge for even browning.
| Tip | Why it matters | Action & Timing |
|---|---|---|
| Warm tortillas | Prevents cracking | Microwave 10–15 seconds with damp towel |
| Cheese above & below | Locks filling and aids melt | Layer thinly; cover skillet briefly to finish |
| Medium heat in skillet | Crisp outside without drying meat | Cook 2–4 minutes per side; lower heat if browning too fast |
High Protein Wrap Nutrition Notes (Without the Guesswork)
I want the nutrition to match the flavor, so I plan these wraps around protein first. That keeps the meal filling and simple to tweak.
Protein-first swaps that keep carbs in check
I treat chicken as the anchor and use cheese sparingly to add protein and satiety. If I want fewer calories, I add extra sliced chicken and reduce cheese slightly.
I also choose higher-protein, lower-carb tortillas and check net carbs and fiber on the label before buying.
How I keep the wrap filling while staying macro-friendly
- I add a handful of spinach or a few thin onion slices for volume without much carb impact.
- A teaspoon of olive oil in the pan boosts flavor and mouthfeel without excess calories.
- I taste and adjust salt last, since cheeses and tortillas can already be salty.
| Goal | What I use | Why it works |
|---|---|---|
| Protein | Sliced chicken | Keeps you full longer |
| Satisfaction | Mozzarella or similar cheese | Melt and texture add satiety |
| Volume | Spinach or onion | More bulk, low carbs |
Meal Prep and Make-Ahead Strategy for Low Carb Chicken Wraps
With one batch of cooked filling, I can pull together hot, crisp meals in minutes during a busy week.
What I prep ahead and what I finish fresh
I usually make chicken filling on Sunday so assembly takes minutes on weekdays. I save the final toasting for just before I eat so the exterior stays crisp.
How long I keep things in the fridge
Cooked filling stores well in an airtight container in the fridge for up to 3 days. Cooked wraps keep up to 2 days in the fridge before they lose their best texture.
Best ways I re-crisp for that just-grilled bite
I reheat in a skillet or pan over medium heat until the outside is crisp again. An air fryer works great for a single portion, and the oven at 350°F for 8–10 minutes is ideal for batches.
- I often use rotisserie or shredded chicken as a shortcut to make chicken filling with almost no cook time.
- Assemble ahead but toast fresh when possible; if storing assembled, place parchment between wraps to prevent sticking.
- Keep seam side down while reheating to help reseal the wrap and keep filling inside.
| Item | Storage | Best reheat |
|---|---|---|
| Cooked filling | Fridge, up to 3 days | Warm in skillet 2–3 minutes per side |
| Assembled cooked wraps | Fridge, best within 2 days | Air fryer or oven 350°F, 8–10 minutes |
| Shredded / rotisserie chicken | Fridge, up to 3 days | Use cold in assembly or warm quick in pan |
Easy Variations I Use for Cheesy Garlic Chicken Wraps
For busy nights I rely on a few fast swaps that keep the melty, savory core intact. These small changes save time and add fresh flavor without turning the recipe into something unrecognizable.
Rotisserie shortcut for busy nights
I shred rotisserie chicken and toss it with a little minced garlic, Italian seasoning, salt, and pepper. This cuts total minutes and still delivers the savory base I want.
I use a light brush of oil in the pan so the shredded meat browns slightly without getting greasy.
Extra flavor add-ins that stay low carb
I fold in spinach, thin-sliced onion, chopped olives, sun-dried tomatoes, or diced gherkins for variety. Pat wet add-ins dry first so the exterior crisps instead of steaming.
For cheese, mozzarella or Monterey Jack is my base. Occasionally I add a cup shredded cheddar for bite; a little goes a long way in the mixture.
Spice options if you want more heat
To boost heat, I mix hot sauce, red pepper flakes, or a pinch of cayenne into the filling so the spice spreads evenly. Start small and taste; a little heat enhances the cheesy garlic flavor.
- Prep tip: use rotisserie to save prep time.
- Keep oil light—just enough for browning.
- Pat add-ins dry to protect crisping.
| Variation | Why I use it | Quick note |
|---|---|---|
| Rotisserie | Saves time | Season shredded chicken and warm 1–2 minutes |
| Spinach & onion | More volume, texture | Dry before adding |
| Cheddar mix | Sharper flavor | Use about 1/4 cup to 1 cup shredded cheddar |
What I Serve with These Wraps for a Full Low-Carb Dinner
To make this an easy weeknight dinner, I pair the wraps with fresh, low-effort sides that balance the rich, cheesy filling. I want something crisp or bright to cut through the melt and keep the plate lively.
Crunchy salad pairings that balance the richness
I often make a simple arugula salad dressed with lemon and olive oil. A quick squeeze of lemon, a drizzle of olive oil, and a pinch of salt and pepper wakes up the greens.
The peppery bite gives a nice contrast to the savory flavor of the wraps and adds light crunch without extra carbs.
Simple roasted veggie sides
Roast zucchini, bell peppers, or asparagus on a sheet pan while you cook. Toss with a little oil, salt, and pepper and roast 12–15 minutes at 400°F so they finish in the same minutes you need to crisp the wraps.
Cauliflower rice is another easy option if you want a warm, low-carb base that soaks up flavor.
- Arugula salad: lemon, olive oil, salt — ready in 3 minutes.
- Sheet-pan veggies: zucchini, peppers, asparagus — roast 12–15 minutes.
- Cucumber–tomato salad: cool contrast; dice, toss with olive oil and salt.
| Side | Why I use it | Timing |
|---|---|---|
| Arugula salad | Peppery crunch that balances cheese | 3 minutes |
| Roasted veggies | Warm, caramelized texture with little fuss | 12–15 minutes |
| Cauliflower rice | Neutral, low-carb base to stretch the meal | 5–7 minutes to sauté |
Common Mistakes That Make Garlic Chicken Wraps Less Crispy
I see the same problems when readers say their roll turns soggy or never browns. Most issues come down to filling size and pan control. Fix those and you get a golden shell with melty cheese every time.
Overfilling and why it prevents browning
The number-one crispness killer is overfilling. Too much filling makes the tortilla bulky so steam forms and the seam can split.
Right amount of filling means the cheese and chicken sit flat enough for full contact with the skillet. The tortilla should press lightly against the mixture so it browns evenly.
Pan temperature problems (too hot vs. too low)
Too hot and the outside burns before the cheese melts. Too low and the chicken dries without crisping. I cook on medium, aiming for 2–4 minutes per side as a baseline.
If the exterior browns fast but the cheese lags, lower the heat and cover the pan briefly to finish melting. A non-stick skillet or well-seasoned pan helps the wrap sit undisturbed and form a crust.
| Problem | Why it happens | Quick fix |
|---|---|---|
| Overfilling | Steam prevents browning | Use less filling; layer cheese thinly |
| Pan too hot | Tortilla burns, cheese unmelted | Reduce heat; watch minutes per side |
| Pan too cool | Chicken dries, no char | Use medium heat; preheat skillet 1–2 minutes |
Make These Low Carb Garlic Chicken Wraps Tonight and Thank Yourself Later
Turn pantry staples into a crisp, melty chicken meal in under 30 minutes and enjoy leftovers all week. This cheesy garlic chicken delivers a crunchy exterior and a gooey, cheesy center that feels indulgent for dinner or lunch.
Follow my simple step order—season, grill, rest, slice, assemble, crisp in a skillet—and you’ll hit the texture and flavor every time. A quick brush of olive oil and the right pinch of salt finishes the outside.
Make extra filling, store it in the fridge for up to 3 days, and reheat in a skillet or air fryer to restore crisp. Use rotisserie as a shortcut or swap cheeses to suit your taste.
Cook it tonight, slice it open, and enjoy a recipe that’s fast, protein-forward, and reliably satisfying.